Table
of contents:
Section 1. Product
Overview
Section 2. Hardware Setup
Section 3.
Wiring
Section 4. Software
Setup
Part 2. Installing the
RealPort Virtual Com Port for
a. Windows 2000
b. Windows XP
c. Windows NT
Section 5. Tested
Omron Products
Section 6.
Performing a firmware upgrade
Section
1. Product Overview
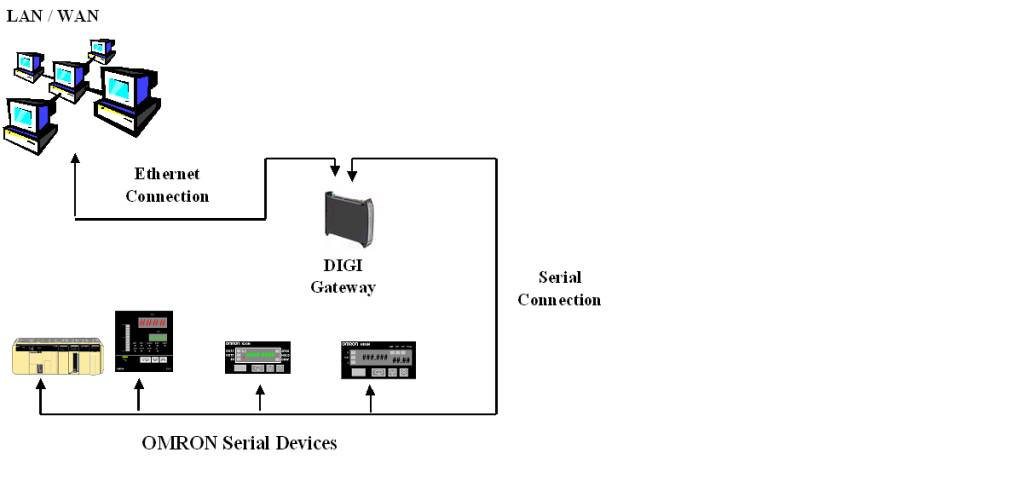
The Ethernet to Serial Gateway is a
product that is a combination of hardware and software that enables Omron PLCs,
temperature controllers, panel meters and other serial devices that do not have
built in Ethernet capabilities to communicate on Ethernet Network. The protocols that can be used with this converter are
HostLink (both C and CV mode) and CompoWay F.
The Digi One IA RealPort gateway can be used for programming, monitoring,
data acquisition, etc.
The hardware component of the Gateway is a DIN Rail
mountable DC Powered Ethernet to Serial Converter.
This converter plugs into a plant Ethernet Network with a user defined IP
address. It also plugs into an
Omron PLC through an RS232, RS422, or RS485 serial port.
The software component of the Gateway is a Virtual COM Port that runs on
the computer that wishes to talk to the PLC, temperature controller, or other
serial device. This Virtual Com
Port allows the hardware Ethernet to Serial converter attached to the serial
device to appear as a standard Windows Com port to an application such as CX
Programmer, FINSGateway, SysConfig, Syswin, or other windows application.
Section
2. Hardware Setup
1.
Connect 12 or 24 VDC power to the Power connector on the Digi One IA
RealPort. The polarity is marked on
the device.
2.
Set the DIP Switches as shown for RS232, RS422, or RS485 connections to
the Omron device.
For RS232
|
Position |
1 |
2 |
3 |
4 |
|
Setting |
On |
Off |
Off |
Off |
For RS422
|
Position |
1 |
2 |
3 |
4 |
|
Setting |
Off |
On |
Off |
On |
For RS485
|
Position |
1 |
2 |
3 |
4 |
|
Setting |
Off |
Off |
On |
On |
3.
Connect the Digi One IA RealPort to the Ethernet network.
4.
Connect the Digi One IA RealPort to the Omron Device(s) using the cabling
diagrams in Section 3: Wiring.
5. Once the cables are connected, proceed to Section 4: Software Setup.
Section
3. Wiring
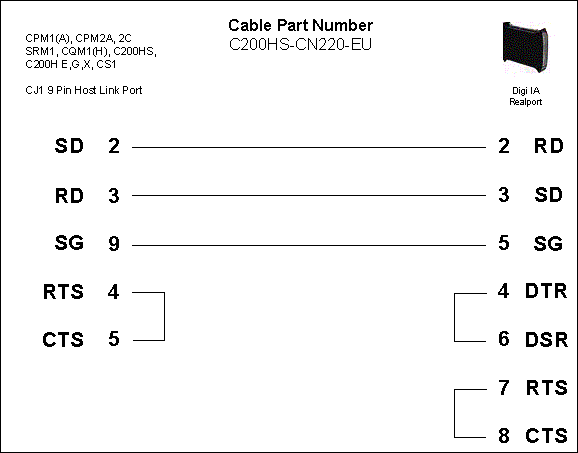
a. For RS232 Connection to Omron PLCs with 9 Pin Serial Port
b.
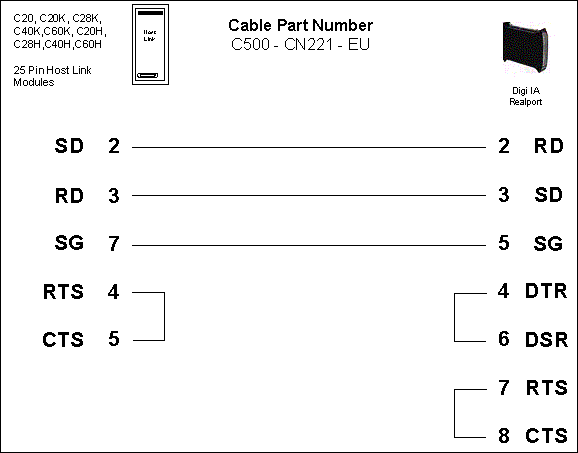
For RS232 connection to Omron PLCs with 25 Pin Serial Ports
c.
For RS422 connection of Omron PLCs using the CPM1-CIF11 RS422 to
Peripheral Port converter. The
CPM2C-CIF11 converter is wired identically.
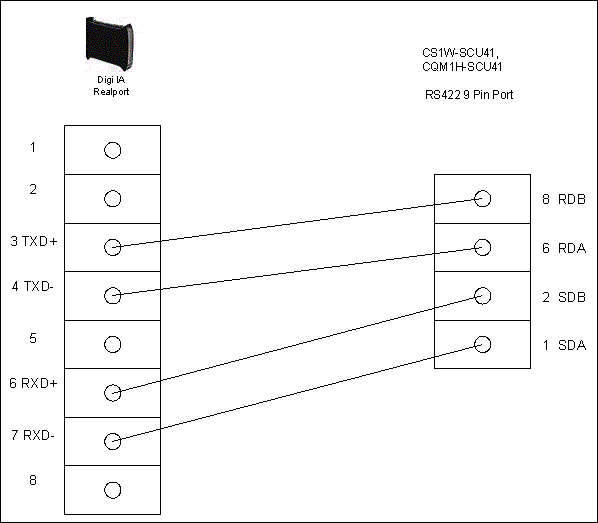
d. For RS422 Connection to Omron
PLCs using CS1W-SCU or CQM1H-SCU41
e.
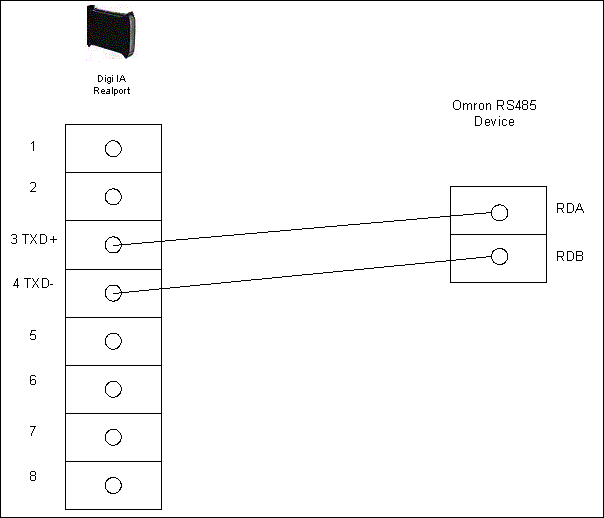
For RS485 Connection to Omron Temperature controllers and other RS485
devices
Section
4. Software Setup
The software setup is divided into 2 parts, configuring the Digi One IA
RealPort hardware using Digi RealPort Remote tool, and installing the virtual
COM port on the computer(s) that will communicate with the Omron devices using
the Ethernet to Serial gateway.
Part 1. Configuring
the Digi One IA RealPort Device
1.
Install the Digi RealPort Remote software by running Setup.exe on the
supplied CD.
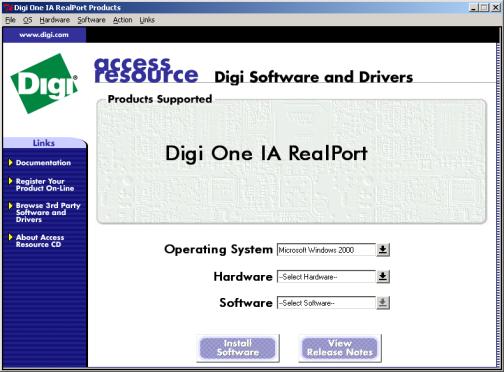
2.
From the above screen, select your computer Operating System
(Currently only Windows NT, 2000, and XP are supported), Hardware (Digi
One), and Software (Digi Port Authority – Remote).
Then click Install Software.
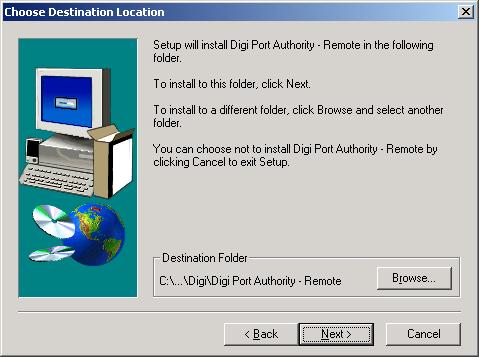
3.
Select the installation location, and click Next.

4.
Select the program folder and click Next.
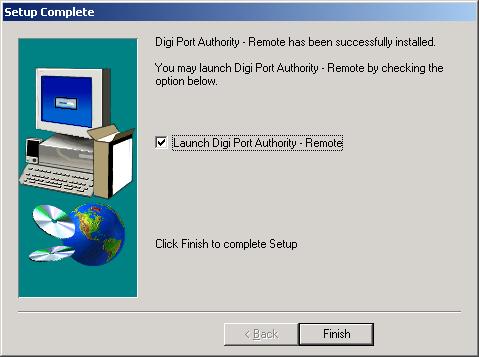
5.
When the installation is complete, click Finish (leave Launch Digi
Port Authority – Remote checked)
6.
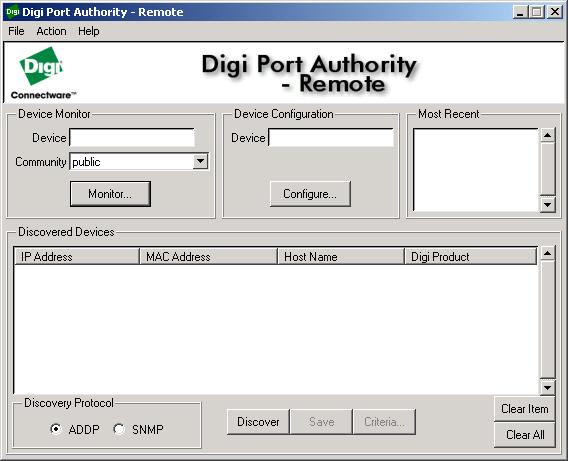
In the above configuration window, click Discover to allow the Digi Port
Authority Remote software to search for the connected hardware.

7.
The software should report that a device without an IP address has been
detected. Click OK. If
the software did not find the hardware, check the power connection and Ethernet
connection to the Digi One RealPort IA device and try the Discover option again.
8.
In the configuration software, click Configure.

9.
Enter the IP address, Subnet, and Gateway (if applicable) for the
hardware. If uncertain of these
parameters, contact your network administrator.
Click OK.
10.
Wait while the software applies the settings, and tests the
device.
11.
The configuration window will appear again, with the IP address that you
entered above in the Device window. Click
Configure.
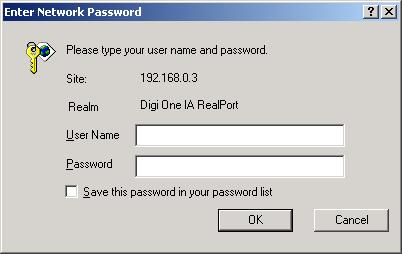
12.
You will be asked for the User Name and Password.
The default User Name is root and the default password is dbps.
Enter these and click OK.
13.
Your default internet application will take you to a web based setup
application that runs on the Digi One IA RealPort.
Select Setup Wizard.
14.
Select Industrial Protocols.
15.
Click Next.
16.
Choose the baud rate, data bits, parity, and stop bits to match the Omron
device. Omron default settings for
many products are 9600, 7,E,2. Click Next.
17.
Select the Omron protocol that you wish to use.
Choose Hostlink for C and CV mode Hostlink , and Compoway/F for the
CompowayF protocol. For Omron PLCs
use Hostlink. Click Next.
18.
Select Slave.
Click Next.
19.
Verify the settings that you have made, and click Finish.
20.
Click on Admin, and then click Reboot.
Click Continue. This
will restart the module, and apply the configuration changes that you have made.
This
concludes the configuration process for the Digi One IA RealPort hardware.
You can modify any of these changes at any time by launching the Digi
Port Authority Remote software from the start menu, and starting at step 11 of
this section. Please proceed to Part
2. Installing the RealPort Virtual Com Port.
Part 2. Installing the RealPort Virtual Com Port
in:
Windows 2000
1.
From the
Control Panel of Windows 2000, Select Add Hardware.
Click Next.
2.
Select Add/Troubleshoot
a device. Click Next.
Windows will search for new devices. When it determines that it cannot find
any new devices, it will
display a list of devices.
3. Select Add a new device Click Next.
4. Select No, I want to select the hardware from a list. Click Next.
5. Select Multi-port serial adapters Click Next.
6. Select Have Disk.
7.
Select Browse, and point the system to the \drivers\windows\w2k\RealPort
directory on the supplied CD, and select the digirp.inf
file. Click Open.
8. Click OK
9.
Select the Digi One IA RealPort.
Click Next, Next
10. If
the Digital Signatures Not Found screen appears, click Yes.
11. Enter the IP
address of the Digi One IA RealPort. Click
Next.
12. Enter a Name to
refer to the Digi One IA RealPort. Enter
the number of simulated COM ports you would like to setup for the
computer that you
are using. Click Next.
13.
Click Finish
This completes the installation of the simulated COM
port. Omron software can now
address your Omron hardware device using the
COM port number that you assigned in step 12.
2.
Select I have already connected the hardware. Click Next.
3. Scroll and select Add a new hardware device. Click Next.
4.
Select Install the hardware that I manually select from a list.
Click Next.
5.
Select Multi-port serial adapters. Click Next.
6.
Select Have Disk.
7.
Select Browse and select the driver location.
From the supplied CD, drivers\windows\w2k\RealPort
8.
Select the RealPort driver and Open Click OK.
9.
Choose the Digi device you are installing Click Next, Next.
10.
A Hardware Installation warning screen appears, choose Continue
Anyway.
11.
Enter the IP address for the Digi IA RealPort device. The TCP port number
should be 771.
12. Follow the prompts to complete configuration of the RealPort driver.
For Windows NT
1.
From the WindowsNT Control Panel, Double Click Network.
2. Click on the Services Tab.
3. Click Add.
4. Click Have Disk.
5. Type the path for the driver. For example, if your CD ROM is drive D, the path would be d:\drivers\windows\nt\RealPort\.
6. Click OK to select the highlighted Digi RealPort Service.
7. Enter the IP address for the Digi One RealPort IA. Click Next.
8.
Enter a Name to refer to the Digi
One IA RealPort. Enter the number
of simulated COM ports you would like to setup for the
computer that you are using.
Click Next
9. Click Finish
10. Click OK
11. Click Yes to start the RealPort service.
Section
5. Tested
Omron Products
a.
PLCs
|
|
CPM1(A) |
CPM2(A,C) |
CQM1(H) |
SRM1 |
C200H
E,G,X |
CJ1 |
CS1 |
CV |
|
Syswin |
YES |
YES |
YES |
YES |
YES |
|
|
YES |
|
CX-Programmer |
YES |
YES |
YES |
YES |
YES |
YES |
YES |
YES |
|
CPT |
YES |
YES |
YES |
YES |
YES |
|
|
YES |
|
CX
Server OPC |
YES |
YES |
YES |
YES |
YES |
YES |
YES |
YES |
|
CX
Server Lite |
YES |
YES |
YES |
YES |
YES |
YES |
YES |
YES |
|
FINS
Gateway |
YES |
YES |
YES |
YES |
YES |
YES |
YES |
YES |
|
DeviceNet
Configurator |
|
|
|
|
|
YES |
YES |
|
|
CX
Protocol |
|
|
YES |
|
YES |
YES |
YES |
|
|
CX
Motion |
|
|
|
|
|
|
YES |
|
|
CX
Supervisor |
YES |
YES |
YES |
YES |
YES |
YES |
YES |
YES |
b. Temperature Controllers and
other MSC products
|
|
E5ZE |
E5ZN |
E5CK |
K3GN |
H8GN |
E_GN |
|
Sysconfig |
YES
(1) |
YES
(2) |
YES
(1) |
YES(2) |
YES(2) |
|
1
– HostLink Protocol
2
– Compoway/F Protocol
c. Other Products
|
Product |
Comments |
|
NT
Series Touch Screens |
Cannot
communicate. This is not a
supported protocol. |
Section
6: Performing
a firmware upgrade.
Periodically, Digi will make updated firmware for the Digi
One IA RealPort available. These
updates may include new drivers or updates for existing drivers.
Below is the procedure for applying a firmware upgrade to a Digi One IA
RealPort.
1.
Obtain an updated firmware file from Digi or Omron. (.bin file extension)
2.
Using the Digi Port Authority Remote software, connect to the Digi One IA
RealPort.
3.
From the menu on the left, click on Admin.
4.
Click on HTTP Upgrade.
5.
Click Browse to select the file from step 1.
6.
Click Submit.
7.
Wait while the unit downloads the update.
8.
When prompted, click Reboot.