Products Applications Support Partners News About Digi Where to Buy


Products

device servers
terminal servers
console management
USB
async


CONFIGURING THE DIGI ONE SINGLE PORT (DIGI ONE IA) FOR SERIAL TUNNELING USING THE SETUP WIZARD

Symptom:
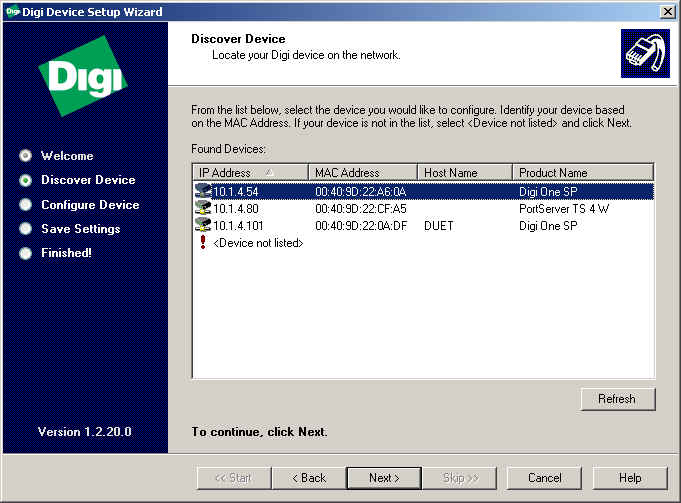
How do you configure the Digi One Single Port or Digi One IA Device Server for serial tunneling using the command line?

Procedure:
A. You will need to be on the latest firmware for the Digi One Single Port/Digi One IA to follow this procedure.  If you are not on the latest firmware, go to www.digi.com to download.
B.  To configure the Digi One Single Port for serial tunneling, you will need two units.  
NOTE: If you have one unit that is on the network already, please follow the Incoming/Outgoing scenario based on whether the serial device accepts incoming connections or establishes outgoing connections.

1. Launch the Digi Device Setup Wizard.
   
2.
Follow the "Before you continue, make sure" message and click Next>.

3. The Discover Device will come up asking you to locate one of the Digi Devices you would like to configure.
   
4. Select the device you want to initially configure and choose Next>.
    NOTE: If this is the initial configuration of the Digi Device, your IP Address may say 0.0.0.0.  This is ok because it
    will prompt you to configure the IP Address.

5. After you have entered the IP Address and Network Settings,
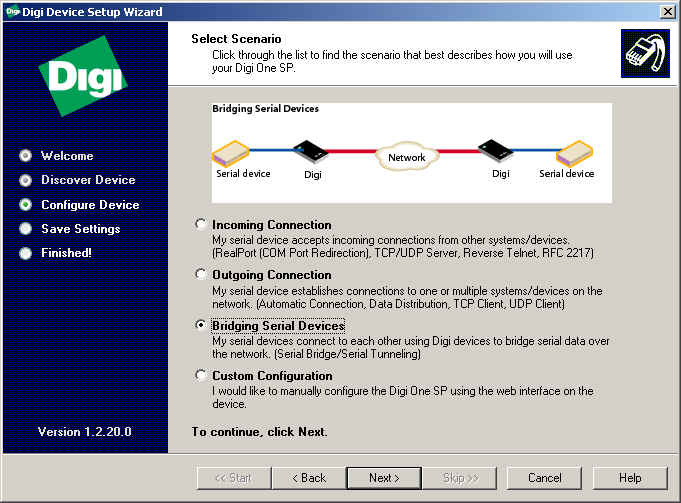
 click Next>.
    NOTE: If you have any problems use the Help button for troubleshooting assistance.

6. From the scenario list choose the radio button next to Bridging Serial Devices.   
    NOTE: Again if you have one unit that is on the network already, please follow the Incoming/Outgoing scenario based on whether the serial
    device accepts incoming connections or establishes outgoing connections.  Click Next>.
   
                                                                                                                                          
7. Select the appropriate baudrate, databits, parity, stopbits and flow control.
   
8. Click Next>.

9.  The Discover Device will come up again asking you to locate the second Digi Devices you would like to configure.
     NOTE: The first Digi Device will not display as it is already configured.

                                                                                                                                                                 
10. After you have entered the IP Address and Network Settings for the second Digi Device, click Next>.
      NOTE: If you have any problems use the Help button for troubleshooting assistance.

11. You will now get the configuration summary page.
     

12. Once you click Next> it will save the configuration to the Digi Devices. 
     

13. It will prompt you during this time to enter the login for the second Digi Device for security verification.
     

14. You have now successfully configured your Digi Device's for bridging and can click Finish.
      NOTE:
For warranty purposes, please make sure you register your product, which is enabled below by default.


products | applications | support | partners | news | about Digi | where to buy | contact us | site map

Copyright © 1996-2002 Digi International. All rights reserved.


Contact Us Site Map Product Selector Digi Homepage