www.digi.com
  Advanced Search
Product Selector
     
  Technical Support
Drivers

Firmware Upgrades

FAQs

Product Documentation

Cabling

Support Tools

Legacy Products

About Digi Support

Knowledge Base

Online Support Request

FTP Site


Related Links
Inside Out Networks


Solutions Partners Support and Training Corporate Info Where to Buy Order Where to Buy Site Map Contact Us
Home > Support >kbase >
Problems Updating The Firmware on an EtherLite

Symptom:

When running DGIPSERV.exe to update the Firmware on an EtherLite, after power cycling the EtherLite (when prompted), it says that it is starting to update the firmware, but just sits there.

Cause:

Depending on how the EtherLite is connected to the network, we have confirmed:
1. You must be on the same subnet (PC and EtherLite).
2. You may have problems if you are on a DHCP network.  The system 
    running DGIPSERV.exe must have a static IP Address.
3. Try segregating the EtherLite and PC on a dumb hub.
    NOTE: Some switches don't pass bootp requests, aren't set to route from 
    host to unit, or switch is set to autosense.  These can all affect the successful
    IP assignment.   
4. Try running the firmware update from a PC with a single Network Interface
    Card. We have seen issues when multiple NICs are involved.
5. Run BOOTPS.exe (download link noted below) to confirm you are seeing
    the EtherLite on the Network.

Solution:

To upgrade the firmware first:

Download 40002241_B.zip, VERLOG.exe and BOOTPS.exe from the following location: http://ftp.digi.com/support/utilities/sts_els/ and extract it.  Run BOOTPS.exe.  When you start it up, it will say waiting for BOOTP requests. When you power cycle the EtherLite it should tell you the MAC Address.
Make sure you are getting a response before you upgrade the firmware.

If you aren't getting a MAC Address back OR it doesn't match that of the 
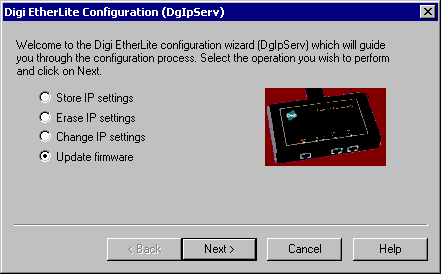
EtherLite, the firmware upgrade will not take.
Once you get the EtherLite's MAC Address, run DGIPSERV.exe to update the firmware.

Digi EtherLite RealPort Firmware Upgrade

1.  Run DgIpServ and select Store IP Settings (see Figure 1).
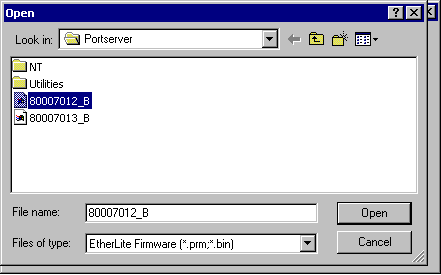
  Click Next.
    
                                                                                                       Figure 1

2.  Locate the firmware file you downloaded and extracted.  
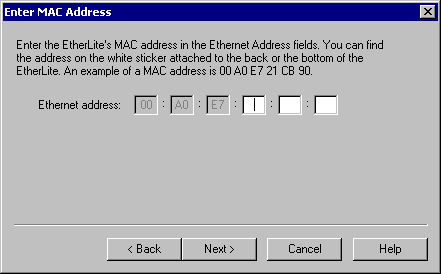
Highlight it and click Open (see Figure 2).
    
                                                                                                       Figure 2

3.  Enter the last 6 digits of the MAC Address.  This will be on a 
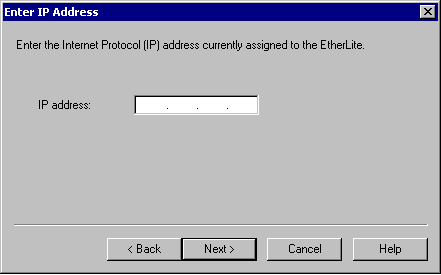
bar code sticker located on the EtherLite (see Figure 3).
    
                                                                                                       Figure 3

4.  Enter the IP Address you want to assign to the EtherLite (see Figure 4).
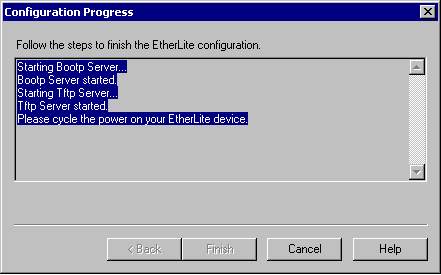
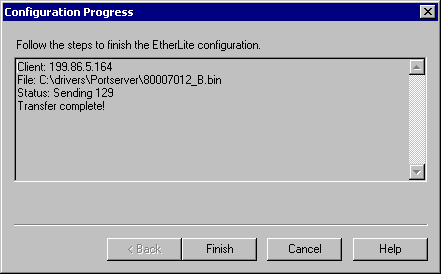
    
                                                                                                      Figure 4

5.  Power cycle the EtherLite (see Figure 5).
    
                                                                                                      Figure 5

5.  After power cycling the EtherLite you will see the following screen if the firmware transfer is successful (see Figure 6).
    
                                                                                                       Figure 6

6.  You can run Verlog.exe to verify the version of the firmware has now been upgraded.

Related Information:

  • http://supportold.digi.com/support/techsupport/hardware/sts_els/windows-realport.html


  • solutions | partner programs | corporate info | support and training | where to buy
    site map | contact us | press releases |
    events | promotions | advertising

    Copyright © 1996-2001 Digi International. All rights reserved.