
Administering WAN lines and calls
The MAX allows you to manage WAN lines, ports, and modems. This section describes how to:
The Line Diag menu for T1 includes the following commands, which you execute by selecting the command in the menu and pressing Enter:
E1 line diagnostics
The MAX provides E1 diagnostic commands you can use to test the configuration of your E1 lines. Access the commands from Net/E1 > Line Diag.
BRI/LT diagnostics
The MAX provides BRI/LT diagnostic commands you can use to test the configuration of your BRI/LT lines. Access the commands from BRI/LT > Line Diag > Line N where N is the number of the line you want to check. Monitoring transmission quality
To monitor transmission quality at the U-interface, the MAX uses internal block-error counters. Block errors encountered in the receive direction are called Near-End Block Errors (NEBE). Block errors encountered in the transmission direction are called Far-End Block Errors (FEBE).
The Line Diag menu includes the following commands for running diagnostic tests, which you access by selecting the command and pressing Enter:
The Line Diag menu also includes a parameter Sealing Current. This parameter enables sealing, which is the ability of an ISDL card to send 40V current on the line to prevent corrosion caused by inactivity. To enable sealing, specify Yes. The default value is No sealing.
Example of performing loopback diagnostics for IDSL
The MAX supports loopback tests from itself to any device on the IDSL connection. For example, you can loop back the signal from the IDSL card to the remote TA or TE, or from the IDSL card to any intermediate repeater.
Figure 5-1. IDSL connection with repeaters

To configure a loopback test on the BRI lines provided by the IDSL slot card:
While the line loops back, normal data transfer is disrupted.
The loopback test sends data originating at the host (the local application) back to the originating port.
To run a loopback test:
31-201 Local LB
> 	DSR  =  Active
	RI=Inactive
	CD=Inactive
	DLO=Inactive
	PND=Inactive
	ACR=Inactive
	Inc Ch Count
	Dec Ch Count
	Rate=64K
Quiescing a modem or modem slot does not result in active calls being torn down. Instead, when active call drops, that modem or modem slot is added to a disabled list and is unavailable for use. If all modems are disabled, incoming callers receive a busy signal until the modems have been restored for service. A quiesced modem is available for use approximately 20 seconds after it has been re-enabled.
To quiesce a modem or modem slot, access the V.34 (V.42) Modem > Modem Diag menu.
To quiesce a modem, use the Modem #N command, where N is the modem number from 1 to 12. You can set one of the following values:
To quiesce a modem slot, use the ModemSlot command. You can set one of the following values:
E1 ISDN call information
If the E1/PRI line or BRI line switch-type is German 1TR6 or Japanese NTT, you can display information about ISDN calls by invoking the terminal-server command line and entering the Show Calls command. For example:
ascend% show callsThe command displays statistics about current calls. For example:
Call ID Called Party ID Calling Party ID InOctets OutOctets
3        5104563434      4191234567        0        0

4        4197654321      5108888888        888888   99999
Called Party ID and Calling Party ID show the telephone number of the answering device and calling device, respectively.
InOctets and OutOctets show the number of bytes received by the answering device and transmitted by the calling device, respectively.
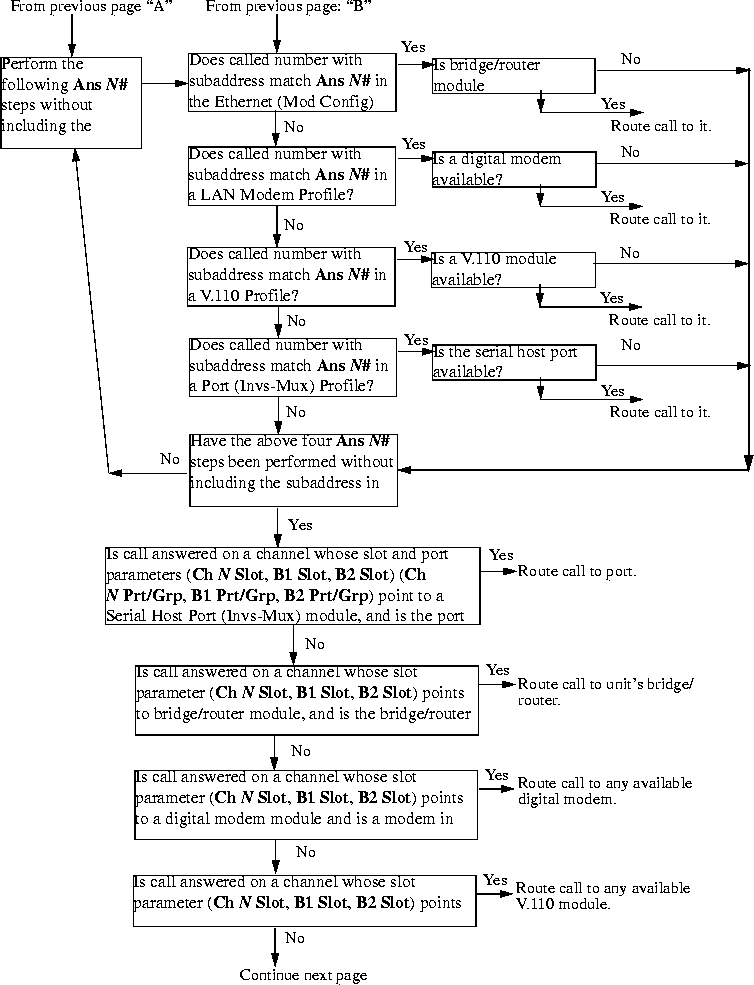
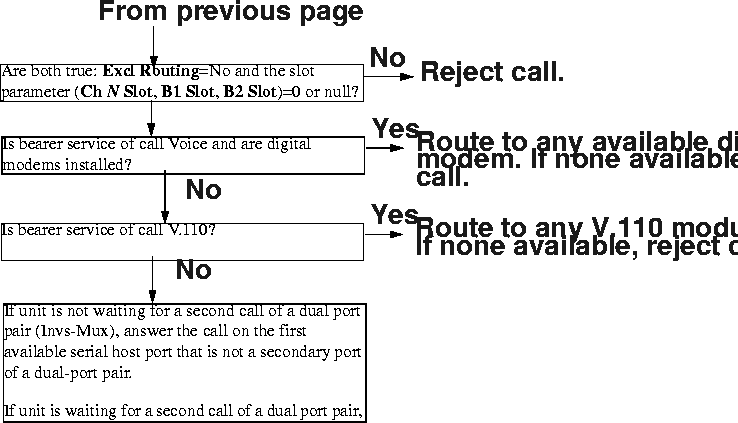
Incoming call routing state diagram
The following pages show detailed state information about inbound call routing in the MAX. For more information about any of the parameters, see the MAX Reference Guide. 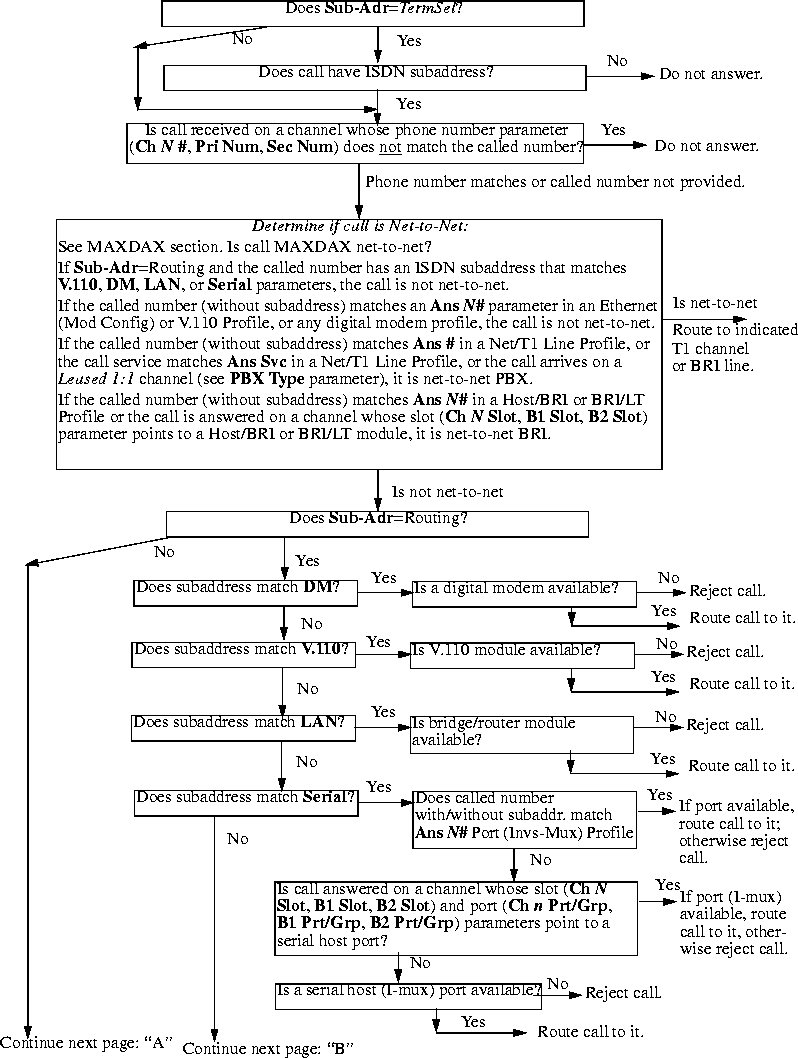
Managing IP routes and sessions
This section describes how to monitor TCP/IP/UDP and related information in the terminal-server command-line interface. To invoke the terminal-server interface, select System > Sys Diag > Term Serv and press Enter. The terminal-server command-line prompt appears: ascend%. Working with the IP routing table
The terminal-server IProute commands display the routing table and enable you to add or delete routes. The changes you make to the routing table by using the IProute command last only until the MAX unit is reset. To display the IProute commands, enter the IP route command with a question mark:
ascend% iproute ?
iproute ?              Display help information

iproute add          iproute add <destination/size> <gateway> [ pref ] [ m

iproute delete    iproute delete <destination/size> <gateway> [ proto ]

iproute show        displays IP routes (same as "show ip routes" command)
ascend% iproute show
Destination        Gateway        IF       Flg Pref  Met   Use   Age

0.0.0.0/0          10.0.0.100     wan0     SG   1     1     0     20887

10.207.76.0/24     10.207.76.1    wanidle0 SG   100   7     0     20887

10.207.77.0/24     10.207.76.1    wanidle0 SG   100   8     0     20887

127.0.0.1/32       -              lo0      CP   0     0     0     20887

10.0.0.0/24        10.0.0.100     wan0     SG   100   1     21387 20887

10.1.2.0/24        -              ie0      C    0     0     19775 20887

10.1.2.1/32        -              lo0      CP   0     0     389   20887

255.255.255.255/32 -              ie0      CP   0     0     0     20887
0.0.0.0/0 10.0.0.100 wan0 SG 1 1 0 20887
10.207.76.0/24 10.207.76.1 wanidle0 SG 100 7 0 20887
10.207.77.0/24 10.207.76.1 wanidle0 SG 100 8 0 20887
127.0.0.1/32 - lo0 CP 0 0 0 20887
The next route is specified in a Connection profile that is currently active:
10.0.0.0/24 10.0.0.100 wan0 SG 100 1 21387 20887
10.1.2.0/24 - ie0 C 0 0 19775 20887
10.1.2.1/32        -              lo0      CP   0     0     389   20887

255.255.255.255/32 -              ie0      CP   0     0     0     20887
iproute add destination gateway [metric]
destination is the destination network address, gateway is the IP address of the router that can forward packets to that network, and metric is the virtual hop count to the destination network (default 8). For example, to add a route to the 10.1.2.0 network and all of its subnets through the IP router located at 10.0.0.3/24 with a metric of 1 (the router is one hop away), enter the following command:
ascend% iproute add 10.1.2.0 10.0.0.3/24 1If you try to add a route to a destination that already exists in the routing table, the MAX replaces the existing route, but only if it has a higher metric than the new route. If you get the message
Warning: a better route appears to exist, the MAX has rejected your attempt to add a route because the routing table already contained a route, to the same destination, with a lower metric. Note that RIP updates can change the metric for the route.
iproute delete destination gateway
ascend% iproute delete 10.1.2.0 10.0.0.3/24
Displaying route statistics
The Traceroute command is useful for locating slow routers or diagnosing IP routing problems. It traces the route an IP packet follows by launching UDP probe packets with a low Time-To-Live (TTL) value and then listening for an ICMP time exceeded reply from a router. The Traceroute command uses the following syntax:
All flags are optional. The only required parameter is the destination hostname or IP address. The elements of the syntax are as follows:traceroute[-n] [-v] [-mmax_ttl][-pport] [-qnqueries]
[-wwaittime] host [datasize]
For example, to trace the route to the host
techpubs:
ascend% traceroute techpubs
traceroute to techpubs (10.65.212.19), 30 hops MAX, 0 byte packetsProbes start with a TTL of one and increase by one until one of the following conditions occurs:
1 techpubs.eng.ascend.com (10.65.212.19) 0 ms 0 ms 0 ms
ascend% traceroute -m 60 techpubs
traceroute to techpubs (10.65.212.19), 60 hops MAX, 0 byte packetsThree probes are sent at each TTL setting. The second line of command output shows the address of the router and round trip time of each probe. If the probe answers come from different gateways, the address of each responding system is shown. If there is no response within a three second timeout interval, the command output is an asterisk. The following annotations can appear after the time field in a response:
1 techpubs.eng.abc.com (10.65.212.19) 0 ms 0 ms 0 ms
!H-Host reached.
!N-Network unreachable.
!P-Protocol unreachable.
!S-Source route failed. Might indicate a problem with the associated device.
!F-Fragmentation needed. Might indicate a problem with the associated device.
!h-Communication with the host is prohibited by filtering.
!n-Communication with the network is prohibited by filtering.
!c-Communication is otherwise prohibited by filtering.
!?-ICMP subcode detected. This event should not occur.
!??-Reply received with inappropriate type. This event should not occur.
All flags are optional. The only required parameter is the destination hostname or IP address. The elements of the syntax are as follows:ping[-q] [-v] [-ccount] [-isec |-Imsec] [-spacketsize]
[-xsrc_address] host
For example, to Ping the host
techpubs:
ascend% ping techpubs
PING techpubs (10.65.212.19): 56 data bytesYou can terminate the Ping exchange at any time by pressing Ctrl-C. When you press Ctrl-C, the command reports the number of packets sent and received, the percentage of packet loss, any duplicate or damaged echo-response packets, and round-trip statistics. In some cases, round-trip times cannot be calculated.
64 bytes from 10.65.212.19: icmp_seq=0 ttl=255 time=0 ms
64 bytes from 10.65.212.19: icmp_seq=3 ttl=255 time=0 ms
^C
--- techpubs ping statistics ---
2 packets transmitted, 2 packets received, 0% packet loss
round-trip min/avg/MAX = 0/0/0 ms
During the Ping exchange, the MAX displays information about the packet exchange, including the Time-To-Live (TTL) of each ICMP echo-response packet.
The Ping command sends an ICMP Mandatory echo-request datagram, which asks the remote station "Are you there?" If the echo-request reaches the remote station, the station sends back an ICMP echo-response datagram, which tells the sender "Yes, I am alive." This exchange verifies that the transmission path is open between the MAX and a remote station.
Configuring Finger support
You can configure the MAX to respond to Finger requests, as specified in RFC 1288, The Finger User Information Protocol.
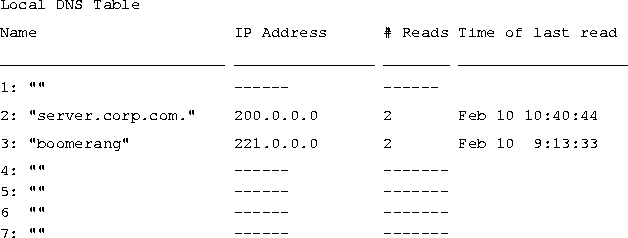
You create the DNS table from the Ethernet > Mod Config > DNS menu by entering up to eight host names. Enter the IP addresses for each host through the terminal-server interface. You can configure a maximum of 35 IP addresses for each host. If you specify automatic updating, you only have to enter the first IP address of each host. Additional IP addresses are added automatically.
Automatic updating replaces the existing address list for a host each time the remote DNS server succeeds in resolving a connection to a host that is in the table. You specify how many of the addresses returned by the remote server can be included in the new list.
On the MAX, the table, which you display from the terminal-server interface, provides additional information for each table entry. The information is in the following two fields, which are updated when the system matches the table entry with a host name that was not found by the remote server:
Figure 5-2. Example of a local DNS table
Displaying IP routing and related information
The following Show commands for monitoring IP routing and related protocols are described in this section:
show arp		Display the Arp Cache

show icmp		Display ICMP information

show if	Display Interface info. Type 'show if ?' for help.

show ip	Display IP information. Type 'show ip ?' for help.

show udp	Display UDP information. Type 'show udp ?' for help.

show tcp	Display TCP information. Type 'show tcp ?' for help.

show pools	Display the assign address pools.
ascend% show arp
entry typ ip address ether addr if rtr pkt insertThe ARP table displays the following information:
0 DYN 10.65.212.199 00C07B605C07 0 0 0 857783
1 DYN 10.65.212.91 0080C7C4CB80 0 0 0 857866
2 DYN 10.65.212.22 080020792B4C 0 0 0 857937
3 DYN 10.65.212.3 0000813DF048 0 0 0 857566
4 DYN 10.65.212.250 0020AFF80F1D 0 0 0 857883
5 DYN 10.65.212.16 0020AFEC0AFB 0 0 0 857861
6 DYN 10.65.212.227 00C07B5F14B6 0 0 0 857479
7 DYN 10.65.212.36 00C07B5E9AA5 0 0 0 857602
8 DYN 10.65.212.71 0080C730041F 0 0 0 857721
9 DYN 10.65.212.5 0003C6010512 0 0 0 857602
10 DYN 10.65.212.241 0080C72ED212 0 0 0 857781
11 DYN 10.65.212.120 0080C7152582 0 0 0 857604
12 DYN 10.65.212.156 0080A30ECE6D 0 0 0 857901
13 DYN 10.65.212.100 00C07B60E28D 0 0 0 857934
14 DYN 10.65.212.1 00000C065D27 0 0 0 857854
15 DYN 10.65.212.102 08000716C449 0 0 0 857724
16 DYN 10.65.212.33 00A024AA0283 0 0 0 857699
17 DYN 10.65.212.96 0080C7301792 0 0 0 857757
18 DYN 10.65.212.121 0080C79BF681 0 0 0 857848
19 DYN 10.65.212.89 00A024A9FB99 0 0 0 857790
20 DYN 10.65.212.26 00A024A8122C 0 0 0 857861
21 DYN 10.65.212.6 0800207956A2 0 0 0 857918
22 DYN 10.65.212.191 0080C75BE778 0 0 0 857918
23 DYN 10.65.212.116 0080C72F66CC 0 0 0 857416
24 DYN 10.65.212.87 0000813606A0 0 0 0 857666
25 DYN 10.65.212.235 00C07B76D119 0 0 0 857708
26 DYN 10.65.212.19 08002075806B 0 0 0 857929
entry-A unique identifier for each ARP table entry.
typ-How the address was learned, dynamically (DYN) or statically (STAT).
ip address-The address contained in ARP requests.
ether addr-The MAC address of the host with that IP address.
if-The interface on which the MAX received the ARP request.
rtr-The next-hop router on the specified interface.
Show icmp command. For example:
ascend% show icmp
3857661 packet received.The Input and Output histograms show the number of ICMP packets received and transmitted, respectively.
20 packets received with errors.
Input histogram: 15070
2758129 packets transmitted.
0 packets transmitted due to lack of resources.
Output histogram: 15218
ascend% show if ?
show if ? Display help informationTo display the status and packet count of each active WAN link and of local and loopback interfaces, enter the Show IF Stats command. For example:
show if stats Display Interface Statistics
show if totals Display Interface Total counts
ascend% show if stats
Interface Name Status Type Speed MTU InPackets OutpacketThe output contains the following fields:
ie0 ethernet Up 6 10000000 1500 107385 85384
wan0 Down 1 0 1500 0 0
wan1 Down 1 0 1500 0 0
wan2 Down 1 0 1500 0 0
wanidle0 Up 6 10000000 1500 0 0
lo0 loopback Up 24 10000000 1500 0 0
ascend% show if totals
Name --Octets----Ucast-- -NonUcast- Discard -Error- Unknown -Same IF-The output contains the following fields:
ie0 i: 7813606 85121 22383 0 0 0 0
o: 101529978 85306 149 0 0 0 0
wan0 i: 0 0 0 0 0 0 0
o: 0 0 0 0 0 0 0
wan1 i: 0 0 0 0 0 0 0
o: 0 0 0 0 0 0 0
wan2 i: 0 0 0 0 0 0 0
o: 0 0 0 0 0 0 0
wanidle0 i: 0 0 0 0 0 0 0
o: 0 0 0 0 0 0 0
lo0 i: 0 0 0 0 0 0 0
o: 0 0 0 0 0 0 0
Displaying IP statistics and addresses
To display the IP statistics and addresses supported commands, enter the Show IP command with a question mark:
ascend% show ip ?
show ip ?           Display help information

show ip stats       Display IP Statistics

show ip address     Display IP Address Assignments

show ip routes      Display IP Routes
ascend% show ip stats
107408 packets received.To display IP interface address information, enter the Show IP Address command. For example:
0 packets received with header errors.
0 packets received with address errors.
0 packets forwarded.
0 packets received with unknown protocols.
0 inbound packets discarded.
107408 packets delivered to upper layers.
85421 transmit requests.
0 discarded transmit packets.
1 outbound packets with no route.
0 reassembly timeouts.
0 reassemblies required.
0 reassemblies that went OK.
0 reassemblies that Failed.
0 packets fragmented OK.
0 fragmentations that failed.
0 fragment packets created.
0 route discards due to lack of memory.
64 default ttl.
ascend% show ip address
Interface   IP Address    Dest Address   Netmask         MTU     Status

ie0         10.2.3.4      N/A            255.255.255.224   1500      Up

wan0        0.0.0.0       N/A            0.0.0.0           1500    Down

wan1        13.1.2.0      13.1.2.128     255.255.255.248   1500    Down

wan2        0.0.0.0       N/A            0.0.0.0           1500    Down

wan3        0.0.0.0       N/A            0.0.0.0           1500    Down

lo0         127.0.0.1     N/A            255.255.255.255   1500      Up

rj0         127.0.0.2     N/A            255.255.255.255   1500      Up

bh0         127.0.0.3     N/A            255.255.255.255   1500      Up
ascend% show udp ?
show udp ? Display help informationTo display the number of UDP packets received and transmitted, enter the Show UDP Stats command. For example:
show udp stats Display UDP Statistics
show udp listen Display UDP Listen Table
ascend% show udp stats
22386 packets received.

    0 packets received with no ports.

    0 packets received with errors.

    0 packets dropped

    9 packets transmitted.
ascend% show udp listen
udp:

Socket Local Port InQLen InQMax    InQDrops    Total Rx

0	1023	0	1	0	0

1	520	0	50	0	532

2	7 	0	32	0	0

3 	123	0	32	0	0

4 	1022	0	128	0	0

5	161	0	64	0	0
ascend% show tcp ?
show tcp ? Display help informationTo display the number of TCP packets received and transmitted, enter the Show TCP Stats command. For example:
show tcp stats Display TCP Statistics
show tcp connection Display TCP Connection Table
ascend% show tcp stats
     0 active opens.

    11 passive opens.

     1 connect attempts failed.

     1 connections were reset.

     3 connections currently established.

 85262 segments received.

 85598 segments transmitted.

   559 segments re-transmitted.
To display current TCP sessions:
ascend% show tcp connection
Socket       Local               Remote                         State

0            *.23                *.*                           LISTEN

1            10.2.3.23           15.5.248.121.15003       ESTABLISHED
ascend% show pools
Pool # Base Count InUseIf you change an address pool while users are still logged in using the addresses from the previous pool,
1 10.98.1.2 55 27
2 10.5.6.1 128 0
Number of remaining allocated addresses: 0
Number of remaining allocated addresses reflects how many users are currently using addresses from the previous pool. Typically, the value is 0 (zero).
Monitoring IPX routes and sessions
Show commands for monitoring IPX connections in the MAX are available at the terminal-server command-line interface. To open the terminal-server interface select System > Sys Diag > Term Serv and press Enter. Verifying the transmission path to NetWare stations
The IPXping command provides network layer verification of the transmission path to NetWare stations. The command works on the same LAN as the MAX or across a WAN connection that has IPX Routing enabled. Following is the command's syntax:
where:ipxping[-ccount] [-idelay] [-spacketsize] hostname
ascend% ipxping CFFF1234:000000000001If you are using the IPXping command to verify connectivity with an advertised NetWare server, you can simply enter the symbolic name of the server. For example:
ascend% ipxping server-1You can terminate the IPXping command at any time by pressing Ctrl-C.
During the IPXping exchange, the MAX calculates and reports the following statistics:
PING server-1 (EE000001:000000000001): 12 data bytesThese statistics include the following information:
52 bytes from (EE000001:000000000001): ping_id=0 time=0ms
52 bytes from (EE000001:000000000001): ping_id=1 time=0ms
52 bytes from (EE000001:000000000001): ping_id=2 time=0ms
?
--- novl1 Ping statistics ---
3 packets transmitted, 3 packets received, 0% packet loss
round-trip min/avg/MAX = 0/0/0 ms
ascend% show netware pings
InPing Requests/OutPing Replies OutPing Requests/InPing Replies
10 10 18 18The output shows how many NetWare stations have pinged the MAX (InPing requests and replies) and how many times the IPXping command has been executed in the MAX (OutPing requests and replies).
ascend% show netware stats
27162 packets received.The MAX drops packets that exceed the maximum hop count (that have already passed through too many routers).
25392 packets forwarded.
0 packets dropped exceeding maximum hop count.
0 outbound packets with no route.
ascend% show netware servers
IPX address type server nameThe output includes the following fields:
ee000001:000000000001:0040 0451 server-1
Displaying the IPX routing table
To display the IPX routing table, enter the Show Netware Networks command:
ascend% show netware networks
network next router hops ticks originThe output includes the following fields:
CFFF0001 00000000000 0 1 Ethernet S
Managing OSPF routes and sessions
This section describes how to work with Open Shortest Path First (OSPF) information in the routing table and how to monitor OSPF activity in the terminal-server command-line interface. Working with the routing table
The OSPF routing table includes routes built from the router's link-state database as well as those added by external routing protocols such as RIP. You can also add routes statically (for example, to direct traffic destined for a remote site through one of several possible border routers). For details about adding static routes (for example, if you want to force the use of one route over those learned from OSPF, see the Network Configuration Guide for your MAX).-l option:
ascend% iproute show -lWhen you include the
-l option, three columns of OSPF-specific fields appear at the routing table:
...     Cost        T        Tag
...     1           0        0xc0000000
...     9           1        0xc8000000
...     10          0        0xc0000000
...     9           1        0xc8000000
...     1           1        0xc0000000
...     3           1        0xc8000000
...     9           1        0xc8000000
...     4           1        0xc8000000
...     5           1        0xc8000000
...     3           1        0xc8000000
...     3           1        0xc8000000
...     3           1        0xc8000000
For example, if router A has two equal-cost routes to
example.com, one via router B and the other via router C, router A's routing table might include the following entries:
Destination Gateway IF Flg Pref Met Use AgeThe M in the Flg column indicates an equal-cost multipath. A Traceroute from router A to
10.174.88.0/25 10.174.88.12 wan2 OGM 10 10 52 19
10.174.88.0/25 10.174.88.13 wan3 OGM 10 10 52 19
10.174.88.12/32 10.174.88.12 wan2 OG 10 10 0 28
10.174.88.13/32 10.174.88.13 wan3 OG 10 10 0 28
192.168.253.0/24 - ie0 C 0 0 1 49
192.168.253.6/32 - lo0 CP 0 0 53 49
223.1.1.0/24 10.174.88.12 wan2 OG 10 10 0 19
223.5.1.0/24 10.174.88.12 wan2 OG 10 10 0 19
223.12.9.0/24 10.174.88.12 wan2 OG 10 10 0 19
255.255.255.255/32 - ie0 CP 0 0 0 49
example.com would produce the following display:
ascend% traceroute -q 10 example.com
traceroute to example.com (10.174.88.1), 30 hops max, 0 byte packets
1  C.example.com (10.174.88.13)  20 ms B .example.com (10.174.88.12)
20 ms C.example.com (10.174.88.13)  20 ms B .example.com
(10.174.88.12)  20 ms  20 ms C.example.com (10.174.88.13)  60 ms  20 ms
B .example.com (10.174.88.12)  20 ms C.example.com (10.174.88.13)  20
ms B .example.com (10.174.88.12)  20 ms
2  example.com (10.174.88.1)  20 ms  20 ms  20 ms  20 ms  30 ms  20 ms
20 ms  30 ms  20 ms  30 ms
Notice the alternating replies. The replies are statistically dispatched to router B and router C, with roughly 50% of the packets sent through each gateway. (For background information about the routing table and about the Traceroute command, see the Network Configuration Guide for your MAX.)
Third-party routing requires that all OSPF routers know how to route to the forwarding address. This usually means that the forwarding address must be on an Ethernet that has an OSPF router acting as the forwarding router, or that the designated router is sending LSAs for that Ethernet to any area that sees the static route's forwarding-address LSAs. The following example shows how to configure a static route for OSPF to advertise a third-party gateway:
Ethernet

      Static Rtes

            Name=third-party

            Silent=No

            Active=Yes

            Dest=10.212.65.0/24

            Gateway=101.2.3.4

            Metric=3

            Preference=100

            Private=No

            Ospf-Cost=1

            LSA-Type=Type1

            ASE-tag=c00000000

            Third-Party=Yes
To enable OSPF to add the RIP-v2 routes to its routing table, configure RIP-v2 normally in the Connection profile. OSPF will import all RIP routes as Type-2 Autonomous System Externels (ASEs). The reason that RIP routes are imported with Type-2 metrics by default is that RIP metrics are not directly comparable to OSPF metrics. To prevent OSPF from interpreting RIP metrics, the imported ASE route is assigned a Type-2 metric, which is so large compared to OSPF costs that the metric can be ignored.
For each IP address and subnet mask pair, the routing table holds one route per protocol. The routes are assigned preferences as follows:
If multiple routes exist for a given address and subnet mask pair, the route with the lowest Preference is best. If two routes have the same Preference, then the lower Metric is better. The best route by these criteria is that actually used by the router. The others remain latent, or hidden, in case the best route is removed.
To assign a WAN link the same preference as a route learned from OSPF:
Ethernet

      Connections

            IP options

                  LAN Adrs=10.9.8.10/22

                  WAN Alias=0.0.0.0

                  IF Adrs=0.0.0.0

                  Metric=5

                  Preference=10

                  Private=No

                  RIP=Off

                  Pool=0
EthernetOr, you might change RIP metrics to Type-1:
Mod Config
Route prefs...
Static Preference=10
Rip Preference=100
RipAseType=Type2
Rip Tag=c8000000
OSPF Preference=10
Ethernet

      Mod Config

            Route prefs...

                  Static Preference=100

                  Rip Preference=100

                  RipAseType=Type1

                  Rip Tag=c8000000

                  OSPF Preference=10
scend% show ospf ?
show ospf ?                    Display help information

show ospf size              Display OSPF size

show ospf areas            Display OSPF areas

show ospf stats            Display OSPF statistics

show ospf intf...        Display OSPF summary/detail interface information

show ospf internal      Display OSPF internal routes

show ospf lsa ...        Display OSPF detail link-state advertisements

show ospf lsdb ...      Display OSPF link-state DB summary for an area

show ospf nbrs ...      Display OSPF summary/detail neighbor information

show ospf routers       Display OSPF routers

show ospf ext                Display OSPF external AS advertisements

show ospf rtab              Display OSPF routing table

show ospf database      Display OSPF entire database summary
Displaying the size of the OSPF routing table
To display the size of the OSPF routing table, enter the Show OSPF Size command. For example:
ascend%The output includes the following fields:show ospf size# Router-LSAs: 2
# Network-LSAs: 0
# Summary-LSAs: 0
# Summary Router-LSAs: 0
# AS External-LSAs (type-5): 1
# AS External-LSAs (type-7): 0
# Intra-area routes: 4
# Inter-area routes: 0
# Type 1 external routes: 0
# Type 2 external routes: 0
Displaying OSPF areas
To display information about OSPF areas, enter the Show OSPF Areas command. For example:
ascend%The output includes the following fieldsshow ospf areaArea ID Authentication Area Type #ifcs #nets #rtrs #brdrs #intnr
0.0.0.0 Simple-passwd Normal 1 0 2 0 3
Displaying general information about OSPF
To display general information about OSPF, enter the Show OSPF Stats command. For example:
ascend% show ospf stats
OSPF version: 2The output includes the following fields
OSPF Router ID: 192.192.192.2
AS boundary capability: Yes
Attached areas: 1 Estimated # ext.(5) routes: 300
OSPF packets rcvd: 94565 OSPF packets rcvd w/ errs: 0
Transit nodes allocated: 3058 Transit nodes freed: 3056
LS adv. allocated: 1529 LS adv. freed: 1528
Queue headers alloc: 32 Queue headers avail: 32
# Dijkstra runs: 4 Incremental summ. updates: 0
Incremental VL updates: 0 Buffer alloc failures: 0
Multicast pkts sent: 94595 Unicast pkts sent: 5
LS adv. aged out: 0 LS adv. flushed: 0
Incremental ext.(5) updates: 0 Incremental ext.(7) updates: 0
External (type-5) LSA database -
Current state: Normal
Number of LSAs: 1
Number of overflows: 0
Displaying information about OSPF interfaces
Enter the Show OSPF Intf command to display either summarized information about all OSPF interfaces or specific information about a single interface. Displaying summarized information
To display summarized information on OSPF interfaces, enter the Show OSPF Intf command. For example:
ascend% show ospf intf
Ifc Address Phys Assoc. Area Type State #nbrs #adjs DIntThe output includes the following fields:
194.194.194.2 phani 0.0.0.0 P-P P-P 1 1 120
Displaying specific information on a specific interface
To display detailed information for a specific interface, enter the Show OSFP Intf command in the following format:
ascend% show ospf intf (ip address or physical name)
For example:
ascend%The output includes the following fields:sh ospf intf 194.194.194.2Interface address: 194.194.194.2
Attached area: 0.0.0.0
Physical interface: phani (wan1)
Interface mask: 255.255.255.255
Interface type: P-P
State: (0x8) P-P
Designated Router: 0.0.0.0
Backup DR: 0.0.0.0
Remote Address: 194.194.194.3
DR Priority: 5 Hello interval: 30 Rxmt interval: 5
Dead interval: 120 TX delay: 1 Poll interval: 0
Max pkt size: 1500 TOS 0 cost: 10
# Neighbors: 1 # Adjacencies: 1 # Full adjs.: 1
# Mcast floods: 1856 # Mcast acks: 1855
Displaying OSPF Link-State Advertisements (LSAs)
You can enter Show OSPF commands to display a router's link state database and to expand the display of a particular LSA. Displaying the OSPF link-state database
To display the router's link-state database, enter the Show OSPF LSDB command. For example:
ascend% show ospf lsdb

                                                Area: 0.0.0.0
Type LS ID LS originator Seqno Age XsumThe output includes the following fields:
RTR 192.192.192.2 192.192.192.2 0x800005f8 696 0x6f0b
RTR 192.192.192.3 192.192.192.3 0x800005f8 163 0x6f09
# advertisements: 2
Checksum total: 0xde14
Field |
Description |
|---|---|
Area
|
Area ID.
|
Type
|
Type of link as defined in RFC 1583:
|
LS ID
|
Target address of the route.
|
LS originator
|
Address of the advertising router.
|
Seqno
|
Hexadecimal number that begins with 80000000 and increments by one for each LSA received.
|
Age
|
Age of the route in seconds.
|
Xsum
|
Checksum of the LSA.
|
# advertise- ments
|
Total number of entries in the link-state database.
|
Checksum total
|
Checksum of the link-state database.
|
Displaying expanded OSPF link-state advertisements
To specify a link-state advertisement to be expanded, first display the database. To specify an LSA, enter a Show OSPF command in the following format, then specify the LSA to expand:
The Show OSPF LSA command requires that you include the first four fields of the LSA as listed in the database. You can select the first four fields and paste them into the command line. For example, to display an expanded view of the last entry in the link-state database shown in the preceding section:show ospf lsaareals-type ls-id ls-orig
ascend% show ospf lsa 0.0.0.0 ase 10.5.2.160 10.5.2.162
LSA type: ASE ls id: 10.5.2.160 adv rtr: 110.5.2.162 age: 568The output includes the following fields:
seq #: 80000037 cksum: 0xfffa
Net mask: 255.255.255.255 Tos 0 metric: 10 E type: 1
Forwarding Address: 0.0.0.0 Tag: c0000000
Displaying OSPF neighbor information
To display information about OSPF neighbors to the MAX, enter the Show OSPF NBRS command.
For example:
ascend%The output includes the following fieldsshow ospf nbrsNeighbor ID Neighbor addr State LSrxl DBsum LSreq Prio Ifc
192.192.192.3 194.194.194.3 Full/- 0 0 0 5 phani
Displaying OSPF routers
To display OSPF routers, enter the Show OSPF Routers command. For example:
ascend%show ospf routersDType RType Destination Area Cost Next hop(s) #
ASBR OSPF 192.192.192.3 0.0.0.0 10 194.194.194.3 2
Displaying OSPF External AS advertisements
To display OSPF External AS advertisements, enter the Show OSPF Ext command. For example:
ascend%The output includes the following fields:show ospf extType LS ID LS originator Seqno Age Xsum
ASE5 192.192.192.0 192.192.192.2 0x800005f6 751 0xc24d
# advertisements: 1
Checksum total: 0xc24d
Displaying the OSPF routing table
To display the OSPF routing table, enter the Show OSPF Rtab command. For example:
ascend%The output includes the following fieldsshow ospf rtab
DTyp RType Destination Area Cost Flags Next hop(s) #
RTE FIX 192.192.192.0/24 - 1 0x82 0.0.0.170 170
RTE OSPF 194.194.194.2/32 0.0.0.0 20 0x1 194.194.194.3 2
ASBR NONE 192.192.192.2/32 - 0 0x0 None -1
RTE OSPF 192.192.192.2/32 0.0.0.0 0 0x1 0.0.0.170 170
RTE OSPF 194.194.194.3/32 0.0.0.0 10 0x101 194.194.194.3 2
RTE NONE 194.194.194.0/24 - 0 0x2 None -1
ASBR OSPF 192.192.192.3/32 0.0.0.0 10 0x100 194.194.194.3 2
RTE OSPF 192.192.192.3/32 0.0.0.0 10 0x1 194.194.194.3 2
Displaying summarized OSPF database information
To display summarized information about the OSPF database, enter the Show OSPF Database command. For example:
ascend%The output includes the following fields:show ospf databaseRouter Link States (Area: 0.0.0.0)
Type LS ID LS originator Seqno Age Xsum
RTR 192.192.192.2 192.192.192.2 0x800005f8 783 0x6f0b
RTR 192.192.192.3 192.192.192.3 0x800005f8 250 0x6f09
# advertisements: 2
Checksum total: 0xde14
External ASE5 Link States
Type LS ID LS originator Seqno Age Xsum
ASE5 192.192.192.0 192.192.192.2 0x800005f6 783 0xc24d
# advertisements: 1
Checksum total: 0xc24d
Managing multicast routing
The terminal-server command-line interface provides commands to support IP multicast functionality. To display the options, invoke the terminal-server interface (System > Sys Diag > Term Serv) and enter the Show IGMP and/or show Mrouting command with a question mark:
ascend% show igmp ?
show igmp ?		Display help information

show igmp stats		Display IGMP Statistics

show igmp groups		Display IGMP groups Table

show igmp clients		Display IGMP clients
ascend% show mrouting ?
show mrouting ?		Display help information

show mrouting stats		Display MROUTING Statistics
ascend% show igmp groups
IGMP Group address Routing Table Up Time: 0:0:22:17The output includes the following fields:
Hash Group Address Members Expire time Counts
N/A Default route *(Mbone) ...... 2224862
10 224.0.2.250
2 0:3:24 3211 :: 0 S5
1 0:3:21 145 :: 0 S5
0(Mbone) ...... 31901 :: 0 S5
Listing multicast clients
To display a list of multicast clients, enter the Show IGMP Clients command. For example:
ascend% show igmp clients
IGMP ClientsThe output includes the following fields:
Client Version RecvCount CLU ALU
0(Mbone) 1 0 0 0
2 1 39 68 67
1 1 33310 65 65
Displaying multicast activity
To display the number of IGMP packet types sent and received, enter the Show IGMP Stats command. For example:
ascend% show igmp stats
46 packets received.To display the number of multicast packets received and forwarded, enter the Show Mrouting Stats commands. For example:
0 bad checksum packets received.
0 bad version packets received.
0 query packets received.
46 response packets received.
0 leave packets received.
51 packets transmitted.
47 query packets sent.
4 response packets sent.
0 leave packets sent.
ascend% show mrouting stats
34988 packets received.In many cases, the number of packets forwarded is greater than the number of packets received, because packets can be duplicated and forwarded across multiple links.
57040 packets forwarded.
0 packets in error.
91 packets dropped.
0 packets transmitted.
Monitoring Frame Relay connections
The terminal-server command-line interface includes Show FR commands for monitoring Frame Relay in the MAX. To display the options, invoke the terminal-server interface (System > Sys Diag > Term Serv) and enter the Show FR command with a question mark:
ascend% show fr ?
show fr ?		Display help information

show fr stats		Display Frame Relay information

show fr lmi		Display Frame Relay LMI information

show fr dlci [name]		Display all DLCI information or just for [name]

show fr circuits		Display the FR Circuit table
ascend% show fr stats
Name Type Status Speed MTU InFrame OutFrameThe output includes the following fields:
fr1 DCE Down 64000 1532 0 1
fr1-temp DCE Up 64000 1532 0 1
fr1-temp-9 DCE Up 64000 1532 0 0
Displaying link management information
To display Link Management Information (LMI) for each link activated by a Frame Relay profile, enter the Show FR LMI command. For example:
ascend% show fr lmi
T1_617D LMI for fr1

  Invalid Unnumbered info         0  Invalid Prot Disc                0

  Invalid Dummy Call Ref          0  Invalid Msg Type                 0

  Invalid Status Message          0  Invalid Lock Shift               0

  Invalid Information ID          0  Invalid Report Type              0

  Num Status Enqs Sent            0  Num Status Msgs Rcvd             0

  Num Update Status Rcvd          0  Num Status Timeouts           2779
LMI is not on for fr1-tempANSI T1.617 Annex D local in-channel signaling protocol is the basis for this information. (For a full definition of each of the fields reported, see Annex D.)
LMI is not on for fr1-temp-9
ascend% show fr dlci
DLCIs for fr1
DLCIs for fr1-temp
eng-lab-236-Cir DLCI = 17 Status = ACTIVE
		input pkts	0	output pkts	0

		input octets	0	output octets	0

		input FECN	0	input DE	0

		input BECN	0

last time status changed: 03/05/1997  14:44:17
DLCIs for fr1-temp-9
eng-lab-236-Cir-9  DLCI =   16    Status = ACTIVE

		input pkts	0	output pkts	0

		input octets	0	output octets	0

		input FECN	0	input DE	0

		input BECN	0

last time status changed: 03/05/1997  14:45:07
DLCIs not assignedThe output includes the following fields:
Displaying circuit information
The Show FR Circuits command displays the Frame Relay profile name, the DLCI, and the status of configured circuits. For example:
ascend% show fr circuits
cir-9 User Setting Up

fr1-temp-9		16		Up

fr1-temp		17		Up
ascend% set circuit ?
set circuit ? Display help informationTo allow data to flow through a circuit, enter the Set Circuit Active command and append the name of the circuit. parameter. For example:
set circuit active [name] Set the CIRCUIT to active
set circuit inactive [name] Set the CIRCUIT to inactive
ascend% set circuit active circuit-1To turn off data flow without disrupting the state of the DLCIs, enter the Set Circuit Inactive command and append the name of the circuit. For example:
ascend% set circuit inactive circuit-2
Monitoring X.25 and PAD connections
The terminal server supports two commands for obtaining information about X.25 and PAD service. To invoke the terminal server, select System > Sys Diag > Term Serv and press Enter. Displaying information about PAD sessions
To display information about PAD sessions, enter the Show PAD commands. For example:
ascend% show pad
The output includes the following fields:
Port   State        LCN        BPS       User     Called Addr.

1     connected      0         9600      rchan     419342855555

2     connected      0         9600      dhersh
Displaying information about X.25
To display information about X.25 frame and packet layers, enter the Show X25 command. For example:
ascend% show x25
The output includes the following fields:
Frame     State           BytesIn        BytesOut

 1        LinkUp            15             45


Packet     State          BytesIn         BytesOut

 1         Ready             0              0
Field |
Description |
|---|---|
Frame
|
Frame layer and packet layer, respectively.
|
Stat
|
State of the connection at that layer. For the frame layer, the following states can occur:
|
BytesIn
|
Number of bytes the MAX receives from the remote node.
|
BytesOut
|
Number of bytes the MAX transmits to the remote node.
|
Setting up ISDN D-channel X.25 support
PAD service signals
The PAD transmits PAD service signals to the terminal server to acknowledge PAD commands and to inform the user about the internal state of the PAD. The terminal-server user can suppress the reception of PAD service signals by setting PAD parameter #6 to 0 (zero). Figure 5-1 lists the PAD service signals.
X.25 clear cause codes
Table 5-2 shows hexadecimal X.25 clear cause codes.
X.25 diagnostic field values
Table 5-3 shows X.25 diagnostics:
Copyright © 1998, Ascend Communications, Inc. All rights reserved.