
![[Top]](../images/home.jpg)
![[Contents]](../images/contents.jpg)
![[Prev]](../images/previous.jpg)
![[Next]](../images/next.jpg)
![[Last]](../images/index.jpg)


Setting Up User Authentication
This chapter covers the following topics:
- Introducing user authentication
|
- Setting up CLID authentication
|
- Setting up called number authentication
|
- Setting up callback security
|
- Setting up call authentication on serial AIM ports
|
- Setting up authentication of PPP, MP, and MP+ calls
|
- Setting up authentication for dial-in terminal server users
|
- Setting up Combinet authentication
|
- Setting up ARA authentication
|
- Setting up X.25 authentication
|
- Setting up IP addressing
|
- Setting up an authentication server
|
Introducing user authentication
User authentication is a method of identifying and allowing access to specified remote users dialing in over both analog and digital lines.
Types of Authentication
The MAX supports the following types of authentication:
CLID (Calling Line ID)
You can require the MAX to authenticate incoming calls by checking the calling party's phone number. The MAX performs CLID authentication before answering an incoming call. For details about configuring the MAX for CLID authentication, see "Setting up CLID authentication" on page 3-5.
Called Number
Called Number authentication works much like CLID authentication, except that the MAX uses the number called by the remote end to authenticate the connection. The called number appears in an ISDN message as part of the call when DNIS (Dial Number Information Service) is in use. Called Number authentication is also known as DNIS authentication.
Callback
Callback security instructs the MAX to hang up on an incoming caller and immediately initiate a call to that destination. For details about configuring the MAX to use callback security, see "Setting up callback security" on page 3-11.
Name and password
You can configure the MAX to verify an incoming call on the basis of the user's name and password. You can also specify a name and password for outgoing calls. Name and password authentication applies to the types of calls listed in Table 3-1:
Table 3-1. Call types authenticated by name and password requirements
Call Type
|
Description
|
|---|
|
PPP, MP, and MP+
|
You can specify Password Authentication Protocol (PAP), Challenge Handshake Authentication Protocol (CHAP), or Microsoft Challenge Authentication Protocol (MS-CHAP) authentication for name and password verification of incoming and outgoing PPP, MP, or MP+ calls. For details, see "Setting up authentication of PPP, MP, and MP+ calls" on page 3-15.
|
|
Terminal server
|
You can specify that users logging into the terminal server through a V.34, V.42, V.110, or V.120 connection must supply a username and password before gaining admission to the terminal server. For instructions, see "Setting up authentication for dial-in terminal server users" on page 3-23.
|
|
Combinet
|
Combinet authentication uses the remote station's MAC address as its username and allows you to require a password for incoming calls. For details, see "Setting up Combinet authentication" on page 3-28.
|
|
ARA
|
You can specify name and password authentication for AppleTalk callers dialing in through a V.34, V.42, V.120, or X.75 connection. For details, see "Setting up ARA authentication" on page 3-31.
|
|
IP Address
|
You can specify that the MAX authenticate an incoming connection by checking the user's IP address or, you can specify that the MAX assign an IP address to each incoming call. For details, see "Setting up IP addressing" on page 3-38.
|
How user authentication works?
All user authentication relies on the MAX finding a matching profile to verify information presented by the caller. The matching Connection profile or Names/Passwords profile can be resident locally or, the profile can be managed by a third-party security server such as RADIUS, TACACS, or TACACS+.
By default, when you require a profile for authentication the MAX always checks for a Connection profile. If a Connection profile does not exist, the MAX checks for a remote RADIUS, TACACS, or TACACS+ profile. However, you can change this default by setting Local Profile First=No in the External-Auth profile. When Local Profile First=No, the MAX first looks for a remote profile. If it cannot find one, the MAX looks for a local Connection profile.
Note: You can also specify that the Answer profile be used for authentication. See
"Preventing dial-in calls with the Names/Passwords profile" on page 3-35.
This section describes how the MAX authenticates an incoming call, the following events take place:
- Before the MAX answers a call, it checks whether the Answer-Defaults profile requires Calling Line ID (CLID) authentication, called number authentication, or both.
The CLID is the phone number of the calling device, which is not always provided by the WAN carrier. When the profile requires CLID authentication, the caller's phone number must match a phone number specified in a local Connection profile or RADIUS user profile.
The called-party number is the phone number the remote device called to connect to the MAX, but does not include a trunk group or dialing prefix specification. This number is always available if specified in a profile. When the profile requires called-number authentication, the number called must match a called-party number in a local Connection profile or RADIUS user profile.
- If CLID authentication is required or preferred (Id Auth=Require or Prefer) in the Answer profile, or called number authentication is required (Id Auth=Called Require or Called Prefer), the MAX first looks for a matching phone number in a local Connection profile.
If unsuccessful, the MAX then looks for a matching phone number in a RADIUS user profile. If it still cannot find the correct phone number, the MAX hangs up.
If CLID authentication is set to Fallback, the MAX must receive a CLID in the incoming call. The MAX answers the call if the CLID matches the local Connection profile or a RADIUS user profile. If the MAX does not receive a response from RADIUS, it uses the authentication set up in the Answer profile.
- If a matching profile to the CLID or called number is found, the call is answered and further authentication is normally not required. If a matching profile to the CLID or called number is not found and ID Auth=Require or Called Require, the call is not answered.
Note: The RADIUS attribute Ascend-Require-Auth specifies whether additional
authentication is required. For more information, see the MAX RADIUS Configuration
Guide.
- If CLID authentication and called number authentication are not required, or if a matching phone number is found in a local Connection profile or RADIUS user profile, the MAX answers the call.
- The MAX checks its other Answer profile settings.
- If the Answer profile specifies the type of link encapsulation the call uses, the MAX continues checking Answer profile parameters. If the Answer profile does not enable the type of link encapsulation the call uses, the MAX drops the call.
- The MAX checks the value of the Profile Reqd parameter in the Answer profile.
If Profile Reqd=Yes, the MAX must find a Connection profile, Names/Passwords profile, RADIUS user profile, or TACACS/TACACS+ profile to authenticate the call. Setting up Profile Reqd configures user authentication for the following:
- Unencapsulated calls
- Calls using ARA or any other encapsulation listed in step 7
- The MAX prompts the user for a login name and password. If the name and password match a local Connection profile or Names/Passwords profile, the call is authenticated. If no match is found and RADIUS or TACACS remote authentication has been enabled, the MAX requests authentication from the remote server. The MAX clears the call if authentication fails.
- If name and password authentication is required, the MAX attempts to match the caller's name and password to a local Connection profile.
If authentication using a local Connection profile succeeds, the MAX uses the parameters specified in the profile to build the connection.
- If it cannot find a matching Connection profile, the MAX looks for a Names/Passwords profile.
If the MAX finds the user's name and password in a Names/Passwords profile, them to build the connection with the settings in the Answer profile.
Note: The Names/Passwords profile applies only to ARA, PPP, MP, and MP+ calls. It
does not apply to terminal server users.
- If it cannot find a matching Names/Passwords profile, the MAX looks for a RADIUS, TACACS, or TACACS+ profile containing a matching name and password.
If authentication using a RADIUS user profile succeeds, the MAX uses the specified RADIUS attributes to build the connection. The MAX can then forward the call to its bridge/router or other destination. For example, the MAX might forward a terminal server call to a Telnet or TCP host.
If authentication using a TACACS or TACACS+ profile succeeds, the MAX must make a request to the server for information about the resources and services the user can access.
- If name and password authentication is not required (Recv Auth=None or Password Reqd=No in the Answer profile), the MAX can match IP-routed PPP calls by using the IP address specified by the Connection profile.
- If the Answer profile does not require a profile (Profile Reqd=No), the MAX uses Answer profile parameters to build the connection.
Note: You can limit the duration of incoming calls. For instructions, see "Setting Connection
profile parameters" on page 3-30.
No matter which authentication method you choose, you can access authentication and user configuration data stored locally or remotely. You have the following options:
- Local authentication using a Connection profile or a Names/Passwords profile.
- Remote authentication using a TACACS, TACACS+, or RADIUS server. (For details of configuring the MAX to use a TACACS or TACACS+ server, see "Setting up an authentication server" on page 3-42. For details of configuring the MAX to use a RADIUS server, see the MAX RADIUS Configuration Guide.)
- Remote authentication using a AssureNet Defender server. For details of configuring the MAX to use a Defender server, see "Configuring direct Defender server authentication" on page 5-24.
- Security-card authentication. You use an external authentication server, such as an ACE or SafeWord server, and set up your network site to require that users change passwords very frequently (many times per day). For details, see Chapter 3, "Setting Up User Authentication."
Setting up CLID authentication
You can require the MAX to authenticate incoming calls by checking the calling party's phone number (CLID authentication). The MAX performs CLID authentication before answering an incoming call. You can thereby ensure that the call originates from a known location. To set up CLID authentication, use the parameters listed in Table 3-2.
When you set up CLID authentication, you can choose one of the following configurations:
- Authenticate all callers using name, password, and calling line ID.
For details, see "Setting up authentication using a name, password, and calling line ID" on page 3-7.
- Authenticate all callers using a calling line ID only. (For details, see "Setting up authentication using a calling line ID only" on page 3-8.)
- Use an external authentication server, such as a token-card authentication server, to authenticate users after CLID authentication. (For details, see the MAX RADIUS Configuration Guide.)
- Request PAP, CHAP, or MS-CHAP after CLID authentication. (For details, see the MAX RADIUS Configuration Guide.)
General guidelines
Before you set up CLID authentication, keep the following limitations in mind:
- In some installations, the WAN provider might not be able to deliver CLIDs, or a caller might choose to keep a CLID private.
- CLID authentication applies only for connections in which CLID is available end-to-end and ANI (Automatic Number Identification) applies to the call.
- T1 access lines and Switched-56 lines do not support CLID.
- When a user dials into the MAX for a MP or MP+ connection, the calling device might have more than one phone number associated with it. In this type of situation, the CLID is the phone number associated with the channel in use.
- If you set up a RADIUS user profile for callback and CLID-only authentication, the MAX never answers the call, and the caller therefore avoids possible billing charges.
CLID authentication requirement options
The Network Configuration Guide for your MAX provides instructions for setting up CLID authentication and for requiring that a RADIUS entry be used for the CLID authentication. You can also configure Connection Profiles to authenticate using caller ID. Ascend recommends that you perform this function in RADIUS.
When you set up CLID authentication either in RADIUS or in a MAX Connection profile, you must specify what the MAX requires for the CLID authentication. Table 3-3 lists the available options:
Setting up authentication using a name, password, and calling line ID
Note: To authenticate on all three criteria (name, password, and Caller ID), you must specify
RADIUS authentication by setting the Auth parameter to RADIUS. For information, see the
MAX RADIUS Configuration Guide.
To require all callers to pass name, password, and CLID, authentication, proceed as follows:
- In the Ethernet > Answer menu, set Id Auth=Prefer.
The Prefer setting specifies that, whenever CLID is available, the MAX compares the calling party's phone number to the value of the Calling # parameter in the Connection profile or a RADIUS user profile set up for Ascend-CLID.
- If a match is found, and no further authentication is required, the MAX accepts the call.
- If a match is found and the MAX requires further authentication (Profile Reqd=Yes in the Answer profile), the MAX applies authentication using the Recv Auth or Password Reqd parameters in the Answer profile.
- If the CLID is not available, or if the MAX cannot find a match to the calling party number, the MAX applies authentication using the Recv Auth or Password Reqd parameters in the Answer profile.
Note: You can also set Id Auth=Require or Id Auth=Fallback.
- Verify that no local profiles are set up for CLID authentication.
- Set Profile Reqd=Yes.
- For PPP calls, set Recv Auth to the authentication protocol.
- For Combinet calls, set Password Reqd=Yes.
- Set the CLID Timeout Busy parameter to specify whether the MAX returns User Busy when CLID authentication fails because of a RADIUS timeout.
Set CLID Timeout Busy=Yes, to specify that MAX returns User Busy as the disconnect cause when CLID authentication fails because of a RADIUS timeout.
The default value is No. When CLID Timeout Busy=No, the MAX returns Normal Call Clearing as the disconnect cause.
- Set the CLID Fail Busy parameter to specify whether the MAX returns User Busy when CLID authentication fails for any reason other than a RADIUS timeout.
Set CLID Fail Busy=Yes to specify that the MAX returns User Busy when CLID authentication fails for any reason other than a RADIUS timeout.
The default is No. CLID Fail Busy=No specifies that the MAX returns Normal Call Clearing.
You can choose the value for this field regardless of the Server setting because the occurrence of this failure does not depend upon using a RADIUS server.
- Save your changes.
For further information, see the MAX RADIUS Configuration Guide.
Setting up authentication that uses a calling-line-ID only
Although you can configure local Connection profiles for authentication by calling-line-ID only. Ascend recommends that you use RADIUS for this type of configuration.
To require all callers to authenticate by a calling-line-ID only, proceed as follows:
- In the System > Sys Config menu, specify the name of the MAX as the Name parameter.
- In the Ethernet > Answer menu, set Profile Reqd=Yes.
- In the Ethernet > Answer menu, set Id Auth=Require.
The Require setting specifies that the calling party's phone number must match the value of the Calling # parameter in the Connection profile before the MAX can answer the call. If CLID is not available, the MAX does not answer the call.
- Open the Ethernet > Connections menu.
- In the Connection profile, specify the caller's phone number by setting the Calling # parameter.
- Save your changes.
Setting up called number authentication
Called-number authentication works like CLID authentication, except that the MAX uses the number called by the remote end to authenticate the connection. The called number appears in an ISDN message as part of the call when DNIS is in use. Called-number authentication is also known as DNIS authentication.
To set up called-number authentication, use the parameters listed in Table 3-4.
Setting up called-number authentication options
You can choose one of the following configurations for called number authentication:
- Authenticate all callers with name, password, and called number. (For details, see "Setting up authentication using a name, password, and called number" on page 3-10.)
- Authenticate all callers by called-number only. (For details, see "Setting up authentication using the called number only" on page 3-10.)
- Authenticate with an external authentication server, such as a token-card authentication server, to authenticate users after called number authentication.
When you configure called number authentication either in RADIUS or in a MAX Connection profile, you must set the XX profile's ID Auth parameter to specify what the MAX requires for the called-number authentication. Table 3-5 shows the available options.
Setting up authentication using a name, password, and called number
To authenticate on all three criteria (name, password, and called number), you must specify RADIUS authentication by setting the Auth parameter to RADIUS. (For further information, see the MAX RADIUS Configuration Guide.)
To require all callers to pass name, password, and called number authentication. Proceed as follows:
- In the Ethernet > Answer menu, set Id Auth=Called Prefer.
The Prefer setting specifies that whenever the called number is available, the MAX compares the phone number called to the value of Called # in the Connection profile.
- If a match is found, and no further authentication is required, the MAX accepts the call.
- If a match is found and the MAX requires further authentication (Profile Reqd=Yes in the Answer profile), the MAX applies authentication using the Recv Auth or Password Reqd parameters in the Answer profile.
- If the called number is not available, or if the MAX cannot find a match to the calling party number, the MAX applies authentication using the Recv Auth or Password Reqd parameters in the Answer profile.
- Verify that no Connection profiles are set up to authenticate users by called number.
- Set Profile Reqd=Yes.
- For PPP calls, set Recv Auth to the authentication protocol.
- For Combinet calls, set Password Reqd=Yes.
- Save your changes.
Setting up authentication using the called number only
Although you can configure local Connection profiles to authenticate by the called number only, Ascend recommends that you in RADIUS for this type of configuration.
To require all callers to pass a called-number authentication only, proceed as follows:
- In the System > Sys Config menu, set the Name parameter to specify the name of the MAX.
- In the Ethernet > Answer menu, set Profile Reqd=Yes.
- In the Ethernet > Answer menu, set Id Auth=Called Require.
The Called Require setting specifies that the called number must match the value of the Called # parameter in the Connection profile before the MAX can answer the call. If the called number is not available, the MAX does not answer the call.
- Open the Ethernet > Connections menu.
- In the Connection profile, specify the called number by setting the Called # parameter.
- Save your changes.
Setting up callback security
There are two types of callback security: Ascend callback security and Microsoft callback security.
Ascend callback security
Callback security instructs the MAX to hang up on an incoming caller and immediately initiate call back. Callback ensures that the connection is with a known destination.
For outgoing calls, you can configure the MAX to expect a callback from the machine that is called. This prevents problems that arise when CLID is set to Required (ID Auth=Required) on the machine that is expected to call back.
For example, in Figure 3-1 Ping or Telnet is initiated through a MAX to a Pipeline, and CLID is set to Required on the Pipeline (the side that is calling back). The Pipeline rejects the incoming call before answering it. To the MAX (the initiating side), it appears as if the call never got through.
Figure 3-1. Callback connection failure
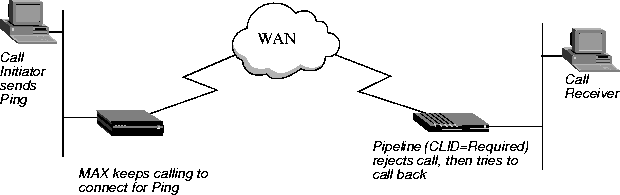
The Callback process is disrupted when protocols like Ping and Telnet continuously try to open a connection.
When Expect Callback is set to Yes, calls that dial out and do not connect (for any reason) are put on a list that disallows any further calls to that destination for 90 seconds. This gives the far end an opportunity to complete the callback. If a call fails for any reason, regardless of whether or not the called machine requires CLID and is attempting a callback, the call initiator must still wait 90 seconds before attempting to call the same number again.
Table 3-6 lists the Ascend callback parameters on the MAX.
For information about setting up callback security in RADIUS, see the MAX RADIUS Configuration Guide.
To set callback security on the MAX, proceed as follows:
- Open the Ethernet > Connections menu.
- Open a Connection profile.
- Set the Dial # parameter to specify the number the MAX dials to reach the remote end of the connection.
For example:
Dial #=555-1213
Note: The MAX can also use the CLID to reach the remote end of the connection, if the
CLID is available.
- Set the Calling # parameter to specify the number the remote device dials to call the MAX.
For example:
Calling #=555-1213
- Open the Telco Options submenu of the Connection profile.
- Turn on callback security by setting the following parameters as shown:
Callback=Yes
Exp Callback=Yes
AnsOrig=Both
Note: Callback does not apply to leased lines (if Call Type=Nailed).
When you set Callback=Yes, you must also set AnsOrig=Both, because the Connection profile must both answer the call and call back the device requesting access. Similarly, the calling device must be able to both dial to and accept calls from the MAX.
To prevent a problem when CLID on the called machine is set to Required, set Exp Callback to Yes.
- Save your changes.
Note: If the Pipeline is the calling device and callback is set up on the MAX, the Pipeline
must be set to Expect Callback.
Microsoft's Callback Control Protocol (CBCP)
Microsoft Corporation developed CBCP to address a need for greater security with PPP connections. The standardized callback option defined in RFC 1570 has a potential security risk because the authentication is performed after the callback. CBCP callback, like Ascend's proprietary callback, occurs after authentication, leaving no potential security hole.
CBCP also offers features not available with the standard callback defined in RFC 1570. The client side supports a configurable time delay to allow users to initialize modems or enable supportive software before the MAX calls the client. You can configure the MAX with a phone number to use for the callback, or you can configure it to allow the client to specify the phone number used for the callback.
Currently, Microsoft's Windows NT 4.0 and Windows 95 software support client-side authentication using CBCP. The MAX supports a CBCP central-site solution.
Ascend's implementation of CBCP
CBCP is an option negotiated during the LCP (Link Control Protocol) negotiation of a PPP session. Although support for CBCP is configured systemwide on the MAX, not every connection must negotiate its use. Parameters exist in the Answer Profile under Ethernet > Answer > PPP Options, and in each Connection Profile under Ethernet > Connections > any Connection profile > Encaps Options. The calling and called sides of a PPP session initiate authentication after acknowledging that CBCP is to be used.
Note: Currently, the MAX does not initiate LCP negotiation of CBCP. The MAX responds to
caller requests to configure CBCP.
The MAX employs the username and password to link a caller with a specific Connection profile or RADIUS User profile. Configured CBCP parameters in that Connection profile specify variables for the callback. If, at any point, the client and the MAX disagree about any CBCP variables, the MAX might drop the connection.
Both sides of the connection must agree on whether the callback phone number is supplied by the client or by the MAX. A new trunk group parameter, configured on the MAX, supplies a trunk group that is prepended to phone numbers when they are supplied by the client.
Table 3-7
lists the MAX parameters for CBCP.
For information about setting up callback security in RADIUS, see the MAX RADIUS Configuration Guide.
Negotiation of CBCP
Following are the steps in CBCP negotiation, from initial connection to MAX callback:
- Caller connects to MAX.
- LCP negotiations begin.
Caller and MAX must agree to use CBCP. Otherwise, the MAX terminates the connection.
- After successful LCP negotiation, both sides have acknowledged that CBCP will be used, and CBCP begins after authentication.
- Caller authenticates itself to MAX. If authentication fails, the MAX terminates the connection.
- The MAX verifies that the profile has CBCP Mode set. CBCP begins.
- The MAX sends a request to determine if a callback is to occur. The caller's configuration must match the CBCP Mode value on the MAX.
The client also supplies to the MAX the number of seconds it should delay before initiating the callback, and, if applicable, the phone number.
- If both sides agree on which phone number the MAX will dial, and the client clears the connection.
- The MAX delays the callback on the basis of the previous negotiation.
- The MAX dials the client, by applying information from the same profile used during negotiation.
Configuring Microsoft's CBCP to use a Connection Profile
To configure CBCP to work with a Connection profile:
- Open the Ethernet > Answer > PPP Options menu.
- Set CBCP Enable = Yes.
- Open the Ethernet > Connections > any Connection profile > Encaps Options menu.
- Set CBCP Mode to the callback mode to be offered the caller.
- If the caller is supplying the phone number, set CBCP Trunk Group to the value (4-9) that the MAX prepends to the number when calling back.
- Save your changes.
Setting up call authentication on serial AIM ports
For calls placed across the Host serial inverse multiplexing ports, you can specify a password in the Call profile for outgoing calls and in the Port configuration profile for incoming calls.
Understanding serial call authentication
Serial call authentication is used only if the receiving unit has a password defined in its Port profile. If the Port profile in the receiving unit does not have a password defined, the units connect without authentication even though the originating unit might have sent authentication parameters.
Note: The MAX only authenticates AIM and BONDING calls. Dual-port calls are not
authenticated.
Upon initial connection of the first channel, the originating unit passes the Call profile password to the authenticating unit. The authenticating unit compares the password received with stored in the Port profile. If the password received matches the stored password, the session is established normally for the remainder of the call. If there is no match, the authenticating unit sends a message back to the originator and drops the session. The port status screen in Host > Dual\>portname\>Message Log indicates that the call failed authentication.
Configuring serial port passwords
To set the passwords, proceed as follows:
- For outgoing AIM or BONDING calls, specify the DBA call password as the Call Password setting in the Host/Dual (or Host/6) \>Port N Menu\>Directory\>appropriate Call profile.
Dynamic Bandwidth Allocation (DBA) enables the MAX to increase bandwidth as needed and drop bandwidth when it is no longer required.
- For incoming AIM and BONDING calls, specify the port password as the Port Password setting in Host/Dual (or Host/6) \>Port N Menu\>Port Config (the Port profile)
Setting up authentication of PPP, MP, and MP+ calls
For PPP, MP, and MP+ calls, the answering unit always determines the authentication method. You can specify PAP, CHAP, or MS-CHAP authentication for name and password verification of incoming PPP, MP, or MP+ calls.
The only MS-CHAP format Ascend units support is the Windows NT version, with DES and MD4 encryption. An Ascend unit can authenticate a Windows NT system and a Windows NT system can authenticate an Ascend unit. For more specific information about the MS-CHAP format, see Microsoft's Web site at:
ftp://ftp.microsoft.com/DEVELOPR/RFC/chapexts.txt
You can also request an authentication protocol for outgoing PPP, MP, and MP+ calls.
For information about how PPP, MP, and MP+ authentication works, see "How does user authentication work?" on page 3-3. For complete information about setting up PPP, MP, and MP+ calls on the MAX, see the Network Configuration Guide for your MAX. For complete information about setting up PPP, MP, and MP+ calls and authentication in RADIUS, see the MAX RADIUS Configuration Guide.
Understanding PPP, MP, and MP+
PPP enables you to set up a single-channel connection to any other device running PPP. A PPP connection can support IP routing, IPX routing, protocol-independent bridging, and password authentication that uses PAP, CHAP, or MS-CHAP.
A PPP connection is usually a bridged or routed network connection initiated in PPP dialup software. Figure 3-2 shows the MAX with a PPP connection to a remote user running Windows 95 with the TCP/IP stack and PPP dialup software.
Figure 3-2. A PPP connection

MP and MP+ are enhancements to PPP for supporting multichannel links.
MP supports a fixed number of multichannel links. The base channel count determines the number of calls to place, and the number of channels does not change. In addition, MP requires that all channels in the connection share the same phone number. That is, the channels on the answering side of the connection must be in a hunt group.
MP+ supports multichannel links and Dynamic Bandwidth Allocation (DBA). DBA enables the MAX to increase bandwidth as needed and drop bandwidth when it is no longer required. MP+ is the only PPP-based encapsulation method that supports DBA. An MP+ connection can combine up to 30 channels into a single high-speed connection.
Understanding PAP, CHAP, and MS-CHAP
For PAP, CHAP, and MS-CHAP authentication, the calling unit and the MAX each share a different secret with the RADIUS server:
- The calling unit's secret is called the remote secret. The MAX does not know the value of this secret.
- The MAX unit's secret is called the NAS secret (because the MAX is an Network Access Server). The calling unit does not know the value of this secret.
PAP, CHAP, or MS-CHAP authentication is required if the incoming PPP call does not include a source IP address.
Note: PAP, CHAP, and MS-CHAP authentication is not available for Combinet, ARA, V.34,
V.42, V.110, or V.120 calls.
How PAP works
PAP is a PPP authentication protocol that provides a simple method for the MAX to establish its identity in a two-way handshake. Authentication takes place only upon initial link establishment and does not use encryption. The remote device must support PAP.
For PAP authentication, the following events take place:
- The calling unit sends the remote secret in the clear to the MAX.
- The MAX uses the NAS secret to encrypt the remote secret.
- The RADIUS server uses the NAS secret to decrypt the remote secret.
- The RADIUS server passes the clear copy of the remote secret to a UNIX or other password validation system.
How CHAP works
CHAP specifies a PPP authentication protocol that is more secure than PAP. It provides a way for the remote device to periodically verify the identity of the MAX by means of a three-way handshake and encryption. Authentication takes place upon initial link establishment. A device can repeat the authentication process any time after the connection is made. The remote device must support CHAP.
For CHAP authentication, the following events take place:
- The MAX sends a random, 128-bit challenge to the calling unit.
- The calling unit uses the remote secret, the challenge, and the PPP packet ID to calculate an MD5 digest.
- The calling unit sends the MD5 digest, the challenge, and the PPP packet ID (but not the remote secret) to the MAX. The MAX never has the remote secret.
- The MAX forwards the digest, along with the original challenge and PPP packet ID to RADIUS.
No encryption is necessary, because MD5 creates a one-way code that cannot be decoded. In addition, RADIUS cannot extract the remote secret. Therefore, it cannot provide a password to a UNIX password system. For this reason, CHAP and UNIX authentication cannot work together.
- The RADIUS server looks up the remote secret from a local database and uses the local version of the remote secret, along with the challenge and the PPP packet ID it received from the MAX, to calculate an MD5 digest.
- The RADIUS server compares the calculated MD5 digest with the digest it received from the MAX.
If the digests are the same, the remote secrets used by the calling unit and the RADIUS server are the same, and the call is authenticated.
How MS-CHAP works
MS-CHAP is similar to CHAP with minor differences. For more information, see the Microsoft Website at
ftp://ftp.microsoft.com/DEVELOPR/RFC/chapexts.txt
Configuring PAP, CHAP, or MS-CHAP for PPP, MP, and MP+ calls
To configure incoming and outgoing connections using PAP, CHAP, or MS-CHAP, you must carry out the following tasks:
Table 3-8 lists the parameters you can set.
Setting systemwide parameters
To set systemwide parameters for PAP, CHAP, or MS-CHAP authentication, proceed as follows:
- To specify the name of the MAX used for making outgoing calls, set the Name parameter in the System > Sys Config menu.
- In the Ethernet > Answer menu, set Profile Reqd=Yes.
This setting specifies that the MAX rejects incoming calls for which it can find no Connection profile, no Names/Passwords profile, and no entry on a remote authentication server.
For an ARA connection, setting Profile Reqd=Yes prohibits Guest access.
- In the Ethernet > Answer > Encaps menu, specify that the unit can receive PPP, MP, or MP+ calls or any combination of PPP, MP, and MP+ calls.
Note: PAP, CHAP, and MS-CHAP authentication is available only if you choose MP,
MPP, or PPP.
- To specify that the unit can receive PPP calls, set PPP=Yes.
- To specify that the unit can receive MP calls, set MP=Yes.
- To specify that the unit can receive MP+ calls, set MPP=Yes.
- In the Ethernet > Answer > PPP Options menu. Set Recv Auth to PAP, CHAP, MS-CHAP, or Either.
When you specify Either, the MAX allows authentication if the remote peer can authenticate with any of the designated authentication schemes. If you specify a protocol, the MAX allows authentication only if the remote peer uses that protocol for authentication.
- If you are using a Names/Passwords profile for an IP routing connection, open the Ethernet > Mod Config > WAN Options menu to begin setting up one or more IP address pools.
Unlike Connection profiles and RADIUS user profiles, Names/Passwords profiles cannot specify an IP address for the calling station. When you use a Names/Passwords profile to authenticate an IP routing connection, the MAX automatically assigns the PPP caller a dynamic IP address as the connection is established. For a call configured in a Names/Passwords profile, the address assignment is always from the pool of addresses defined as Pool #1, if Pool #1 exists and has available addresses. If Pool #1 does not exist or does not have available addresses, the MAX assigns an address from Pool #2.
- Set up address pools by setting the Pool #n Count and Pool #n Start parameters.
The Pool #n Count parameter specifies the number of IP addresses in the IP address pool. Specify a number between 0 and 254. The default value is 0 (zero).
The Pool #n Start parameter specifies the first IP address in the address pool. Specify an IP address in dotted decimal notation. The default value is 0.0.0.0.
You can also set up address pools by setting the Ascend-IP-Pool-Definition attribute. For details, see the MAX RADIUS Configuration Guide.
- Set Pool Only=Yes.
The Pool Only parameter determines whether a caller can reject an IP address assignment and use his or her own IP address. To eliminate the possibility of a caller rejecting the automatic dynamic assignment and spoofing a local, trusted address, set Pool Only=Yes when using Names/Passwords profiles to authenticate IP routing connections.
For a call configured in a Names/Passwords profile, the address assignment is always from the pool of addresses defined as Pool #1, if Pool #1 exists and has available addresses. If Pool #1 does not exist or does not have available addresses, the MAX assigns an address from Pool #2.
If the calling station rejects the assignment, the MAX ends the call.
- Save your changes.
Setting Connection profile parameters
If you set up a Connection profile, you do not need to set up a Names/Passwords profile or a RADIUS user profile. To set Connection profile parameters for PAP, CHAP, or MS-CHAP authentication, proceed as follows:
- Open the Ethernet > Connections menu.
- Open a Connection profile.
- Set the Station parameter to the name of the user or device making the incoming call.
- Set the Encaps parameter to the type of encapsulation used on the link:
- PPP, which specifies Point-to-Point Protocol, ensures basic compatibility with non-Ascend devices. For this setting to work, both the dialing side and the answering side of the link must support PPP.
- MP specifies Multilink Protocol.
- MPP specifies Multilink Protocol Plus (MP+). Both the dialing side and the answering side of the link must support MP+. If only one side supports MP+, the connection attempts to use MP. If MP is not available, the connection uses standard single-channel PPP.
- MP+ calls cannot combine an ISDN BRI channel with a channel on a T1 access line or a T1 PRI line.
- Open the Encaps Options submenu of the Connection profile.
- Set the Recv PW parameter to specify the password that the remote end of the link must send.
If the password specified by Recv PW does not match the remote end's value for Send PW (in a Connection profile), Ascend-Send-Passwd (in a RADIUS user profile), or Ascend-Send-Passwd (in a RADIUS user profile), the MAX disconnects the link.
- Save your changes.
Setting Names/Passwords profile parameters
If you set up a Names/Passwords profile, by default you do not need to set up a Connection profile or a RADIUS user profile. The Names/Passwords profile applies only to ARA, PPP, MP, and MP+ calls and to terminal server users.
You have to set Names/Passwords profile parameters, including the Template Connection # parameter and then activate the profile.
Setting the names and passwords profile parameters
To set Names/Passwords profile parameters for PAP, CHAP, or MS-CHAP authentication, proceed as follows:
- Open the Ethernet menu.
- Open the Names/Passwords menu.
- Open a Names/Passwords profile.
- Set the Name parameter to the name of the user or device making the incoming call.
In a Names/Passwords profile, the Name parameter specifies the username associated with the profile. The name you specify also becomes the name of the profile.
- Set the Recv PW parameter to specify the password that the remote end of the link must send.
If the password specified by Recv PW does not match the remote end's value for Send PW (in a Connection profile), Ascend-Send-Passwd (in a RADIUS user profile), or its equivalent, the MAX disconnects the link.
Setting the Template Connection # parameter
To set the value for Template Connection #, proceed as follows:
Activating the profile
To activate the Names/Passwords profile, proceed as follows:
- Set Active=Yes.
- Save your changes.
When a user calls the MAX and Recv Auth has been set to a value other than None in the Answer profile, the MAX asks for a username and password. If the user enters the username specified by the Name parameter in the Names/Passwords profile, and the password specified by the Recv PW parameter in the Names/Passwords profile, the MAX uses the Answer profile parameters to establish the connection.
Disabling groups of dial-in calls with the Names/Passwords profile
If you specify a Connection profile to use as a template for the Names/Passwords profile, you can specify a single Connection profile for a group of users, but have individual Names/Passwords profiles for each user by setting Template Connection # to a number that refers to a Connection profile. The MAX uses that Connection profile for authentication.
For example, you can set up a Connection profile for the Sales group to use when dialing in, then set up a Names/Passwords profile for each individual salesperson. To prevent a user (or users) from dialing in, use one of the following two methods:
- To prevent a single salesperson from dialing in, deactivate the Names/Passwords profile for that salesperson by setting the Names/Passwords Active flag for the user's Names/Passwords profile to No.
- De-activate the entire Sales group by setting the Connection profile Active flag for the Sales group to No.
Note: You can set the Template Connection # parameter to the same value for different
Names/Passwords profiles.
Using a RADIUS user profile
If you set up a RADIUS user profile, you do not need to set up a Connection profile or a Names/Passwords profile. For information about setting RADIUS attributes for PAP, CHAP, or MS-CHAP authentication, see the MAX RADIUS Configuration Guide.
Requesting PAP, CHAP, or MS-CHAP for outgoing calls
To request PAP, CHAP, or MS-CHAP authentication for an outgoing PPP, MP, or MP+ call, use the parameters listed in Table 3-9.
To specify PAP, CHAP, or MS-CHAP for an outgoing PPP, MP, or MP+ call, proceed as follows:
- Set the Name parameter in the System > Sys Config menu to specify the name of the MAX,
- Open the Ethernet > Connections menu.
- In the Connection profile, set the Encaps parameter to the type of encapsulation used on the link:
- PPP specifies that Point-to-Point Protocol, which ensures basic compatibility with non-Ascend devices. For this setting to work, both the dialing side and the answering side of the link must support PPP.
- MP specifies Multilink Protocol.
- MPP specifies Multilink Protocol Plus. Both the dialing side and the answering side must support MP+. If only one side supports MP+, the connection attempts to use MP. If MP is not available, the connection uses standard single-channel PPP.
- MP+ calls cannot combine an ISDN BRI channel with a channel on a T1 access line or a T1 PRI line.
- In the Encaps Options submenu of the Connection profile, set Send Auth=PAP, CHAP, or MS-CHAP.
This parameter specifies the authentication protocol that the MAX requests when initiating a connection using PPP, MP, or MP+ encapsulation. The answering side of the connection determines which authentication protocol the connection uses (if any).
- In the Encaps Options submenu, set the Send PW parameter to the password that the MAX sends to the remote end of a connection on outgoing calls.
If the password specified by Send PW does not match the remote end's value for Recv PW (in a Connection profile), Ascend-Receive-Secret (in a RADIUS user profile), or its equivalent the remote end disconnects the link.
- Save your changes.
For complete information about setting up an outgoing call in the MAX configuration interface, see the Network Configuration Guide for your MAX. For complete information about setting up an outgoing call and requesting authentication in RADIUS, see the MAX RADIUS Configuration Guide.
Setting up authentication for dial-in terminal server users
This section describes the authentication of users calling into the MAX from a terminal or other device that transmits and receives asynchronous data. Such sessions are called remote- terminal-server sessions even if the user never sees the MAX terminal-server commands or menu.
A remote-terminal-server session uses one of the following types of encapsulation:
Table 3-10. Dial-in terminal-server encapsulation types
Encapsulation Type
|
Description
|
|---|
|
Modem calls
|
The calls originate from either analog or digital modems. Incoming modem calls and incoming digital calls come over the same digital line to the MAX unit's integrated V.34 or V.42 digital modem. An incoming modem call could be initiated from a PC running a communication program like Soft Comm, which causes the user's modem to dial into the MAX. The MAX directs the call to its digital modems, and then forwards the calls to its terminal-server software. The terminal server either displays one of its interfaces to the caller or forwards the call to a Telnet or TCP host on the local network, depending on how it is configured.
|
|
V.110
|
A V.110 card provides eight V.110 modems, each of which enables the MAX to communicate with an asynchronous device over synchronous digital lines. An asynchronous device such as an ISDN modem encapsulates its data in V.110. The V.110 module in the MAX removes the encapsulation and enables an asynchronous session, that is, a terminal server session.
|
|
V.120 calls
|
V.120 terminal adapters such as the BitSurfer (also known as ISDN modems) asynchronous calls with CCITT V.120 encapsulation. The MAX handles V.120 encapsulation in software, so it does not require installed devices to process these calls. After removing the link encapsulation, the MAX forwards these calls to its terminal-server software. The terminal server either displays one of its interfaces to the caller or forwards the call to a Telnet or TCP host on the local network, depending on how it is configured. Or, if it detects PPP encapsulation, it can forward the call to the bridge/router software for an async PPP session.
|
How terminal server authentication works
You can set up standard terminal-server authentication or per-user terminals. This section does not apply to authentication using the Answer or Connection profile as a template (as described in "Using an Answer or Connection profile as a template" on page 3-27).
For more general information about how authentication works in the MAX, see "How does user authentication work?" on page 3-3.
Standard terminal server authentication
Terminal-server authentication makes use of the following parameters and profiles:
- The Passwd parameter in the Ethernet > Mod Config > TServ Options menu
- Connection profile parameters
The following events take place:
- A caller initiates a terminal-server session that uses a V.34, V.42, V.110, or V.120 connection.
- If Security=Full or Partial and Initial Scrn=Cmd in the TServ Options menu, the MAX compares the password to the Passwd parameter.
- If the caller enters the wrong password, the MAX hangs up.
- If the caller enters the proper password or if no password is assigned to the Passwd parameter, the MAX attempts to verify the caller by using Connection profile information.
- If Security=None or Partial and Initial Scrn=Menu, the MAX skips the Passwd parameter and attempts to verify the caller by using the Connection profile information.
Per-user terminal server authentication
Authentication by CLID or called-party number is slightly different from authentication on a general basis. For per-user terminal server authentication, the following events occur:
- Before the MAX answers a call, it checks whether the Answer-Defaults profile requires Calling Line ID (CLID) authentication, called number authentication, or both.
The CLID is the phone number of the calling device, which is not always provided by the WAN carrier. When the profile requires CLID authentication, the caller's phone number must match a phone number specified in a local Connection profile or RADIUS user profile.
Note: The called-party number is the phone number the remote device called to connect
to the MAX, but does not include a trunk group or dialing prefix specification.
This number is always available if specified in a profile. When the profile requires called- number authentication, the number called must match a called-party number in a local Connection profile or RADIUS user profile.
- If CLID authentication is required (Id Auth=Require in the Answer profile) or called-number authentication is required (Id Auth=Called Require), the MAX first looks for a matching phone number in a local Connection profile.
If one does not exist, it then looks for a matching phone number in a RADIUS user profile. If it cannot find the correct phone number, the MAX hangs up.
- If CLID authentication and called-number authentication are not required, or if the MAX finds a matching phone number in a local Connection profile or RADIUS user profile, it answers the call.
- Terminal-server sessions can require a system-terminal-server password in addition to the per-user password.Whether a system-terminal-server user password is required depends upon how the Security and Initial Scrn parameters in the Ethernet profile have been set:
- If Security=None, no authentication is performed.
- If Security=Partial, The MAX checks the value of the Profile Reqd parameter in the Answer profile. If Profile Reqd=Yes, the MAX must find a Connection profile, Names/Passwords profile, RADIUS user profile, or TACACS/TACACS+ profile to authenticate the call.
- If Security=Full, the MAX must find a Connection profile, Names/Passwords profile, RADIUS user profile, or TACACS/TACACS+ profile to authenticate the call, and then prompt the user for the correct name.
- If the name matches a local Connection profile or Names/Passwords profile, the call is authenticated. If no match is found and RADIUS or TACACS remote authentication has been enabled, the MAX requests authentication from the remote server. The MAX clears the call if authentication fails.
Note: If Security=Partial or Security=Full, the user must supply the system-terminal-server
password whenever changing from the menu mode to the command-line mode.
Modem calls
A modem call might contain PPP encapsulation. For example, if the user is running Windows 95 with the TCP/IP stack and Netscape, Windows 95 could be configured to dial up the MAX whenever Netscape is started. In that case, Windows 95 would be running async PPP. After the call is forwarded to the terminal-server software, if PPP encapsulation is detected, the call is forwarded to the bridge/router software for an async PPP session.
For dial-in users using modems, V.120, or V.110 devices to transport asynchronous PPP, see "Setting up authentication of PPP, MP, and MP+ calls" on page 3-15. In these cases, none of the above steps apply. Asynchronous PPP and synchronous PPP sessions are treated identically by the MAX, except that asynchronous PPP sessions do not allow the user access to the MAX unit's terminal-server menus or commands.
This section describes first-level authentication using the Passwd parameter. For information about authentication using a Connection profile, see "Setting Connection profile parameters" on page 3-20.
Dial-in calls with no login host specified
You can configure the MAX to accept dial-in calls when Login-Service=TCP-Clear or Login-Service=Telnet and no Login Host is specified in the RADIUS user profile. This option does not apply to PPP encapsulated calls, because the MAX does not accept dial-in PPP calls with the Login-Service set either to Telnet or TCP-Clear.
To set up the MAX to accept dial-calls when no login server is specified, set Auth TS Secure=No in the Ethernet > Mod Config > Auth menu. The default is Auth TS Secure=Yes, which means the MAX drops dial-in calls if there is no login server and Login-Server is Telnet or TCP-Clear.
Immediate Service
You can specify that a remote terminal-server user can establish a Telnet session immediately after the terminal-server banner appears. To do so, set Immed Service=Telnet and Telnet Host Auth=Yes in Ethernet > Mod Config > TServ Options menu.
Configuring terminal server authentication
Table 3-11 lists the parameters you can use to set up terminal-server password authentication.
To set up password authentication for the terminal-server interface, proceed as follows:
- Open the Ethernet > Mod Config > TServ Options menu.
- Set TS Enabled=Yes.
This setting enables users to access the terminal server interface. If you set this parameter to No, no one can access the terminal server interface.
- Set the Passwd parameter to specify the password a user must enter to begin a terminal- server session.
You can enter up to 20 characters. The password is case sensitive
- Set Security either to Full or Partial.
The Security parameter specifies whether a user must enter a password under different circumstances.
- Partial specifies that the user must enter the system-terminal-server password (as specified by the Passwd parameter) before entering the terminal-server command line mode, but the user is not prompted for a login name or password. The user must enter a terminal-server password when changing between menu-driven mode and command-line mode if Initial Scrn=Cmd or Toggle Scrn=Yes in the TServ Options menu.
- Full specifies that the user must enter the system terminal server password (in the Passwd parameter) before entering the terminal server command line mode. When making the initial connection, the user must enter a login name and password that match a local Connection profile or a RADIUS or TACACS profile. The user must enter a terminal server password when changing between menu-driven mode and command-line mode if Initial Scrn=Cmd or Toggle Scrn=Yes in the TServ Options menu. For information about restricting the options available from the menu-driven interface, see "Restricting Telnet, raw TCP, and Rlogin access to the terminal server" on page 3-28.
- Set the Login Timeout parameter. to specify the number of seconds the MAX waits for a user to complete logging in before disconnecting the user.
You can enter any integer from 0 to 300 seconds. The default is 300 (seconds).
The timer starts when the login prompt appears on the terminal-server screen. It does not reset when the user makes an unsuccessful login attempt. If the user has not logged in successfully by the time indicated by Login Timeout has elapsed, the MAX disconnects the call.
- Set the Login Prompt parameter to specify the prompt the terminal-server displays when asking the user for a login name.
A login prompt can consist of up to 31 characters.
- Set the Password Prompt parameter.
Specify the prompt the terminal-server displays when asking the user for a password.
A login prompt can consist of up to 31 characters.
- Save your changes.
Using an Answer or Connection profile as a template
When a user with a Names/Passwords profile attempts to connect to the terminal server, the MAX uses a template profile constructed from the Answer or Connection profile and the name and password from the Names/Passwords profile. For more information, see the MAX Reference Guide.
If you prefer, you can authenticate a terminal-server user with the name and password from a Names/Passwords profile, with any additional required parameter settings from the Answer or Connection profile. Because the Names/Passwords profile does not include all the parameters a terminal-server session might require, the MAX uses the settings from the Answer profile or Connection profile named in the Template parameter for the additional parameters.
Restricting Telnet, raw TCP, and Rlogin access to the terminal server
For the security of other hosts on your local network, you can:
- Give users a menu of specific hosts to which they can establish a Telnet, raw TCP, or Rlogin session. For information about menu mode, see the Network Configuration Guide for your MAX.
- Specify that users establish a Telnet, raw TCP, or Rlogin session with a device immediately after login, bypassing the terminal server interface altogether. For information about immediate mode, see the Network Configuration Guide for your MAX.
To restrict Telnet, raw TCP, and Rlogin access to the terminal server, proceed as follows:
- Open the Ethernet > Mod Config > TServ Options menu.
- Set the Host #n Addr and Host #n Text parameters to specify the hosts to which users can establish Telnet, raw TCP or Rlogin sessions.
These parameters specify the IP addresses and descriptions of the first, second, third, and fourth hosts to which an operator can Telnet. The user sees a list of hosts only if he or she has access to the menu-driven interface. For details of granting such access, see "Restricting Telnet, raw TCP, and Rlogin access to the terminal server" on page 3-28.
For example, you might specify the following settings:
Host #1 Addr=10.2.3.1/24
Host #1 Text=host1.abc.com
Host #2 Addr=10.2.3.2/24
Host #2 Text=host2.abc.com
Host #3 Addr=10.2.3.3/24
Host #3 Text=host3.abc.com
Host #4 Addr=10.2.3.4/24
Host #4 Text=host4.abc.com
The MAX ignores the Host #n Addr parameter if a RADIUS server supplies the list of Telnet hosts, that is, if you set Remote Conf=Yes. For information about setting up a list of hosts in RADIUS, see the MAX RADIUS Configuration Guide.
- Save your changes.
Setting up Combinet authentication
The MAX supports Combinet bridging to link two LANs as though they were one segment. Figure 3-4 shows a Combinet connection between two networks.
Figure 3-3. A Combinet connection

Combinet bridging uses a physical Media Access Control (MAC) address and a password to authenticate calls. For information about how MAX authentication works, see "How does user authentication work?" on page 3-3.
Table 3-12 lists the Combinet authentication parameters with sample values.
This section describes how to set up authentication for Combinet calls in the MAX configuration interface. For complete information about setting up Combinet calls on the MAX, see the MAX Network Configuration Guide. For information about setting up Combinet calls and Combinet authentication in RADIUS, see the MAX RADIUS Configuration Guide.
Understanding Combinet authentication
To configure incoming connections that support Combinet authentication, you must perform the following tasks:
When the MAX receives a Combinet call, it checks whether COMB encapsulation is enabled in the Answer profile and, if so, whether a Combinet password is required. It then looks for a Connection profile that matches the caller's MAC address (and, if appropriate, the caller's password). If it finds a match, it accepts the call.
If it cannot find a matching Connection profile, the MAX looks for a RADIUS user profile, a TACACS profile, or a TACACS+ profile.
Setting systemwide parameters
To set systemwide parameters for authenticating a Combinet connection, follow these steps:
- Set the Name parameter in the System > Sys Config menu to specify the name of the MAX.
- Open the Ethernet > Answer menu.
- To disable Guest access via Combinet, set Profile Reqd=Yes.
Note that Combinet does not support PAP, CHAP, or MS-CHAP authentication.
- In the Ethernet > Answer > PPP Options menu, set Bridge=Yes.
- In the Ethernet > Answer > Encaps menu, set COMB=Yes.
- To require a password in addition to a MAC address, set Password Reqd=Yes in the Ethernet > Answer > COMB Options menu.
When Password Reqd=Yes, the MAX compares the caller's MAC address to each of these values until it finds a match:
- Set Bridging=Yes in the Ethernet > Mod Config menu.
- Save your changes.
Setting Connection profile parameters
Note: If you set up a Connection profile, you do not need to set up a Names/Passwords
profile or a RADIUS user profile.
To set Connection profile parameters for authenticating a Combinet connection, follow these steps:
- Open the Ethernet > Connections menu.
- Open the Connection profile.
- Set the Station parameter to the MAC address of the device making the call.
- Set Encaps=COMB.
- Set Bridge=Yes.
- To limit the duration of calls that use this Connection profile, specify a value for the MAX Call Duration parameter.
You can specify from 1 to 1440 minutes. The connection is checked once per minute, so the actual time of the call is slightly longer (usually less than a minute longer) than the actual time you set.
The default is MAX Call Duration=0. With this setting, incoming calls are not timed. They can be of unlimited duration.
To specify a maximum duration for calls that use the Answer profile for authentication, you must set the MAX Call Duration value in the Answer profile.
- Open the Encaps Options submenu of the Connection profile.
- If Password Reqd=Yes in the Ethernet > Answer menu, set the Recv PW parameter in the Connection profile to specify the password that the remote end of the link must send.
If the password specified by Recv PW does not match the remote end's value for Send PW (in a Connection profile), Ascend-Send-Passwd (in a RADIUS user profile), Ascend-Send-Secret (in a RADIUS user profile), or its equivalent the MAX disconnects the link.
- For outgoing calls, set the Password Reqd and Send PW parameters.
- Close the Encaps Options submenu.
- To grant access to the Immediate Modem feature, open the Telco options submenu of the Connections profile and set Dialout OK=Yes.
For more information about restricting the Immediate Modem feature, see "Restricting access to the Immediate Modem feature" on page 6-7.
- Save your changes.
Setting up a RADIUS user profile
If you set up a RADIUS user profile, you do not need to set up a Connection profile for Combinet. For information about setting RADIUS attributes for Combinet authentication, see the MAX RADIUS Configuration Guide.
Setting up ARA authentication
The MAX includes a minimal AppleTalk stack for AppleTalk Remote Access (ARA) support. The minimal stack includes a Name Binding Protocol (NBP) network visible entity and an AppleTalk Echo Protocol (AEP) echo responder. You can therefore use standard AppleTalk management and diagnostic tools, such as InterPoll from Apple Computer, to obtain information.
For a pure AppleTalk connection, a Macintosh user must have ARA Client software and an asynchronous modem. For a TCP/IP connection through ARA, the Macintosh must also be running TCP/IP software, such as MacTCP or Open Transport.
ARA is an asynchronous protocol. It supports V.34, V.42, and V.120 calls only. It does not support V.110 calls or synchronous connections.
For more information about how authentication works on the MAX, see "How does user authentication work?" on page 3-3.
This section describes how to set up ARA authentication in the MAX configuration interface. Figure 3-4 shows a Macintosh with an internal modem dialing into the MAX. The Macintosh uses the ARA Client software to communicate with an IP host on the Ethernet.
Figure 3-4. An ARA connection

Table 3-13 shows ARA authentication parameters on the MAX. The values shown are examples.
For complete information about setting up ARA calls on the MAX, see the MAX Network Configuration Guide. For complete information on setting up ARA calls and authentication in RADIUS, see the MAX RADIUS Configuration Guide.
Understanding ARA authentication
To configure incoming connections that support ARA authentication, you must perform the following tasks:
- Set systemwide System, Answer, and Ethernet profile parameters specifying the name of the MAX, the type of encapsulation allowed, the type of authentication in use, and the contents of one or more IP address pools.
- Set up a Connection profile, or a Names/Passwords profile, or a RADIUS user profile, a TACACS profile, or a TACACS+ profile containing settings for each individual connection.
When the MAX receives an ARA call, it checks whether ARA encapsulation is enabled in the Answer profile and, if so, whether a profile is required. It then looks for a Connection profile that matches the caller's name and password. If it finds a match, it accepts the call.
If the MAX cannot find a matching Connection profile, it looks for a Names/Passwords profile. If it cannot find a matching Names/Passwords profile, the MAX looks for a RADIUS user profile, TACACS profile, or TACACS+ profile.
Setting systemwide parameters
To set systemwide parameters for ARA authentication, proceed as follows:
- In the System > Sys Config menu, set the Name parameter to the name of the MAX.
- To disable Guest access via ARA, set Profile Reqd=Yes in the Ethernet > Answer menu.
Note that ARA does not support PAP, CHAP, or MS-CHAP authentication.
- Enable ARA encapsulation by setting ARA=Yes in the Ethernet > Answer > Encaps menu.
- Set Appletalk=Yes in the Ethernet > Mod Config menu.
- If the local Ethernet supports an AppleTalk router with configured zones, set the Zone Name parameter in the Ethernet > Mod Config > AppleTalk menu.
- If you are using a Names/Passwords profile for an IP routing connection, open the Ethernet > Mod Config > WAN Options menu to begin setting up one or more IP address pools.
Unlike Connection profiles and RADIUS user profiles, Names/Passwords profiles cannot specify an IP address for the calling station. When you use a Names/Passwords profile to authenticate an IP routing connection, the MAX automatically assigns the PPP caller a dynamic IP address as the connection is established. For a call configured in a Names/Passwords profile, the address assignment is always from the pool of addresses defined as Pool #1, if Pool #1 exists and has available addresses. If Pool #1 does not exist or does not have available addresses, the MAX assigns an address from Pool #2.
- Designate address pools by setting the Pool #n Count and Pool #n Start parameters.
The Pool #n Count parameter specifies the number of IP addresses in the IP address pool. Specify a number between 0 and 254. The default value is 0 (zero).
The Pool #n Start parameter specifies the first IP address in the address pool. Specify an IP address in dotted decimal notation. The default value is 0.0.0.0.
You can also designate address pools by setting the Ascend-IP-Pool-Definition attribute. For details, see the MAX RADIUS Configuration Guide.
- Set Pool Only=Yes.
The Pool Only parameter determines whether a caller can reject an IP address assignment and use his or her own IP address. To eliminate the possibility of a caller rejecting the automatic dynamic assignment and spoofing a local, trusted address, set Pool Only=Yes when using Names/Passwords profiles to authenticate IP routing connections.
For a call configured in a Names/Passwords profile, the address assignment is always from the pool of addresses defined as Pool #1, if Pool #1 exists and has available addresses. If Pool #1 does not exist or does not have available addresses, the MAX assigns an address from Pool #2.
If the calling station rejects the assignment, the MAX ends the call.
- Save your changes.
Setting Connection profile parameters
Note: If you set up a Connection profile, you do not need to set up a Names/Passwords
profile or a RADIUS user profile.
To set Connection profile parameters for ARA authentication, proceed as follows:
- Open the Ethernet > Connections menu.
- Open the Connection profile.
- Set the Station parameter to the name of the remote device.
- Set Encaps=ARA.
- Open the Encaps Options submenu of the Connection profile.
- Set the Password parameter to specify the ARA password.
- Save your changes.
Setting Names/Passwords profile parameters
The Names/Passwords profile applies only to ARA and PPP-encapsulated calls. It does not apply to terminal server users.
Note: If you set up a Names/Passwords profile, you do not need to set up a Connection
profile or a RADIUS user profile.
To set Names/Passwords profile parameters for ARA authentication, proceed as follows:
- Open the Ethernet menu.
- Open the Names/Passwords menu.
- Open a Names/Passwords profile.
- Set the Name parameter to specify the name of the remote device.
In a Names/Passwords profile, the Name parameter specifies the username associated with the profile. The name you specify also becomes the name of the profile.
- Set the Recv PW parameter to specify the password that the remote end of the link must send.
If the password specified by Recv PW does not match the remote end's value for Send PW (in a Connection profile), Ascend-Send-Passwd (in a RADIUS user profile), or Ascend-Send-Secret (in a RADIUS user profile), the MAX disconnects the link.
- Set the value for Template Connection #:
- Use the default, Template Connection#=0 (the Answer profile), to specify that the Name/Names/Passwords profile uses the Answer Profile as a template.
- This mode supports clients dialing in over PPP and ARA, but does not support a router dialing in.
- Save your changes.
When a user calls the MAX and Recv Auth has been set to a value other than None in the Answer profile, the MAX asks for a username and password. If the user enters the username specified by the Name parameter in the Names/Passwords profile and the password specified by the Recv PW parameter in the Names/Passwords profile, the MAX uses the Answer profile parameters to establish the connection.
Preventing dial-in calls with the Name/Password profile
The Answer profile is the default template for a Name/Password profile, but you can specify the use of a Connection profile as a template for the Name/Password profile. You can specify a single Connection profile for a group of users, but have an individual Name/Password profile for each user by setting Template Connection # to a number that refers to a Connection profile. The MAX uses that Connection profile for authentication.
For example, you can set up a Connection profile for the Sales group to use when dialing in, then set up a Names/Passwords profile for each individual salesperson. To prevent a user from dialing in using one of the two following methods:
- De-activate the Names/Passwords profile for a single salesperson, to prevent that salesperson from dialing in, by setting the Names/Passwords Active flag for the user's Names/Passwords profile to No.
- De-activate the entire Sales group by setting the Connection profile Active flag for the Sales group to No.
Using a RADIUS user profile
If you set up a RADIUS user profile, you do not need to set up a Connection profile or a Names/Passwords profile. For information about setting RADIUS attributes for ARA authentication, see the MAX RADIUS Configuration Guide.
Using a SecurID server with AppleTalk Remote Access (ARA)
A SecurID server can authenticate ARA callers by using the following profiles:
- Connection profile (described in "Setting Connection profile parameters" on page 3-30)
- Password profile (described in "Setting Names/Passwords profile parameters" on page 3-34)
- RADIUS user profile
Authentication using RADIUS and a SecurID server
For authentication with RADIUS and a SecurID server, set Auth=RADIUS/LOGOUT in the Ethernet>Mod Config menu.
The SecurID client module must be version 1.3 or later.
Once the user makes the initial connection, SecurID authentication begins with a pop-up screen on the Macintosh. At this point, the user must enter the User ID and Passcode. When Auth=LOGOUT/RADIUS, the username must be SecurID, and no password should be entered. If the user enters incorrect values, he or she gets two more tries to authenticate before the connection fails.
If the user is required to enter a new PIN, a pop-up screen prompts for this information. The user has three chances to enter the correct PIN. Once the new PIN is accepted, a pop-up screen instructs the Macintosh user to first wait for the token code to change, then log in with the new PIN and token code.
Setting up X.25 authentication
X.25 is an international standard protocol established by the Consultative Committee on International Telephony and Telegraphy (CCITT) to transmit information between users over a WAN. It handles both high-volume data transfers and interactive use of host machines.
X.25 terminals can connect to the MAX in an X.25/PAD or X.25/IP session. The MAX unit's X.25/PAD implementation allows users to access a packet-switched network over a leased line or a nailed-up ISDN connection.
A Packet Assembler/Disassembler (PAD) is an asynchronous terminal concentrator that enables several asynchronous devices to share a single network line. The PAD assembles data from terminals into packets for transmission to an X.25 network, and disassembles incoming packets from the network into a separate data stream for each terminal. In addition to this multiplexing function, the PAD also provides a nearly error-free connection.
The MAX unit's X.25/IP implementation supports the use of IP routing over an X.25 link. It does not support bridging or other routing protocols. Ascend's implementation of IP over X.25 follows the specification for IETF RFC1356 encapsulation. This implementation connects two or more IP networks linked to a public or private packet-switched network (PSPDN).
Table 3-14 lists the parameters for X.25 authentication. The values shown are examples.
.
This section describes how to set up X.25 authentication in the MAX configuration interface. For complete information about setting up X.25 connections on the MAX, see the Network Configuration Guide for your MAX. For complete information about setting up X.25 calls and authentication in RADIUS, see the MAX RADIUS Configuration Guide.
To set up X.25 authentication, proceed as follows:
- Open the Ethernet > Answer menu.
- Set Profile Reqd=Yes.
- Open the Ethernet > Answer > Encaps menu.
- Set X25/PAD=Yes and X25/IP=Yes.
- Open the Ethernet > Answer > PPP Options menu.
- For an X.25/IP user, set Recv Auth=Either.
- Open the Ethernet > Mod Config > TServ Options menu.
- If you want terminal-server users to begin an X.25/PAD session immediately, upon authentication:
- Open the Ethernet > Connections menu.
- Open the X.25 user's Connection profile.
- For an X.25/PAD connection, set Encaps=X.25/PAD. For an X.25/IP connection, set Encaps=X.25/IP.
- For an X.25/IP connection, set the Station name parameter to the name of the remote device.
- Open the Encaps Options submenu of the Connection profile.
- For an X.25/PAD or an X.25/IP connection, set the Recv PW parameter to the password the remote user must enter.
- Save your changes.
Setting up IP addressing
If password authentication is required, the MAX attempts to match each incoming call with a caller's name and password in a local Connection profile, or in a RADIUS user profile. If password authentication is not required for an IP-routed PPP call, the MAX need only match the call with an IP address specified in a Connection profile or in a RADIUS user profile. The IP address in the Connection profile or user profile can be specified either statically or dynamically. However, an address cannot be assigned dynamically to a profile that has been assigned a static address.
The MAX verifies the IP address as part of the PPP negotiation before a call is established. Establishment of a connection involves one of the following sequences of events:
Table 3-15 lists the parameters you can set for IP addressing. The values shown are examples.
You can set additional parameters in Name/Password profile.
See the Network Configuration Guide for your MAX for related information on setting up IP routing connections in the MAX configuration interface. See the MAX RADIUS Configuration Guide for related information on setting up IP routing connections in RADIUS.
Specifying a static IP address
To set up a static IP address that must match a caller's IP address, proceed as follows:
- Open the Ethernet > Answer > PPP Options menu.
- Set Route IP=Yes.
- Open the Ethernet > Connections menu.
- Open the Connection profile for the caller.
- Open the IP Options submenu of the Connection profile.
- To specify a static address, set the LAN Adrs parameter.
- Save your changes.
Assigning a dynamic IP address to a caller requesting one
To configure the MAX to assign an IP address to a caller that requests one, follow these steps
- Open the Ethernet > Answer menu.
- Set Assign Adrs=Yes.
When you specify this setting, the MAX asks the device to accept an address chosen from the pool of addresses specified by the Pool #n Start and Pool #n Count parameters or by the Ascend-IP-Pool-Definition attribute. If the calling end accepts the IP address, the MAX sets the LAN Adrs parameter in the Connection profile to the assigned address.
Note: In some TCP/IP implementations, when the workstation needs the MAX to set the
IP address, you must set the workstation's address to 0.0.0.0. Setting the address to any
other value tells the workstation to use that value and notify the MAX.
- Open the Ethernet > Answer > PPP Options menu.
- Set Route IP=Yes.
- Open the Ethernet > Mod Config > WAN Options menu.
- Specify up address pools by setting the Pool #n Count and Pool #n Start parameters.
The Pool #n Count parameter specifies the number of IP addresses in the IP address pool. Assign a number between 0 and 254. The default value is 0 (zero).
The Pool #n Start parameter specifies the first IP address in the address pool. Assign an IP address in dotted decimal notation. The default value is 0.0.0.0.
You can also specify address pools by setting the Ascend-IP-Pool-Definition attribute in RADIUS. For details, see the MAX RADIUS Configuration Guide.
- Open the Ethernet > Connections menu.
- Open a Connection profile.
- In the Connection profile, set the Pool parameter to the number of the pool to use for the call.
- Save your changes.
Requiring that a caller accept an IP address from the MAX
To require that a caller accept an IP address from the MAX, proceed as follows:
- Open the Ethernet > Answer menu.
- Set Assign Adrs=Yes.
When you specify this setting, the MAX asks the device to accept an chosen address specified from the pool of addresses by the Pool #n Start and Pool #n Count parameters or by the Ascend-IP-Pool-Definition attribute. If the calling end accepts the IP address, the MAX sets the LAN Adrs parameter in the Connection profile to the assigned address.
- Open the Ethernet > Answer > PPP Options menu.
- Set Route IP=Yes.
- Open the Ethernet > Mod Config > WAN Options menu.
- If the assigned address is to be chosen dynamically, specify address pools by setting the Pool #n Count and Pool #n Start parameters.
The Pool #n Count parameter specifies the number of IP addresses in the IP address pool. Specify a number between 0 and 254. The default value is 0 (zero).
The Pool #n Start parameter specifies the first IP address in the address pool. Assign an IP address in dotted decimal notation. The default value is 0.0.0.0.
You can also set up address pools by setting the Ascend-IP-Pool-Definition attribute in RADIUS. For details, see the MAX RADIUS Configuration Guide.
- To require a calling station to accept an IP address from the MAX, set Pool Only=Yes.
This setting requires the calling station to accept the static address specified in a Connection profile or RADIUS user profile, or a dynamic address. If the calling station rejects the assignment, the MAX ends the call.
If you set Pool Only=No, the MAX accepts the IP address specified by the caller.
- Open the Ethernet > Connections menu.
- Open a Connection profile.
- In the Connection profile, set the LAN Adrs parameter to specify a static address, or set the Pool parameter to the number of the pool to use for assigning a dynamic IP address.
- Save your changes.
Using Names/Passwords profiles to prevent IP address spoofing
IP address spoofing is a technique in which outside users pretend to be on the local network in order to obtain unauthorized access.
Unlike Connection profiles and RADIUS user profiles, Names/Passwords profiles cannot specify an IP address for the calling station. When you use a Names/Passwords profile to authenticate an IP routing connection, the MAX automatically assigns the PPP caller a dynamic IP address as the connection is established, ensuring that the user is not spoofing the address. Table 3-16 shows the relevant parameters on the MAX.
Note: You also can set up data filters to prevent IP address spoofing. For details, see "A
sample IP filter to prevent address spoofing" on page 4-12.
To set parameters to prevent IP spoofing, proceed as follows:
- Open the Ethernet menu.
- Open the Names/Passwords menu.
- Open a Names/Passwords profile.
- Set the Name parameter to the name of the user or device making the incoming call.
In a Names/Passwords profile, the Name parameter specifies the username associated with the profile. The name you specify also becomes the name of the profile.
- Set the Recv PW parameter to specify the password that the remote end of the link must send.
If the password specified by Recv PW does not match the remote end's value for Send PW, the MAX disconnects the link.
- Open the Ethernet > Mod Config > WAN Options menu.
- Specify address pools by setting the Pool #n Count and Pool #n Start parameters.
The Pool #n Count parameter specifies the number of IP addresses in the IP address pool. Assign a number between 0 and 254. The default value is 0 (zero).
The Pool #n Start parameter specifies the first IP address in the address pool. Specify an IP address in dotted decimal notation. The default value is 0.0.0.0.
You can also specify up address pools by setting the Ascend-IP-Pool-Definition attribute. For details, see the MAX RADIUS Configuration Guide.
- Set Pool Only=Yes.
The Pool Only parameter determines whether a caller can reject an IP address assignment and use his or her own IP address. To eliminate the possibility of a caller rejecting the automatic dynamic assignment and spoofing a local, trusted address, set Pool Only=Yes.
For a call configured in a Names/Passwords profile, the address assignment is always from the pool of addresses defined as Pool #1, if Pool #1 exists and has available addresses. If Pool #1 does not exist or does not have available addresses, the MAX assigns an address from Pool #2.
If the calling station rejects the assignment, the MAX ends the call.
- Save your changes.
Setting up an authentication server
The MAX supports resident Connection profiles and Names/Passwords profiles for authenticating incoming connections, but the amount of RAM in the unit limits the total number of supported profiles. Many ISPs and other large sites use a third-party authentication server to centrally control, manage, and audit security.
Understanding authentication servers
When the MAX receives an incoming call, it first looks through its resident profiles (Connection and Names/Passwords profiles). If it does not find a matching profile, it checks its Ethernet profile for an authentication server's address. If it finds one, it accesses the authentication database in that server to search for a matching profile. The MAX supports the following types of authentication servers:
Authentication server
|
Description
|
|---|
|
RADIUS
|
Remote Authentication Dial-In User Service (RADIUS) is a protocol originally developed by Livingston Enterprises, and extended by Ascend Communications, Inc. The Ascend extensions let you configure most of the features supported by the resident profiles. The information resides in a database on a PC or UNIX system. The RADIUS daemon on that system accesses the data.
For complete information about installing and configuring a RADIUS server, and about setting up the MAX to operate with a RADIUS server, see the MAX RADIUS Configuration Guide.
|
|
TACACS
|
Terminal Access Concentrator Access Control Server (TACACS) is a simple query/response protocol that enables the MAX to check a user's password and enable or prevent access. TACACS supports Password Authentication Protocol (PAP), Combinet name and password validation, and terminal server validation. It does not support CHAP authentication.
For details about setting up a TACACS server, see the documentation that came with your TACACS software. For information about setting up the MAX to operate with a TACACS server, see "Configuring the MAX to use a TACACS or TACACS+ server" on page 3-43.
|
|
TACACS+
|
TACACS+ is an extension of TACACS. For information about setting up the MAX to operate with a TACACS+ server, see "Configuring the MAX to use a TACACS or TACACS+ server" on page 3-43.
|
|
AssureNet Defender
|
The MAX supports terminal-server authentication through the Defender server. If the MAX is configured to use Defender authentication, the service provided to authenticated users depends on the parameters of the TServ Options submenu in the Ethernet profile.
|
|
ACE
|
The MAX can authenticate terminal server users by directly contacting an ACE server, developed by Security Dynamics. Although SecurID ACE authentication is also indirectly supported through RADIUS, direct support for the SecurID ACE server can provide a significant advantage. For those installations in which other RADIUS features are not required, SecurID ACE support on the Ascend unit decreases the complexity of the system, making the system easier to configure and maintain.
|
Configuring the MAX to use a TACACS or TACACS+ server
To configure the MAX to communicate with a TACACS or TACACS+ server, proceed as follows, as in the following example:
- Open the Ethernet > Mod Config > Auth menu.
X0-X00 Mod Config
  Auth...
  >Auth=TACACS
    Auth Host #1=10.23.45.11
    Auth Host #2=10.23.45.12
    Auth Host #3=10.23.45.13
    Auth Port=1645
    Auth Timeout=5
    Auth Key=N/A
    Auth Pool=N/A
    Auth Req=Yes
    Local Profile First=Yes
    APP Server=No
    APP Host=N/A
    APP Port=N/A
    CLID Timeout Busy=No
    CLID Fail Busy=No
    SecurID DES encryption=N/A
    SecurID host retries=N/A
    SecurID NodeSecret=N/A
- Set Auth=TACACS or TACACS+.
- Set each Auth Host parameter, to specify the IP address of a TACACS or TACACS+ host.
You can specify up to three addresses. The MAX first tries to connect to Auth Host #1. If it receives no response within the time specified by the Auth Timeout parameter, it tries again to connect to Auth Host #1 and waits for the same amount of time. If the MAX does not receive a response within the specified timeout, it sends a request for authentication to Auth Host #2. If it again receives no response within the time specified by Auth Timeout, it tries to connect to the next server on the Auth Host List and repeats the process. If the MAX unit's request again times out, it reinitiates the process with Auth Host #1. The MAX can complete this cycle of requests a maximum of ten times. If the MAX is unsuccessful in obtaining a response from any of the servers on the list, the connection fails.
When it successfully connects to an authentication server, the MAX uses that machine until it fails to serve requests. The MAX does not use the first host until the second machine fails, even if the first host has come back online.
You can specify the same address for all three Auth Host parameters. If you do so, the MAX keeps trying to create a connection to the same server.
- For the Auth Port parameter, enter the UDP port number used by the TACACS or TACACS+ software. For example:
Auth Port=1645
The MAX and the TACACS or TACACS+ software must agree about which UDP port to use for communication, so make sure that the number you specify for the Auth Port parameter matches the number specified in the TACACS or TACACS+ configuration file.
- Set the Auth Timeout parameter to specify the number of seconds the MAX waits for a response to an authentication request.
If the MAX does not receive a response within the time specified by Auth Timeout, it sends the authentication request to the next authentication server specified by the Auth Host parameter.
- Specify whether to use remote authentication before local. The default is Yes.
If you enter No, the MAX tries remote authentication and the MAX waits for authentication to succeed or for the timeout specified in Auth Timeout to expire. This can take longer than the timeout specified for the connection. If the connection times out, all connection attempts to fail.
To prevent this set the value for Auth Timeout low enough not to cause the line to be dropped, but still high enough to permit the unit to respond if it is able to. The recommended time is 3 seconds.
Some authentication methods do not work the same without a remote authenticator as they do with one. Table 3-17 shows authentication methods and the specific information you should consider if you use a particular method with Local Profile First=No.
- Enter the port number for the source port for remote authentication requests.
Type a port number between 0 and 65535. The default value is 0 (zero). If you accept this value, the Ascend unit can use any port number between 1024 and 2000.
You can specify the same port for authentication and accounting requests.
- Save your changes.
Vendor-Specific Attribute (VSA) support
RFC 2138, Remote Authentication Dial In User Service (RADIUS), specifies methods of handling vendor extensions and of encrypting and decrypting the User-Password. The RFC-defined methods differ from the way Ascend has implemented these functions in the past. In the past, Ascend extended RADIUS operations by adding Ascend vendor attributes, such as Ascend-Xmit-Rate, and used its own Ascend algorithm for User-Password encryption.
The MAX supports RADIUS RFC-compliance for the Vendor-Specific Attribute (VSA) and the RFC-defined User-Password encryption algorithm. Ascend maintains backward compatibility by making VSA compatibility mode configurable. However, attributes of Type 91 or smaller are supported only in VSA compatibility mode. Attributes of Type 92 or higher are supported in both VSA compatibility mode and the default mode, which is compatible with older Ascend implementations.
About the Vendor-Specific attribute
RFC 2138 defines the Vendor-Specific attribute (type 26), which encapsulates attributes introduced by vendors. The purpose of the Vendor-Specific attribute is to enable companies to extend RADIUS operations without leading to possible attribute collisions (two attributes with the same type number but different meanings).
The format of Ascend vendor attributes in a request or response is new. The older Ascend format for all attributes is as follows:
 0                   1                   2
 0 1 2 3 4 5 6 7 8 9 0 1 2 3 4 5 6 7 8 9 0
+-+-+-+-+-+-+-+-+-+-+-+-+-+-+-+-+-+-+-+-+-+-
|     Type      |    Length     | Value ...	   +-+-+-+-+-+-+-+-+-+-+-+-+-+-+-+-+-+-+-+-+-+-
The format of the VSA (as defined in RFC 2138) is as follows:
 0                   1                   2                   3
 0 1 2 3 4 5 6 7 8 9 0 1 2 3 4 5 6 7 8 9 0 1 2 3 4 5 6 7 8 9 0 1
+-+-+-+-+-+-+-+-+-+-+-+-+-+-+-+-+-+-+-+-+-+-+-+-+-+-+-+-+-+-+-+-+
|     Type      |  Length       |            Vendor-Id
+-+-+-+-+-+-+-+-+-+-+-+-+-+-+-+-+-+-+-+-+-+-+-+-+-+-+-+-+-+-+-+-+
 Vendor-Id (cont)           | Vendor type   | Vendor length |
+-+-+-+-+-+-+-+-+-+-+-+-+-+-+-+-+-+-+-+-+-+-+-+-+-+-+-+-+-+-+-+-+
|    Attribute-Specific...
+-+-+-+-+-+-+-+-+-+-+-+-+-+-+-
The Type of the VSA is 26. The Length is 8 or greater. Ascend's Vendor-Id is 529.
The Vendor Type, Vendor Length, and Attribute-Specific Value are the same as the Type, Length, and Value of the unencapsulated Ascend attribute found in the current dictionary. For example, the Type of the Ascend-Xmit-Rate attribute is 255. Because it is an integer, it has a Length of 6. The Value is the transmit rate of the connection. So, the fields of the VSA will specify the following values:
- Type = 26
- Length = 12
- Vendor-Id = 529
- Vendor Type = 255
- Vendor Length = 6
- Attribute-Specific Value = transmit-rate
Note: Some vendors have interpreted RFC 2138 to allow packing more than one vendor
attribute in a single VSA. Ascend does not support this use. The MAX sends a single vendor
attribute per VSA. If it receives a VSA that contains more than one vendor attribute, it
recognizes the first vendor attribute and ignores the rest.
Configuring the MAX for VSA compatibility mode
When you configure the MAX to support VSA, the MAX uses the Vendor-Specific attribute to encapsulate Ascend vendor attributes and uses the RFC-defined User-Password encryption algorithm.
When you configure the MAX not to support VSA, which is the default setting, the MAX does not send the Vendor-Specific attribute to the RADIUS server and does not recognize it if the server sends it. The MAX uses the Ascend algorithm when encrypting and decrypting the User-Password attribute, and the Ascend algorithm differs from the RFC-defined algorithm, because it does not null fill the password string to a multiple of 16 bytes before encryption, and the Ascend algorithm does not use the previous segment's hash to calculate the next intermediate value when the password is longer than 16 bytes.
Because you can configure four different functions for RADIUS with each function operating independently of the others and possibly interacting with different RADIUS servers (or clients), the MAX displays four separate VSA-related parameters for specifying whether to operate in the older Ascend mode or in VSA-compatible mode. Following are the relevant parameters, shown with their default settings:
For additional details, see the MAX Reference Guide.
techpubs@ascend.com
Copyright © 1998, Ascend Communications, Inc. All rights
reserved.
 ny Connection profile