[Top][Contents][Prev][Next][Last]Search


Defining Static Filters


Introduction to Ascend filters 4-1
Overview of filter profiles 4-3
Filtering inbound and outbound packets
Sample filters

Introduction to Ascend filters

Static filters are packet filters created by setting parameters in Ethernet > Filters menus.
A packet filter contains rules that specify what the MAX does when it encounters different types of packets. When you specify a packet filter in a RADIUS user profile, the MAX monitors the data stream associated with that profile and takes a specified action when packet contents match the filter rules. Each filter specification either forwards or drops packets. You can apply a filter to inbound packets, outbound packets, or both. In addition, you can specify that the MAX forward or drop those packets that match the rules, or all packets except those that match the rules.

You can set up three types of packet filters on a per-user basis:

Type of filter

Function

Generic filter

Examines the byte- or bit-level contents of a packet. Focuses on certain bytes or bits and compares them with a value defined in the filter. To use generic filters effectively, you need to know the contents of certain bytes in the packets you wish to filter. Protocol specifications are usually the best source of such information.

IP filter

Examines higher level fields specific to IP packets. Focuses on known fields, such as source or destination address, or protocol number. An IP filter operates on logical information that is relatively easy to obtain.

IPX filter

Examines fields specific to IPX packets. You can direct the MAX to filter on the basis of network address, node address and socket number.

How packet filters work

You can specify several filters in a RADIUS user profile. Filter entries apply on a first-match basis. Therefore, the order in which you specify filter entries is significant. When you define a filter in a RADIUS user profile, it applies to data the user sends or receives. If you make changes to a filter, the changes do not take effect until a call uses that profile.

A match occurs at the first successful comparison between a filter and the packet being examined. When a comparison succeeds, the filtering process stops and the MAX applies the forward or drop action to the packet.

If no comparisons succeed, the packet does not match the filter. The MAX does not forward such packets. When no filter is in use, the MAX forwards all packets. But by applying a filter to a connection, you reverse this default. For security purposes, the MAX does not automatically forward nonmatching packets. It requires a rule that explicitly enables such packets to pass.

In a generic filter, all settings work together to specify a location in a packet and a number that the MAX compares to the value in that location. In an IP filter, the MAX makes a set of distinct comparisons in order. When a comparison fails, the packet goes on to the next comparison. When a comparison succeeds, the filtering process stops and the MAX applies the forward or drop action to the packet. The IP filter tests proceed in the following order:

  1. Compare the source address specified by the filter to the source address of the packet. If they are not equal, the comparison fails.

  2. Compare the destination address specified by the filter to the destination address in the packet. If they are not equal, the comparison fails.

  3. If the protocol specified by the filter is zero (which matches any protocol), the comparison succeeds. If it is non-zero and not equal to the protocol field in the packet, the comparison fails.

  4. If the source port specified by the filter does not compare to the source port of the packet as the filter indicates, the comparison fails.

  5. If the destination port specified by the filter does not compare to the destination port of the packet as the filter indicates, the comparison fails.

  6. If the filter specifies a match only if a TCP session is already established, and a TCP session is up, the comparison succeeds.

If both a data filter (which defines packets the MAX can transmit over a connection) and a call filter (which defines packets that can bring up a connection or reset the idle timer for an established link) apply to an interface, the data filter is applied first.

For complete information about how filters work, see the filter configuration chapter in the MAX Network Configuration Guide.

You can also set up filters on the MAX or define firewalls in SecureConnect Manager (SCM), and then specify those filters or firewalls in a RADIUS user profile. When the connection is made the RADIUS user profile determines which filters are used for the connection. For more information, see the MAX RADIUS Configuration Guide, or your SCM documentation.


Note: This chapter describes how to set up and use data filters only. For information about how to configure call filters, see the MAX Network Configuration Guide. For information about IPX SAP filters, which affect which NetWare services the MAX adds to its service table, see the MAX Network Configuration Guide.

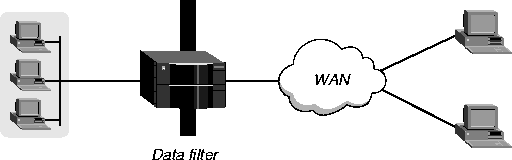
Data filters for dropping or forwarding certain packets

A data filter defines which packets the MAX can transmit over a connection. Many sites use data filters for security purposes, but you can apply data filters for any purpose that requires the MAX to drop or forward only specific packets. For example, you can use data filters to drop packets addressed to particular hosts or to prevent broadcasts from going across the WAN. You can also use data filters to restrict user access to include only specific devices across the WAN.

When you apply a data filter, its forward or drop action affects the actual data stream by preventing certain packets from reaching the Ethernet from the WAN, or vice versa. In Figure 4-1 the vertical bar represents a data filter blocking packets.

Figure 4-1. Data filters can drop or forward certain packets

Data filters do not affect the idle timer, and a data filter applied to a RADIUS user profile does not affect the answering process.

Overview of filter profiles

Figure 4-2 shows how filters are organized and the terminology used to describe each part of a filter.

Figure 4-2. Filter terminology
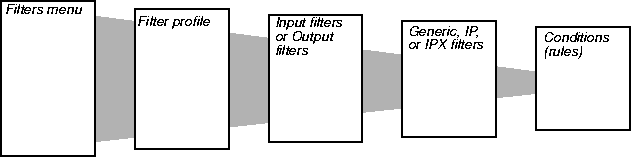
Filters menu

The Filters menu contains a list of numbered profiles. When applying a filter, you identify it by the unique portion of its Filter profile number (for example, 1, 2, 3...). The MAX applies all filter conditions within that profile.

Filter profile

Each profile in the Filters menu defines a set of filters that are applied as a group. The term filter can apply to a filter profile or to one of the individual filters defined in the profile.

Input and output filters

At the top level of a Filter profile are submenus labeled Input Filters and Output Filters. Each submenu contains a list of 12 filters. In each of the 24 filters, you can set parameters to specify conditions. The MAX first applies the Input Filters, in order from 1 to 12, then it applies the Output Filters, in order from 1 to 12.

Generic, IP, or IPX filters

Each input filter or output filter can be a Generic filter, an IP filter, or an IPX filter. The type you specify determines which parameters are included in the filter.

Filter conditions

Filter conditions specify the actual packet characteristics that the MAX examines in the data stream. Generic filter conditions specify locations and values that can appear in any packet. IP filter conditions specify IP-specific packet characteristics, such as address, mask, and port. IPX filter conditions specify IPX-specific packet characteristics, such as network address, node address, and socket number. Once you assign a type, you can open the corresponding submenu to define the packet-level filter conditions.

Filtering inbound and outbound packets

To set up a filter, first assign it a name. Within the filter, activate each individual filter that you want to apply and specify its type. Depending on the type you specify, define the Generic filter conditions, IP filter conditions, or IPX filter conditions. Once you have defined each individual (component) filter, you can apply the entire filter by specifying it in an Answer profile, Connections profile, or Ethernet profile.

Specifying and activating an input or output filter

To begin setting up filters for inbound and outbound packets, proceed as follows:

  1. Open the Filters menu.

  2. Open a Filter profile.

  3. For the Name parameter, specify a descriptive name for the profile. For example,

  4. Open the Input Filters or Output Filters submenu.

    When you select Input Filters, the following menu appears:

    You can specify up to 12 input filters and 12 output filters in a Filter profile. The MAX applies these filters in the order in which they appear. A filter must be activated for the MAX to apply it. Input filters cause the MAX to examine incoming packets. Output filters cause the MAX to examine outgoing packets.

    If the MAX applies the filter as a data filter on Ethernet, it affects packets from the Ethernet into the MAX or from the MAX out to the Ethernet. If the MAX applies a data filter on a WAN interface defined in a Connection profile, the filter affects packets from that WAN interface into the MAX or from the MAX out to that interface.

    If you define only input filters, the default action for output filters is to forward all packets. The same is true in the other direction. If you define only output filters, the default action for inbound packets is to forward them.

  5. Select an In filter or an Out filter to configure.

    When you open an In filter, a menu similar to the following appears:

    When you open an Out filter, the a menu similar to the following appears:

  6. To activate the filter, set Valid=Yes.

    To be able to apply the filter, you must activate it.

  7. Define the filter type: Generic, IP, or filter.

Defining generic filter conditions

If the Type is set to Generic, you can define generic filter conditions. Table 4-1 shows the parameters you can set. The values shown are examples.

Table 4-1. Generic filter conditions

Location

Parameters with sample values

Ethernet\>Filters\>any Filter profile\>Input filters\>01 to 12\>Generic

Ethernet\>Filters\>any Filter profile\>Output filters\>01 to 12\>Generic

Forward=No
Offset=14
Length=8
Mask=ffffffffffffffff
Value=aaa030000000080f3
Compare=Equals
More=No

To specify generic filter conditions, proceed as follows:

  1. Set the Forward parameter to specify whether the MAX forwards or drops packets that meet the conditions.

    If you set Forward to Yes, the MAX forwards a packet that matches the filter definition. If you set Forward to No, the MAX drops a packet that matches the filter definition.

  2. Set the Length, Offset, Mask, and Value parameters.

    The Length parameter indicates the number of bytes in a packet. The Offset parameter specifies the starting position of the bytes the filter examines. The MAX ignores the portion of the packet that exceeds the Length specification. In other words, the Offset parameter hides the left-most bytes of data, while the Length parameter hides the right-most bytes of data.

    The Mask value consists of the same number of bytes as the Length parameter. A mask hides the part of a number that appears behind the binary zeroes in the mask. For example, if Mask is set to FFFF0000 in hexadecimal format, the MAX uses only the first 16 bits in the comparison, because F is set to 1111 in binary format. The MAX applies the value of the Mask parameter before comparing the bytes to the setting of the Value parameter.

  3. Set the Compare parameter to specify how the MAX compares a packet's contents to the Value specified in the filter.

    After applying the Offset, Mask, and Length values to determine the appropriate location in a packet, the MAX compares the contents of that location to the Value parameter.

  4. Set the More parameter to specify whether the current filter is linked to the one immediately following it.

    If More is set to Yes, the MAX can examine multiple non-contiguous bytes within a packet by marrying the current filter to the next one.The match occurs only if both sets of

    bytes contain the specified values. If More is set to No, the MAX makes a separate forward or drop decision for each filter.

Defining IP filter conditions

If Type is set to IP, you can define filter conditions relevant only to TCP, IP, and UDP data packets, including bridged packets.

An IP filter can examine source address, destination address, and IP protocol type and port. Table 4-2 shows the filter conditions you can specify in an IP filter. The values shown are examples.

Table 4-2. IP filter conditions

Location

Parameters with sample values

Ethernet\>Filters\>any Filter profile\>Input filters\>01 to 12\>Ip

Ethernet\>Filters\>any Filter profile\>Output filters\>01 to 12\>Ip

Forward=Yes
Src Mask=255.255.255.192
Src Adrs=192.100.40.128
Dst Mask=0.0.0.0
Dst Adrs=0.0.0.0
Protocol=0
Src Port Cmp=None
Src Port #=N/A
Dst Port Cmp=None
Dst Port #=N/A
TCP Estab=N/A

To specify IP filter conditions, proceed as follows:

  1. Set the Forward parameter to specify whether the MAX forwards or drops packets that match the conditions.

    If you set Forward to Yes, the MAX forwards a packet that matches the filter definition. If you set Forward to No, the MAX drops a packet that matches the filter definition.

  2. Set the Src Adrs parameter to specify the address to which the MAX compares a packet's source address.

    Enter the address in dotted decimal format. The null address (0.0.0.0) is the default. If you accept the default, the MAX does not use the source address as a filtering criterion.

  3. Set the Src Mask parameter to specify the bits the MAX should mask when comparing a packet's source address to the value of the Src Adrs parameter.

    A mask hides the part of a number that appears behind each binary 0 (zero) in the mask. The MAX uses only the part of a number that appears behind binary 1s. The MAX applies the mask to the address by performing a logical AND after both mask and address have been translated into binary format.

    The value 0 (zero) hides all bits, because the decimal value 0 is the binary value 00000000; the value 255 does not mask any bits, because the decimal value 255 is the binary value 11111111. The null address (0.0.0.0) is the default. It specifies that the MAX masks all bits.

    To specify a single source address, set Src Mask to 255.255.255.255 and set Src Adrs to the IP address that the MAX uses for comparison.

  4. Set the Dst Adrs parameter to specify the address to which the MAX compares a packet's destination address.

    Enter the address in dotted decimal format. The null address (0.0.0.0) is the default. If you accept the default, the MAX does not use the destination address as a filtering criterion.

  5. Set the Dst Mask parameter to specify the bits the MAX should mask when comparing a packet's destination address to the value of the Dst Adrs parameter.

  6. Set the Protocol parameter to identify a specific TCP/IP protocol. For example, 6 specifies a TCP packet.

    Common protocols are listed below, but protocol numbers are not limited to this list. For a complete list, see the section on Well-Known Port Numbers in RFC 1700, Assigned Numbers, by Reynolds, J. and Postel, J., October 1994.

  7. Set the Src Port # parameter to specify the port number to which the MAX compares the packet's source port number.

    The Src Port Cmp criterion determines how the MAX carries out the comparison.

    For Src Port #, you can enter a number from 0 to 65535. The default setting is 0 (zero). If you accept the default, the MAX does not use the source port number as a filtering criterion.

  8. Set the Src Port Cmp parameter to specify the type of comparison the MAX makes when applying the Src Port # parameter. You can specify one of the following settings:

    None is the default.

  9. Set the Dst Port # parameter to specify the port number to which the MAX compares the packet's destination port number.

    The Dst Port Cmp criterion determines how the MAX carries out the comparison.

    For Dst Port #, you can enter a number between 0 and 65535. The default setting is 0 (zero). If you accept the default, the MAX does not use the destination port number as a filtering criterion.

  10. Set the Dst Port Cmp parameter specifies the type of comparison the MAX makes when applying the Dst Port # parameter. You can specify any of the settings available for Src Port Cmp (as described in step 8).

    The Dst Port Cmp parameter works only for TCP and UDP packets. You must set Dst Port Cmp to None if the Protocol parameter is not set to 6 (TCP) or 17 (UDP).

  11. Set the TCP Estab parameter to specify whether the filter should match only established TCP connections. You can specify one of these settings:

Defining IPX filter conditions

If Type is set to IPX, you can define filter conditions relevant to IPX packets and bridged packets.

An IPX filter can examine network address, node address, and socket number. Table 4-2 shows the filter conditions you can specify in an IPX filter. The values shown are examples.

Table 4-3. IP filter conditions

Location

Parameters with sample values

Ethernet\>Filters\>any Filter profile\>Input filters\> 01 to 12\>Ipx

Ethernet\>Filters\>any Filter profile\>Output filters\>01 to 12\>Ipx

Forward=Yes
Src Network Adrs=aaaa1234
Dst Network Adrs=bc34aa56
Src Node Adrs=111111111111
Dst Node Adrs=00000000000
Src Socket #=0451
Src Socket Cmp=Eql
Dst Socket #=N/A
Dst Socket Cmp=None

To specify IPX filter conditions, perform any or all of the following:

  1. Set the Forward parameter to specify whether the MAX forwards or drops packets that meet the conditions.

    If you set Forward to Yes, the MAX forwards a packet that matches the filter definition. When you set Forward to No, the MAX drops a packet that matches the filter definition.

  2. Set Src Network Adrs to specify the address to which the MAX compares a packet's source network address.

    Enter the address in hexadecimal format. The null address (000000000000) is the default. If you accept the default, the MAX does not use the source network address as a filtering criterion.

  3. Set Dst Network Adrs to specify the address to which the MAX compares a packet's destination network address.

    Enter the address in hexadecimal. The null address (000000000000) is the default. If you accept the default, the MAX does not use the destination network address as a filtering criterion.

  4. Set Src Node Adrs to specify the node address to which the MAX compares a packet's source node address.

    Enter the address in hexadecimal. The null address (000000000000) is the default. If you accept the default, the MAX does not use the source node address as a filtering criterion.

  5. Set Dest Node Adrs to specify the node address to which the MAX compares a packet's source node address.

    Enter the address in hexadecimal format. The null address (000000000000) is the default. If you accept the default, the MAX does not use the destination node address as a filtering criterion.

  6. Set the Src Socket # parameter to identify a specific IPX socket. For example, 0451is the socket used for NetWare file services.

  7. Set the Src Socket Cmp parameter to specify the type of comparison the MAX makes when applying the Src Socket # parameter.

  8. Set the Dst Socket # parameter to identify a specific IPX socket. For example, 0451is the socket used for NetWare file services.

  9. Set the Dst Socket Cmp parameter to specify the type of comparison the MAX makes when applying the Dest Socket # parameter.

Specifying a data filter in a profile

Using the Data Filter parameter, you can specify a data filter in an Answer profile, a Connection profile, or an Ethernet profile. Keep the following information in mind:

Specifying a data filter for the WAN interface

To define which packets can cross the WAN interface, proceed as follows:

  1. Open a Connection profile (under Ethernet > Connections) or the Ethernet > Answer menu.

  2. Open the Session Options menu.

  3. Set the Data Filter parameter to specify a data filter.

    If you set Data Filter to 0 (zero), the MAX forwards all data packets.

    If IPX client bridging is in use (Handle IPX is set to Client in the Connection profile), set the Data Filter parameter to 0 (zero).

  4. Close the Connection profile or Answer profile and save your changes.

A filter applied to a Connection or Answer profile takes effect only when the connection goes from an offline state to a call-placed state.

Specifying a data filter for the local Ethernet interface

To define which packets can cross the local Ethernet interface, proceed as follows:

  1. Open the Ethernet > Mod Config > Ether Options menu.

  2. Set the Filter parameter to specify a data filter.

    If you set Filter to 0 (zero), the MAX forwards all data packets.

    If IPX client bridging is in use (Handle IPX is set to Client in the Connection profile), set the Filter parameter to 0 (zero).

  3. Save your changes.

A filter applied to the Ethernet interface takes effect immediately. If you change the Filter profile definition, the new filters apply as soon as you save the Filter profile.

Sample filters

This section provides a step-by-step examples of creating Filter profiles and defining IP filters for network security purposes.

A sample IP filter to prevent address spoofing

IP address spoofing is a technique in which outside users pretend to be on the local network in order to obtain unauthorized access. This section shows how to define an IP data filter whose purpose is to prevent spoofing of local IP addresses. You can also use Password profiles to prevent IP address spoofing (for details, see Using Names/Passwords profiles to prevent IP address spoofing).

In this example, the filter first defines input filters that drop (inbound) packets whose source address is on the local IP network or is the loopback address (127.0.0.0). The third input filter defines every other source address (0.0.0.0) and specifies that inbound packets with those source addresses are forwarded.

The data filter then defines an output filter that drops all outbound packets with nonlocal source addresses.

This example assumes a local IP network address of 192.100.50.128, with a subnet mask of 255.255.255.192. Of course, you use your own local IP address and mask when defining a Filter profile.

To define an IP data filter to prevent address spoofing, proceed as follows:

  1. Select an unnamed Filter profile in the Filters menu, and press Enter.

    For example, select 50-404:

  2. Assign a name to the Filter profile.

    For example:

  3. Open the Input Filters submenu

  4. Open In filter 01.

  5. Set Valid to Yes and Type to IP.

  6. Open the IP submenu and specify the following conditions:

    The Src Mask parameter specifies the local subnet mask, and the Src Adrs parameter specifies the local IP address. If an incoming packet has the local address, the MAX does not forward it onto the Ethernet.

  7. Close In filter 01 and open In filter 02.

  8. Set Valid to Yes and Type to IP.

  9. Open the IP submenu and specify the following conditions:

    These conditions specify the loopback address in the Src Mask and Src Adrs fields. If an incoming packet has this address, the MAX does not forward it onto the Ethernet.

  10. Close In filter 02, and then open In filter 03.

  11. Set Valid to Yes and Type to IP.

  12. Open the IP submenu and specify the following conditions:

    These conditions specify every other source address (0.0.0.0). If an incoming packet has any nonlocal source address, the MAX does not forward it onto the Ethernet.

  13. Close In filter 03 and return to the top level of the no spoofing Filter profile.

  14. Open the Output Filters submenu, and select Out filter 01.

  15. Set Valid to Yes and Type to IP.

  16. Open the IP submenu and specify the following conditions:

    The Src Mask parameter specifies the local subnet mask, and the Src Adrs parameter specifies the local IP address. If an outgoing packet has a local source address, the MAX forwards it.

  17. Close the Filter profile and save the changes.

A sample IP filter for more complex security issues

This section illustrates some of the issues you might need to consider when writing your own IP filters. The sample filter presented here does not address the fine points of network security, but you can use it as a starting point and augment it to address your security requirements.

In this example, the local network supports a Web server and the administrator needs to carry out the following tasks:

However, many local IP hosts need to dial out to the Internet and use IP-based applications such as Telnet or FTP. Therefore, their response packets need to be directed appropriately to the originating host. In this example, the Web server's IP address is 192.9.250.5.

Each input filter is defined as described in the following sections.

In filter 01

The first input filter specifies the Web server's IP address as the destination and sets IP forwarding to Yes. The MAX forwards all IP packets received with that destination address. The parameter settings are as follows:

In filter 01...Ip...Forward=Yes
In filter 01...Ip...Src Mask=0.0.0.0
In filter 01...Ip...Src Adrs=0.0.0.0
In filter 01...Ip...Dst Mask=255.255.255.255
In filter 01...Ip...Dst Adrs=192.9.250.5
In filter 01...Ip...Protocol=6
In filter 01...Ip...Src Port Cmp=None
In filter 01...Ip...Src Port #=N/A
In filter 01...Ip...Dst Port Cmp=Eql
In filter 01...Ip...Dst Port #=80
In filter 01.Ip...TCP Estab=No

In filter 02

The second input filter specifies TCP packets (Protocol is set to 6) from any address and to any address. The filter forwards them if the destination port number is greater than that of the source port. For example, Telnet requests go out on port 23 and responses come back on some random port above port 1023. Therefore, this filter defines packets coming back to respond to a user's request to Telnet to a remote host. The parameter settings are as follows:

In filter 02...Ip...Forward=Yes
In filter 02...Ip...Src Mask=0.0.0.0
In filter 02...Ip...Src Adrs=0.0.0.0
In filter 02...Ip...Dst Mask=0.0.0.0
In filter 02...Ip...Dst Adrs=0.0.0.0
In filter 02...Ip...Protocol=6
In filter 02...Ip...Src Port Cmp=None
In filter 02...Ip...Src Port #=N/A
In filter 02...Ip...Dst Port Cmp=Gtr
In filter 02...Ip...Dst Port #=1023
In filter 02...Ip...TCP Estab=No

In filter 03

The third input filter specifies UDP packets (Protocol is set to 17) from any address and to any address. The filter forwards them if the destination port number is greater than that of the source port. For example, suppose a RIP packet goes out as a UDP packet to destination port 520. The response to this request goes to a random destination port greater than 1023. The parameter settings are as follows:

In filter 03...Ip...Forward=Yes
In filter 03...Ip...Src Mask=0.0.0.0
In filter 03...Ip...Src Adrs=0.0.0.0
In filter 03...Ip...Dst Mask=0.0.0.0
In filter 03...Ip...Dst Adrs=0.0.0.0
In filter 03...Ip...Protocol=17
In filter 03...Ip...Src Port Cmp=None
In filter 03...Ip...Src Port #=N/A
In filter 03...Ip...Dst Port Cmp=Gtr
In filter 03...Ip...Dst Port #=1023
In filter 03.Ip...TCP Estab=No

In filter 04

The fourth input filter specifies unrestricted Pings and Traceroutes. ICMP does not use ports like TCP and UDP, so a port comparison is unnecessary. The parameter settings are as follows

In filter 04...Ip...Forward=Yes
In filter 04...Ip...Src Mask=0.0.0.0
In filter 04...Ip...Src Adrs=0.0.0.0
In filter 04...Ip...Dst Mask=0.0.0.0
In filter 04...Ip...Dst Adrs=0.0.0.0
In filter 04...Ip...Protocol=1
In filter 04...Ip...Src Port Cmp=None
In filter 04...Ip...Src Port #=N/A
In filter 04...Ip...Dst Port Cmp=None
In filter 04...Ip...Dst Port #=N/A
In filter 04.Ip...TCP Estab=No


[Top][Contents][Prev][Next][Last]Search

techpubs@ascend.com

Copyright © 1998, Ascend Communications, Inc. All rights reserved.