
User's Manual
|
| RabbitCore RCM4500W User's Manual |
3. Running Sample Programs
To develop and debug programs for the RCM4510W (and for all other Rabbit hardware), you must install and use Dynamic C. This chapter provides a tour of its major features with respect to the RCM4510W.
3.1 Introduction
To help familiarize you with the RCM4510W modules, Dynamic C includes several sample programs. Loading, executing, and studying these programs will give you a solid hands-on overview of the RCM4510W's capabilities, as well as a quick start with Dynamic C as an application development tool.
This chapter provides sample programs that illustrate the digital I/O and serial capabilities of the RCM4510W RabbitCore module. Section 6.2 discusses the sample programs that illustrate the ZigBee features.
NOTE The sample programs assume that you have at least an elementary grasp of the C language. If you do not, see the introductory pages of the Dynamic C User's Manual for a suggested reading list. In order to run the sample programs discussed in this chapter and elsewhere in this manual,
- Your module must be plugged in to the Prototyping Board as described in Chapter 2, "Getting Started."
- Dynamic C must be installed and running on your PC.
- The programming cable must connect the programming header on the module to your PC.
- Power must be applied to the module through the Prototyping Board.
Refer to Chapter 2, "Getting Started," if you need further information on these steps.
To run a sample program, open it with the File menu, then compile and run it by pressing F9.
Each sample program has comments that describe the purpose and function of the program. Follow the instructions at the beginning of the sample program.
More complete information on Dynamic C is provided in the Dynamic C User's Manual.
3.2 Sample Programs
Of the many sample programs included with Dynamic C, several are specific to the RCM4510W modules. These programs will be found in the
-SAMPLES\RCM4500Wfolder.
CONTROLLED.C—Demonstrates use of the digital outputs by having you turn LEDs DS2 and DS3 on the Prototyping Board on or off from the STDIO window on your PC.Parallel Port B bit 2 = LED DS2
Parallel Port B bit 3 = LED DS3Once you compile and run
CONTROLLED.C, the following display will appear in the Dynamic C STDIO window.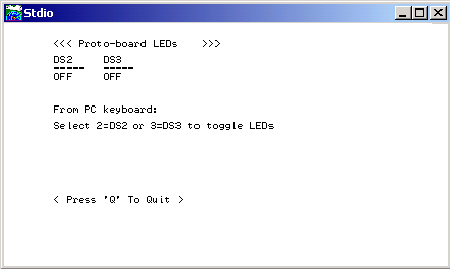
Press "2" or "3" on your keyboard to select LED DS2 or DS3 on the Prototyping Board. Then follow the prompt in the Dynamic C STDIO window to turn the LED ON or OFF. A logic low will light up the LED you selected.
FLASHLED1.C—demonstrates the use of assembly language to flash LEDs DS2 and DS3 on the Prototyping Board at different rates. Once you have compiled and run this program, LEDs DS2 and DS3 will flash on/off at different rates.
FLASHLED2.C—demonstrates the use of cofunctions and costatements to flash LEDs DS2 and DS3 on the Prototyping Board at different rates. Once you have compiled and run this program, LEDs DS2 and DS3 will flash on/off at different rates.
TAMPERDETECTION.C—demonstrates how to detect an attempt to enter the bootstrap mode. When an attempt is detected, the battery-backed onchip-encryption RAM on the Rabbit 4000 is erased. This battery-backed onchip-encryption RAM can be useful to store data such as an AES encryption key from a remote location.This sample program shows how to load and read the battery-backed onchip-encryption RAM and how to enable a visual indicator.
Once this sample is compiled and running (you pressed the F9 key while the sample program is open), remove the programming cable and press the reset button on the Prototyping Board to reset the module. LEDs DS2 and DS3 will be flashing on and off.
Now press switch S2 to load the battery-backed RAM with the encryption key. The LEDs are now on continuously. Notice that the LEDs will stay on even when you press the reset button on the Prototyping Board.
Reconnect the programming cable briefly and unplug it again to simulate an attempt to access the onchip-encryption RAM. The LEDs will be flashing because the battery-backed onchip-encryption RAM has been erased. Notice that the LEDs will continue flashing even when you press the reset button on the Prototyping Board.
You may press switch S2 again and repeat the last steps to watch the LEDs.
TOGGLESWITCH.C—demonstrates the use of costatements to detect switch presses using the press-and-release method of debouncing. LEDs DS2 and DS3 on the Prototyping Board are turned on and off when you press switches S2 and S3. S2 and S3 are controlled by PB4 and PB5 respectively.Once you have loaded and executed these five programs and have an understanding of how Dynamic C and the RCM4510W modules interact, you can move on and try the other sample programs.
3.2.1 Serial Communication
The following sample programs are found in the
SAMPLES\RCM4500W\SERIALfolder.
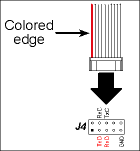
FLOWCONTROL.C—This program demonstrates how to configure Serial Port D for CTS/RTS flow control with serial data coming from Serial Port C (TxC) at 115,200 bps. The serial data received are displayed in the STDIO window.To set up the Prototyping Board, you will need to tie TxD and RxD together on the RS-232 header at J4, and you will also tie TxC and RxC together using the jumpers supplied in the Development Kit as shown in the diagram.

A repeating triangular pattern should print out in the STDIO window. The program will periodically switch flow control on or off to demonstrate the effect of flow control.
If you have two Prototyping Boards with modules, run this sample program on the sending board, then disconnect the programming cable and reset the sending board so that the module is operating in the Run mode. Connect TxC, TxD, and GND on the sending board to RxC, RxD, and GND on the other board, then, with the programming cable attached to the other module, run the sample program.
PARITY.C—This program demonstrates the use of parity modes by repeatedly sending byte values 0–127 from Serial Port C to Serial Port D. The program will switch between generating parity or not on Serial Port C. Serial Port D will always be checking parity, so parity errors should occur during every other sequence.
To set up the Prototyping Board, you will need to tie TxC and RxD together on the RS-232 header at J4 using one of the jumpers supplied in the Development Kit as shown in the diagram.
The Dynamic C STDIO window will display the error sequence.
SERDMA.C—This program demonstrates using DMA to transfer data from a circular buffer to the serial port and vice versa. The Dynamic C STDIO window is used to view or clear the buffer.Before you compile and run the sample program, you will need to connect the RS-232 header at J4 to your PC as shown in the diagram using the serial to DB9 cable supplied in the Development Kit.
Once you have compiled and run the sample program, start Tera Term or another terminal emulation program to connect to the selected PC serial port at a baud rate of 115,200 bps. You can observe the output in the Dynamic C STDIO window as you type in Tera Term, and you can also use the Dynamic C STDIO window to clear the buffer.
The Tera Term utility can be downloaded from hp.vector.co.jp/authors/VA002416/teraterm.html.
SIMPLE3WIRE.C—This program demonstrates basic RS-232 serial communication. Lower case characters are sent on TxC, and are received by RxD. The received characters are converted to upper case and are sent out on TxD, are received on RxC, and are displayed in the Dynamic C STDIO window.
To set up the Prototyping Board, you will need to tie TxD and RxC together on the RS-232 header at J4, and you will also tie RxD and TxC together using the jumpers supplied in the Development Kit as shown in the diagram.
SIMPLE5WIRE.C—This program demonstrates 5-wire RS-232 serial communication with flow control on Serial Port D and data flow on Serial Port C.To set up the Prototyping Board, you will need to tie TxD and RxD together on the RS-232 header at J4, and you will also tie TxC and RxC together using the jumpers supplied in the Development Kit as shown in the diagram.
Once you have compiled and run this program, you can test flow control by disconnecting the TxD jumper from RxD while the program is running. Characters will no longer appear in the STDIO window, and will display again once TxD is connected back to RxD.
If you have two Prototyping Boards with modules, run this sample program on the sending board, then disconnect the programming cable and reset the sending board so that the module is operating in the Run mode. Connect TxC, TxD, and GND on the sending board to RxC, RxD, and GND on the other board, then, with the programming cable attached to the other module, run the sample program. Once you have compiled and run this program, you can test flow control by disconnecting TxD from RxD as before while the program is running. Since the J4 header locations on the two Prototyping Boards are connected with wires, there are no slip-on jumpers at J4 on either Prototyping Board.
SWITCHCHAR.C—This program demonstrates transmitting and then receiving an ASCII string on Serial Ports C and D. It also displays the serial data received from both ports in the STDIO window.To set up the Prototyping Board, you will need to tie TxD and RxC together on the RS-232 header at J4, and you will also tie RxD and TxC together using the jumpers supplied in the Development Kit as shown in the diagram.
Once you have compiled and run this program, press and release switches S2 and S3 on the Prototyping Board. The data sent between the serial ports will be displayed in the STDIO window.
IOCONFIG_SWITCHECHO.C—This program demonstrates how to set up Serial Ports E and F, which then transmit and then receive an ASCII string when switch S2 or S3 is pressed. The echoed serial data are displayed in the Dynamic C STDIO window.Note that the I/O lines that carry the Serial Port E and F signals are not the Rabbit 4000 defaults. The Serial Port E and F I/O lines are configured by calling the library function
serEFconfig()that was generated by the Rabbit 4000IOCONFIG.EXEutility program.Note that the
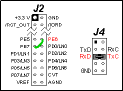
RCM45_29MHZ_IOCONFIG.LIBlibrary generated byIOCONFIG.EXEto support this sample program is provided in the Dynamic CSAMPLES\RCM4500W\SERIALfolder.Serial Port E is configured to use Parallel Port E bits PE6 and PE7. These signals are available on the Prototyping Board's Module Extension Header (header J2).
Serial Port F is configured to use Parallel Port C bits PC2 and PC3. These signals are available on the Prototyping Board's RS-232 connector (header J4).
Serial Port D is left in its default configuration, using Parallel Port C bits PC0 and PC1. These signals are available on the Prototyping Board's RS-232 connector (header J4). Serial Port D transmits and then receives an ASCII string with Serial Port F when switch S3 is pressed.
To set up the Prototyping Board, you will need to tie TxC and RxD together on the RS-232 header at J4 using the jumpers supplied in the Development Kit; you will also tie TxE (PE6) and RxE (PE7) together with a soldered wire or with a wire jumper if you have soldered in the IDC header supplied with the accessory parts in the Development Kit.
Once you have compiled and run this program, press and release switches S2 or S3 on the Prototyping Board. The data echoed between the serial ports will be displayed in the STDIO window.
3.2.2 Real-Time Clock
If you plan to use the real-time clock functionality in your application, you will need to set the real-time clock. Use the
SETRTCKB.Csample program from the Dynamic CSAMPLES\RTCLOCKfolder, and follow the onscreen prompts. TheRTC_TEST.Csample program in the Dynamic CSAMPLES\RTCLOCKfolder provides additional examples of how to read and set the real-time clock.3.2.3 ZigBee Sample Programs
Section 6.2 describes the sample programs associated with the XBee RF module.
| Rabbit—A Digi International Brand www.rabbit.com |