Getting Started
| Rabbit 2000 Dev Kit Getting Started |
|
3. Sample Programs
A series of sample programs is provided in the Dynamic C
SAMPLES/JACKRABfolder. The sample programs are listed in Table 1.
Table 1. BL1810 Sample Programs
The first five sample programs provide a step-by-step introduction to the BL1810 board. Additional sample programs illustrate more advanced topics.
Each sample program has comments that describe the purpose and function of the program. Loading, executing and studying these programs will give you a solid hands-on overview of the BL1810's capabilities, as well as a quick start with Dynamic C as an application development tool. These programs are intended to serve as tutorials, but then can also be used as starting points or building blocks for your own applications.
NOTE It is assumed in this section that you have at least an elementary grasp of ANSI C. If you do not, see the introductory pages of the Dynamic C User's Manual for a suggested reading list. Before running any of these sample program, make sure that your BL1810 is connected to the Prototyping Board and to your PC as described in Section 2.3, "Development Hardware Connections."
To run a sample program, open it with the File menu (if it is not already open), then compile and run it by pressing F9 or by selecting Run in the Run menu.
3.1 Running Sample Program DEMOJR1.C
This sample program can be used to illustrate some of the functions of Dynamic C.
First, open the file
DEMOJR1.C, which is in theSAMPLES/JACKRABfolder. The program will appear in a window, as shown in Figure 4 below (minus some comments). Use the mouse to place the cursor on the function name WrPortI in the program and type <Ctrl-H>. This will bring up a documentation box for the functionWrPortI. In general, you can do this with all functions in Dynamic C libraries, including libraries you write yourself. Close the documentation box and continue.To run the program
DEMOJR1.C, load it with the File > Open menu, compile it using the Compile menu, and then run it by selecting Run in the Run menu. The LED on the Development Board should start flashing if everything went well. If this doesn't work review the following points.
- The target should be ready, which is indicated by the message "BIOS successfully compiled..." If you did not receive this message or you get a communication error, recompile the BIOS by typing <Ctrl-Y> or select Recompile BIOS from the Compile menu.
- A message reports that "No Rabbit processor detected" in cases where the BL1810 and Prototyping Board are not connected together, the wall transformer is not connected, or is not plugged in. (The red power LED lights whenever power is connected.)
- The programming cable must be connected to the BL1810. (The colored wire on the programming cable is closest to pin 1 on header J3 on the BL1810, as shown in Figure 3.) The other end of the programming cable must be connected to the PC serial port. The COM port specified in the Dynamic C Options menu must be the same as the one the programming cable is connected to.
- To check if you have the correct serial port, select Compile, then Compile BIOS, or type <Ctrl-Y>. If the "BIOS successfully compiled ..." message does not display, try a different serial port using the Dynamic C Options menu until you find the one you are plugged into. Don't change anything in this menu except the COM number. The baud rate should be 115,200 bps and the stop bits should be 1.
Compile or re-compile
DEMOJR1.Cby clicking the Compile button on the task bar. The program will compile and the screen will come up with a highlighted character (green) at the first executable statement of the program. Use the F8 key to single-step. Each time the F8 key is pressed, the cursor will advance one statement. When you get to thefor(j=0, j< ...statement, it becomes impractical to single-step further because you would have to press F8 thousands of times. We will use this statement to illustrate watch expressions.Type <Ctrl-W> or chose Add/Del Watch Expression in the Inspect menu. A box will come up. Type the lower case letter j and click on add to top and close. Now continue single-stepping with F8. Each time you step, the watch expression (
j) will be evaluated and printed in the watch window. Note how the value ofjadvances when the statementj++is executed.Move the cursor to the start of the statement:
for(j=0; j<1000; j++);To set a break point on this statement, type F2 or select Breakpoint from the Run menu. A red highlight will appear on the first character of the statement. To get the program running at full speed, type F9 or select Run on the Run menu. The program will advance until it hits the break point. Then the break point will start flashing and show both red and green colors. Note that LED DS3 is now solidly turned on. This is because we have passed the statement turning on LED DS3. Note that
jin the watch window has the value 25000. This is because the loop above terminated whenjreached 25000.To remove the break point, type F2 or select Toggle Breakpoint on the Run menu. To continue program execution, type F9 or select Run from the Run menu. Now the LED should be flashing again since the program is running at full speed.
You can set break points while the program is running by positioning the cursor to a statement and using the F2 key. If the execution thread hits the break point, a break point will take place. You can toggle the break point off with the F2 key and continue execution with the F9 key. Try this a few times to get the feel of things.
Click on the Edit box on the task bar. This will set Dynamic C into the edit mode so that you can change the program. Use the Save as choice on the File menu to save the file with a new name so as not to change the demo program. Save the file as
MYTEST.C. Now change the number 25000 in thefor (..statement to 10000. Then use the F9 key to recompile and run the program. The LED will start flashing, but it will flash much faster than before because you have changed the loop counter terminal value from 25000 to 10000.Watching Variables Dynamically
Go back to edit mode (select edit) and load the program
DEMOJR2.Cusing the File menu Open command. This program is the same as the first program, except that a variablekhas been added along with a statement to incrementkeach time around the endless loop. The statement:
runwatch();has been added. This is a debugging statement that makes it possible to view variables while the program is running.
Use the F9 key to compile and run
DEMOJR2.C. Now type <Ctrl-W> to open the watch window and add the watch expressionkto the top of the list of watch expressions. Now type <Ctrl-U>. Each time you type <Ctrl-U>, you will see the current value ofk, which is incrementing about 5 times a second.As an experiment add another expression to the watch window:
k*5Then type <Ctrl-U> several times to observe the watch expressions
kandk*5.So far you have practiced using the following features of Dynamic C.
- Loading, compiling and running a program. When you load a program it appears in an edit window. You can compile by selecting Compile on the task bar or from the Compile menu. When you compile the program, it is compiled into machine language and downloaded to the target over the serial port. The execution proceeds to the first statement of main where it pauses, waiting for you to command the program to run, which you can do with the F9 key or by selecting Run on the Run menu. If want to compile and start the program running with one keystroke, use F9, the run command. If the program is not already compiled, the run command will compile it first.
- Single-stepping. This is done with the F8 key. The F7 key can also be used for single-stepping. If the F7 key is used, then descent into subroutines will take place. With the F8 key the subroutine is executed at full speed when the statement that calls it is stepped over.
- Setting break points. The F2 key is used to turn on or turn off (toggle) a break point at the cursor position if the program has already been compiled. You can set a break point if the program is paused at a break point. You can also set a break point in a program that is running at full speed. This will cause the program to break if the execution thread hits your break point.
- Watch expressions. A watch expression is a C expression that is evaluated on command in the watch window. An expression is basically any type of C formula that can include operators, variables and function calls, but not statements that require multiple lines such as for or switch. You can have a list of watch expressions in the watch window. If you are single-stepping, then they are all evaluated on each step. You can also command the watch expression to be evaluated by using the <Ctrl-U> command. When a watch expression is evaluated at a break point, it is evaluated as if the statement was at the beginning of the function where you are single-stepping. If your program is running you can also evaluate watch expressions with a <Ctrl-U> if your program has a
runwatch()command that is frequently executed. In this case, only expressions involving global variables can be evaluated, and the expression is evaluated as if it were in a separate function with no local variables.3.1.1 Other Sample Programs Illustrating Digital I/O
This sample program also illustrates the use of the
runwatch()function to allow Dynamic C to update watch expressions while running. To test this:
1. Add a watch expression for "k" under "Inspect:Add/Del Watch Expression."
2. Click "Add to top" so that it will be permanently in the watch list.
3. While the program is running, type <Ctrl+U> to update the watch window.
DEMOJR3.C--demonstrates the use of costatements to LED DS4 (which is controlled by PA3) on the Prototyping Board. This sample program will also watch button S1 (PB2) and toggle LED DS1 (which is controlled by PA0) on/off when pressed. Note that S1 presses are debounced by the software.Parallel Port A can be set for all outputs or all inputs via the slave port control register (SPCTR). Do not use Parallel Port A if the slave port is being used.
Bits 0-5 on Parallel Port B are always inputs, and bits 6-7 are always outputs. Do not use Parallel Port B if the slave port is being used.
JRIOTEST.C--exercises the BL1810's four digital output channels, the one analog input channel, and the two analog output channels.
JRIO_COF.C--demonstrates the use of cofunctions with the analog input driver. Before you run this sample program, connect DA1 to AD0 on header J7 of the Prototyping Board to provide an input voltage. Once the sample program is running, it will read the input voltage ten times while another costatement is executed concurrently. The values will be printed out in the Dynamic C STDIO window at the end of the program.Before running the
RABDB01.Cand theRABDB02.Csample programs, you will need to install 3 mm LEDs such as the Vishay Telefunken TLUR4400 at DS5-DS8 on the Jackrabbit Prototyping Board. These LEDs are included with the Rabbit 2000 Development Kit.
RABDB01.C--flashes LEDs DS5-DS8 on the Prototyping Board (which are connected to PA4-PA7) when corresponding switches S1-S4 (which are connected to PB2-PB5) are pressed. The buzzer, which is driven by HV0 from PE0, will also sound whenever switch S1 switch is pressed.
RABDB02.C--flashes LEDs DS5-DS8 on the Prototyping Board (which are connected to PA4-PA7) when corresponding switches S1-S4 (which are connected to PB2-PB5) are pressed. The buzzer, which is driven by HV0 from PE0, will also sound whenever switch S1 switch is pressed.Before running the
LCD_DEMO.Csample program, you will need an LCD based on the HD44780 (or an equivalent) controller.
LCD_DEMO.C--demonstrates a 4-bit interface to an LCD based on the HD44780 (or an equivalent) controller.Connect the LCD to Parallel Port A.
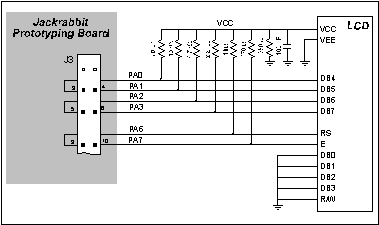
PA0--LCD DB4
PA1--LCD DB5
PA2--LCD DB6
PA3--LCD DB7
PA6--LCD RS Register Select
(0 = command, 1 = data)
PA7--LCD E: normally low, latches on high to low transitionThe R/W pin and DB0-DB3 on the LCD are grounded. DB0-DB3 are not used with a 4-bit interface. This sample program only involves writing, and that is why we ground the R/W pin. VEE is used to control brightness--the simplest thing to do is ground it. If you need to control the brightness, you can connect a potentiometer between ground and -5 V, with the arm going to the VEE pin. Check the specs on the LCD before doing this as some LCDs may require a different connection. VCC is +5 V and VSS is ground.
3.1.2 RS-232 Serial Communication Sample Programs
JR_FLOWCONTROL.C--This program demonstrates hardware flow control by configuring Serial Port C (PC3/PC2) for CTS/RTS with serial data coming from TxB at 115,200 bps. One character at a time is received and is displayed in the STDIO window.To set up the Prototyping Board, you will need to tie PC4 and PC5 (TxB and RxB) together at header J1, and you will also tie PC2 and PC3 (TxC and RxC) together as shown in the diagram.

A repeating triangular pattern should print out in the STDIO window. The program will periodically switch flow control on or off to demonstrate the effect of no flow control.
Refer to the
serBflowcontrolOn()function call in the Dynamic C Function Reference Manual for a general description on how to set up flow control lines.
JR_PARITY.C--This program demonstrates the use of parity modes by repeatedly sending byte values 0-127 from Serial Port B to Serial Port C. The program will switch between generating parity or not on Serial Port B. Serial Port C will always be checking parity, so parity errors should occur during every other sequence.
To set up the Prototyping Board, you will need to tie PC4 and PC3 (TxB and RxC) together at header J1 as shown in the diagram.
The Dynamic C STDIO window will display the error sequence.
3.1.3 RS-485 Serial Communication Sample Program
The following sample program illustrates the use of the RS-485 serial drivers. The sample program shows a byte being transmitted, and then the RS-485 transceiver waits for a reply.
#define DOUTBUFSIZE 15
void main( void ){
int nEcho,nReply;
char cChar;
Jr485Init (); // Init RS485 Control (PD5)
serDopen ( 9600 ); // Open Serial Port D
for (;;) { // Forever
for (cChar='a';cChar<='z';++cChar){
// Send Alphabet
Jr485Tx (); // Enable RS485 Transmitter
serDputc ( cChar ); // Send Byte
while ((nEcho = serDgetc ()) == -1);
// Wait for Echo
Jr485Rx (); // Disable RS485 Transmitter
while ((nReply = serDgetc ()) == -1);
// Wait for Reply
printf ( "%02x -> %02x\n",nEcho,nReply );
}
}
}
3.2 Cooperative Multitasking
Cooperative multitasking is a convenient way to perform several different tasks at the same time. An example would be to step a machine through a sequence of steps and at the same time independently carry on a dialog with the operator via a human interface. Cooperative multitasking differs from a different approach called preemptive multitasking. Dynamic C supports both types of multitasking. In cooperative multitasking each separate task voluntarily surrenders its compute time when it does not need to perform any more activity immediately. In preemptive multitasking control is forcibly removed from the task via an interrupt.
Dynamic C has language extensions to support multitasking. The major C constructs are called costatements, cofunctions, and slicing. These are described more completely in the Dynamic C User's Manual. The example below, sample program
DEMOJR3.C, uses costatements. A costatement is a way to perform a sequence of operations that involve pauses or waits for some external event to take place. A complete description of costatements is in the Dynamic C User's Manual. TheDEMOJR3.Csample program has two independent tasks. The first task flashes LED DS4 once a second. The second task uses button S1 on the Prototyping Board to toggle the logical value of a virtual switch,vswitch, and flash DS1 each time the button is pressed. This task also debounces button S1.
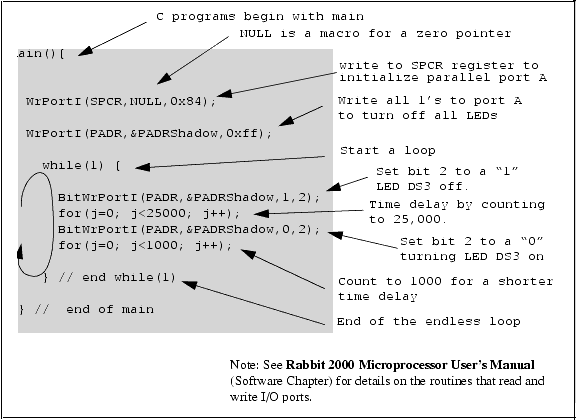
main(){ // begin main program
// set up parallel port A as output
WrPortI(SPCR,NULL,0x84);
WrPortI(PADR,&PADRShadow,0xff); // turn off all LEDs
vswitch=0; // initialize virtual switch off
(1) while (1) { // Endless loop
BigLoopTop(); // Begin a big endless loop
// first task flash LED DS4 every second for 200 milliseconds
(2) costate { // begin a costatement
BitWrPortI(PADR,&PADRShadow,0,3); // LED DS4 on
(3) waitfor(DelayMs(200)); // light on for 200 ms
BitWrPortI(PADR,&PADRShadow,1,3); // LED DS4 off
waitfor(DelayMs(800)); // light off for 800 ms
(4) } // end of costatement
// second task - debounce switch #1 and toggle virtual switch vswitch
// check button 1 and toggle vswitch on or off
costate {
(5) if(BitRdPortI(PBDR,2)) abort; // if button not down skip out
waitfor(DelayMs(50)); // wait 50 ms
if(BitRdPortI(PBDR,2)) abort; // if button not still down skip out
vswitch=!vswitch; // toggle virtual switch- button was down 50 ms
while (1) { // wait for button to be off 200 ms
waitfor(BitRdPortI(PBDR,2)); // wait for button to go up
waitfor(DelayMs(200)); // wait for 200 milliseconds
if(BitRdPortI(PBDR,2)) break;// if button up break
} // end of while(1)
} // end of costatement
// make LED agree with vswitch if vswitch has changed
(6) if( (PADRShadow & 1) == vswitch) {
BitWrPortI(PADR,&PADRShadow,!vswitch,0);
)
(7) } // end of while loop, go back to start
} // end of main, never come here
The numbers in the left margin are reference indicators and are not a part of the code. Load and run the program. Note that LED DS4 flashes once per second. Push button S1 several times and note how LED DS1 is toggled.
The flashing of LED DS4 is performed by the costatement starting at the line marked (2). Costatements need to be executed regularly, often at least every 25 ms. To accomplish this, the costatements are enclosed in a while loop. The term while loop is used as a handy way to describe a style of real-time programming in which most operations are done in one loop. The while loop starts at (1) and ends at (7). The function
BigLoopTop()is used to collect some operations that are helpful to do once on every pass through the loop. Place the cursor on this function nameBigLoopTop()and hit <Ctrl-H> to learn more.The statement at (3) waits for a time delay, in this case 200 ms. The costatement is being executed on each pass through the big loop. When a
waitforcondition is encountered the first time, the current value ofMS_TIMERis saved and then on each subsequent pass the saved value is compared to the current value. If awaitforcondition is not encountered, then a jump is made to the end of the costatement (4), and on the next pass of the loop, when the execution thread reaches the beginning of the costatement, execution passes directly to thewaitforstatement. Once 200 ms has passed, the statement after the waitfor is executed. The costatement has the property that it can wait for long periods of time, but not use a lot of execution time. Each costatement is a little program with its own statement pointer that advances in response to conditions. On each pass through the big loop, as little as one statement in the costatement is executed, starting at the current position of the costatement's statement pointer. Consult the Dynamic C User's Manual for more details.The second costatement in the program debounces the switch and maintains the variable
vswitch. Debouncing is performed by making sure that the switch is either on or off for a long enough period of time to ensure that high-frequency electrical hash generated when the switch contacts open or close does not affect the state of the switch. Theabortstatement is illustrated at (5). If executed, the internal statement pointer is set back to the first statement within the costatement, and a jump to the closing brace of the costatement is made.At (6) a use for a shadow register is illustrated. A shadow register is used to keep track of the contents of an I/O port that is write only - it can't be read back. If every time a write is made to the port the same bits are set in the shadow register, then the shadow register has the same data as the port register. In this case a test is made to see the state of the LED and make it agree with the state of vswitch. This test is not strictly necessary, the output register could be set every time to agree with
vswitch, but it is placed here to illustrate the concept of a shadow register.To illustrate the use of snooping, use the watch window to observe
vswitchwhile the program is running. Add the variablevswitchto the list of watch expressions. Then togglevswitchand the LED. Then type <Ctrl-U> to observevswitchagain.3.2.1 Advantages of Cooperative Multitasking
Cooperative multitasking, as implemented with language extensions, has the advantage of being intuitive. Unlike preemptive multitasking, variables can be shared between different tasks without having to take elaborate precautions. Sharing variables between tasks is the greatest cause of bugs in programs that use preemptive multitasking. It might seem that the biggest problem would be response time because of the big loop time becoming long as the program grows. Our solution for that is a device caused slicing that is further described in the Dynamic C User's Manual.
3.3 Switching Between Program Mode and Run Mode
The BL1810 is automatically in Program Mode when the programming cable is attached, and is automatically in Run Mode when no programming cable is attached. See Figure 5.
3.3.1 Detailed Instructions: Changing from Program Mode to Run Mode
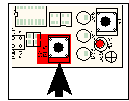
- Reset the BL1810. You may do this as explained in Figure 5. Figure 6 shows the location of the RESET button on the Prototyping Board.
The BL1810 is now ready to operate in the Run Mode.
3.3.2 Detailed Instructions: Changing from Run Mode to Program Mode
| Z-World, Inc. www.zworld.com Phone: 1.530.757.3737 FAX: 1.530.757.3792 |