
![[Top]](../images/home.jpg)
![[Contents]](../images/contents.jpg)
![[Prev]](../images/previous.jpg)
![[Next]](../images/next.jpg)
![[Last]](../images/index.jpg)


Configuring WAN Access
The MAX supports up to four T1- or E1-line connections. It also has a serial WAN port, which typically connects to a Frame Relay switch. Optional cards provide other types of WAN connections. Digital-modem cards and V.110-modem cards provide communications with analog modem users and V.110 terminal-adapter users, respectively. In Japan, the MAX supports Personal Handy Phone Service. You can install and configure an ISDN BRI card if your connections do not warrant the expense of a T1 or E1 line. With the Host BRI module, the MAX emulates a telco switch providing ISDN BRI lines to local hosts. The BRI/LT card supports Ascend's ISDN Digital Subscriber Line (IDSL) standard for voice and data transmissions. To provide the bandwidth needed for video teleconferencing, Host/6 and Host/Dual cards support two types of inverse multiplexing:Bandwidth on Demand Interoperability Group (BONDING) and Ascend Inverse Multiplexing (AIM). If your MAX connects only to ISDN lines and supports only digital-modem cards, call routing is preconfigured. You must configure it, however, if you have a mixture of cards or if the WAN lines do not support ISDN signaling.
Introduction to WAN configuration
The MAX has four built-in T1 or E1 lines and a V.35 serial port for WAN access. It also has six expansion slots, which can support cards for additional bandwidth (BRI lines), AIM-port modules for videoconferencing, and digital modems for analog modem connections over digital lines.
Menus and profiles
To configure the MAX, you set parameters in the VT100 menus. (For a description of navigating the interface, see the Hardware Installation Guide for your MAX. Many of the menus and submenus include profiles, which are groups of related parameters.
Figure 3-1. Slot and port numbering in the MAX 6000
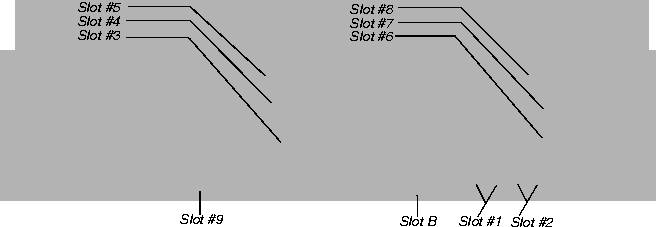
How the VT100 menus relate to slots and ports
The numbers in the VT100 menus relate to slot numbers in the MAX unit, which can represent actual expansion slots or virtual slots on the unit's motherboard.
System slot
The system itself is assigned slot number 0 (menu 00-000). The System menu contains the following profiles and submenus that are all related to systemwide configuration and maintenance:
00-000 System
      00-100 Sys Config
      00-200 Sys Diag
      00-300 Security
      00-400 Destinations
      00-500 Dial Plan
T1 or E1 slots
The built-in T1 or E1 lines are slot 1 and slot 2 (menus 10-000 and 20-000). Each of these slots includes two T1 or E1 lines. The menus for configuring and testing the lines are organized as follows:
10-000 Net/T1 (or Net/E1)
      10-100 Line Config
      10-200 Line Diag
20-000 Net/T1 (or Net/E1)
      20-100 Line Config
      20-200 Line Diag
Expansion slots
The six expansion slots are slots 3-8 (menus 30-000 through 80-000), numbered as shown in Figure 3-1.
Ethernet and WAN slots
Slot 9 is the Ethernet slot (menu 90-000). The Ethernet menu contains submenus and profiles related to the local network, routing and bridging, and WAN connections. Slot A Etherdata (menu A0-000), is not applicable for the MAX with built-in Ethernet. The serial WAN port is slot B (menu B0-000).
Phone number assignments
The MAX receives calls on phone numbers assigned to its T1 or E1 and (if applicable) Net BRI channels. In the MAX configuration, each phone number has a limit of 24 characters, which can include the following: 1234567890()[]!z-*#|. To assign the phone numbers you must understand add-on numbers, hunt-groups, and Service Profile Identifiers (SPIDs).
Add-on numbers
You build multichannel calls (MP, MP+, AIM, or BONDING) by specifying add-on numbers. A multichannel call begins as a single-channel connection to one phone number. The calling unit then requests additional phone numbers that it can dial to connect additional channels, and stores the add-on numbers it receives from the answering unit. To add channels to the call, the calling unit must integrate the add-on numbers with the phone number it dialed initially. Three parameters specify add-on numbers: Ch N#, PRI Num and Sec Num.
Typically, the phone numbers assigned to the channels share a group of leading (leftmost) digits. Enter only the unique digits identifying each phone number, as following:
- If the add-on number in the called unit is shorter than the phone number dialed by the calling unit, the MAX replaces only the rightmost digits.
- For example, suppose you dial 777-3330 to reach channel 1 of line 1, and dial 777-3331 through 777-3348 to reach other channels (on the same line or a different line). In this case, set Ch1#=30, and set the Ch N# parameter for the other channels to 31, 32, and so forth.
- If the add-on number is longer than the phone number dialed, the MAX discards the extra digits. For example:
- Ch1# = 510-655-1212
- Dial# = 655-1212
- Derived number for channel 1 = 655-1212
- If there is no add-on number, the derived number equals the dialed number. For example:
- Ch1# = (null)
- Dial# = 555-1213
- derived number for channel 1 = 555-1213
The most common reason multichannel calls fail to connect beyond the initial connection is that the answering unit sends the calling unit add-on numbers it cannot use to dial the other channels. The group of channels that make a multichannel call is called a bundle. A 10-channel bundle in which each channel is 64Kbps, provides a 640 Kbps connection.
Note: AIM and BONDING call bundles should not span dial plans. If you are receiving AIM
or BONDING calls and have multiple dial plans, set up each dial plan as a separate trunk
group. This also prevents MP and MP+ call bundles from spanning dial plans.
For example, you have two PRI lines from different service providers. You set the ChN Trnk Grp parameters for the first line to 9 and for the second line to 8. Also, enabling trunk groups on your MAX separates the two dial plans and prevents the formation of bundles with channels from both PRI lines.
Hunt groups
A hunt group is a group of channels that has the same phone number. When a call comes in on that number, the MAX uses the first available channel to which the number was assigned. Because channels in a hunt group share a common phone number, the add-on numbers in the profile are the same.
Note: If all of a line's channels have the same add-on number, you can leave the phone
number assignment blank.
SPIDS (for Net BRI lines)
The SPIDs assigned to a BRI line operating in multipoint mode are numbers used at the central switch to identify services provisioned for your ISDN line. Your carrier bases the SPIDs on the telephone numbers assigned to your BRI lines, and tells you the SPIDs when it installs the lines.
Note: Not all telephone companies include a suffix on their SPIDs. When receiving SPIDs
from your telephone company, ask them to verify whether or not suffixes are included. The
SPID formats described in the next sections have been agreed upon by most telephone
companies.
For example, for an AT&T switch in multipoint mode, SPIDs have one of the following formats:
01nnnnnnn0
01nnnnnnn00
In the AT&T SPID formats, nnnnnnn is the 7-digit phone number (not including the area code). For example, if the phone number is 555-1212, the SPID is 0155512120 or 01555121200. For a Northern Telecom switch, SPIDs have one of the following formats:
aaannnnnnnSS
aaannnnnnnSS00
In the Northern Telecom SPID formats, aaannnnnnn is the 10-digit phone number (including the area code). SS is an optional suffix. If specified it is a one or two-digit number differentiating the channels. For example, if the phone numbers are 212-555-1212 and 212-555-1213, the SPIDs might be:
21255512121
21255512132
or:
212555121201
212555121302
or one of the above formats followed by 00 (for example, 21255512130200).
How the MAX routes inbound and outbound calls
When the MAX receives a call on one of its phone numbers, it routes that call internally to one of its slots or ports. When a digital modem, AIM port, or a host on the local Ethernet port originates a dial-out connection, the MAX routes that call internally to an available WAN channel to place the call. The channel configuration of a WAN line determines how the channel routes inbound calls and places outbound calls. For details, see Configuring call routing.
Configuring T1 lines
Each built-in T1 line contains 24 channels, each of which can support one single-channel connection. Depending on the signaling mode used on the line, all 24 channels are available for user data, or 23 channels are available for data and the 24th channel is reserved for signaling.
T1 line configuration parameters are in a Line Config profile, as shown in the following example:
Net/T1
      Line Config
          slot profile
                Name=mytelco
                1st Line=Trunk
                2nd Line=Trunk
                Line 1...
                      Sig Mode=Inband
                      NFAS ID num=N/A
                      Rob Ctl=Wink-Start
                      Switch Type=N/A
                      Framing Mode=D4
                      Front End=CSU
                      Encoding=AMI
                      FDL=N/A
                      Length=1-333
                      Buildout=N/A
                      Clock Source=Yes
                      Pbx Type=N/A
                      Delete Digits=N/A
                      Add Number=N/A
                      Call-by-Call=N/A
                      T1-PRI:PRI # Type=Unknown
                      T1-PRI:NumPlanID=ISDN
                      Ans #=N/A
                      Ans Service=N/A
                      Input Sample count=N/A
                      Send Disc=0
                      Ch 1=Switched
                      Ch 1 #=12
                      Ch 1 Slot=3
                      Ch 1 Prt/Grp=1
                      Ch 1 TrnkGrp=5
                    Ch 2=Switched
The Ch N parameters are repeated for each channel in the line. (There are 23 channels if you use PRI signaling and 24 channels if you use robbed-bit.) For detailed information about each parameter, see the MAX Reference Guide.
In the slot menu, you can assign a name to the line configuration of the slot's two lines. You can configure several such slot profiles and activate a profile when it is needed. To activate a profile, see Activating a profile.
You can set Line 1 and Line 2 to trunk service (indicating a standard T1 interface with signaling information) or disabled. For Line 2, you can also specify D&I (Drop-and-Insert) service. Drop-and-Insert on Line 2 specifies that some of Line 1's channels transparently pass over to Line 2. A device (such as a PBX) connected to Line 2 assumes that it is connected to the WAN switch and is not aware that the channels actually pass through the MAX before going to the WAN.
Understanding the line interface parameters
This section provides background information about the T1 line interface parameters. For complete information, see the MAX Reference Guide.
Sig Mode
A T1 line's signaling mode (Sig Mode) can be one of the following:
- Inband, robbed-bit signaling-The MAX uses the Rob Ctrl parameter for the Call Control mechanism.
- ISDN signaling-Designate the 24th channel of the T1 line as the D channel.
- ISDN NFAS (Non-Facility Associated Signaling)-Enables two or more T1 lines to share a D channel. One of the lines must be configured as the primary D channel and one as the secondary (backup) D channel.
- PBX (Private Branch Exchange) T1 signaling-The second T1 line can receive calls placed on the first T1 line. The MAX emulates a WAN switch, and the PBX (or other device connected to the second T1 line) places and answers calls by using the Call Control mechanism.
NFAS ID Num
The NFAS ID Num value is a different interface ID for each NFAS line. In most cases, the default 1 for the first line and 2 for the second line are correct. If the carrier requires different NFAS interface IDs, type the numbers they specify.
Inband, robbed-bit call control mechanism
Rob Ctl is the call-control mechanism for robbed-bit signaling. When it is set to Wink-Start (the default), the switch can seize the trunk by going off hook. The local unit requires the switch to wait for a 200 msec wink before it seizes a trunk.
Switch Type
The Switch Type parameter specifies the network switch providing ISDN service on a T1/PRI line. The ISDN carrier supplies the setting, which can be one of the following:
- AT&T
- NTI (Northern Telecom)
- NI-2 (National ISDN-2)
- GloBanD
- Japan
Framing Mode and Encoding
The Framing Mode parameter specifies the physical layer frame format for the T1 line. The two possible settings are D4 or ESF. The D4 format, also known as the superframe format, consists of 12 consecutive frames separated by framing bits. The line may not use ISDN signaling with D4 framing. If it does, false framing and Yellow Alarm emulation can result. ESF specifies the extended superframe format, consisting of 24 consecutive frames separated by framing bits. The ISDN specification advises that you use ESF with ISDN D-channel signaling.
The Encoding parameter sets the layer-1 line encoding used for the physical links, which affects the way the digital signals on the line represent data. Your carrier can tell you which encoding to use. AMI (the default) specifies Alternate Mark Inversion encoding. B8ZS specifies Bipolar with 8-Zero Substitution. The None setting is identical to AMI, but without density enforcement.
Front End
Enable the internal CSU of any TR/PRI port by setting the Net/T1 > Line Config > slot profile > Line N > Front End parameter to CSU. If you use external CSUs, disable the MAX internal CSU by setting Front End to DSX.
FDL for monitoring line quality
The telephone company uses a facilities data link (FDL) protocol to monitor the quality and performance of T1 lines. If your carrier's maintenance devices require regular data-link reports and the line is not configured for D4 framing, you can specify the type of protocol (AT&T, ANSI, or Sprint) to use for the reports.
You cannot use FDL reporting on a line configured for D4 framing. However, you can obtain D4 and ESF performance statistics in the FDL Stats windows even if you do not choose an FDL protocol.
Length and Buildout
Assign a value to the Length parameter if you use an external Channel Service Unit (CSU) for a T1 port in the MAX. Choose the value that corresponds to the length of the line from the CSU to the MAX. The value should reflect the longest line length you expect (up to a maximum of 655 feet). A length of more than 655 feet requires that you enable the internal CSU.
The Buildout parameter specifies the amount of attentuation to apply to the MAX T1 transceiver's internal CSU. The amount, if any, depends on the length of the line between the MAX and the repeater from which it receives the signal. If the MAX is too close to a repeater, you might need to specify some attenuation to reduce the strength of the signal. Valid values are 0 dB (decibels) through 22.5 dB.
Clock Source
The Clock Source parameter determines whether the T1 line can be used as the master clock source for synchronous connections. In synchronous transmission, both the sending device and the receiving device must maintain synchronization in order to determine where one block of data ends and the next begins.
If two Ascend units connect to each other through a crossover cable (with optional T1 repeaters) between their network ports, you might need to disable this parameter on one of the units.
PBX parameters
The PBX Type parameter specifies the signaling to use with the PBX on line 2. When the parameter is set to Voice, the PBX that connects to line two views the MAX as a switch. A switch is the device that connects the calling party to the answering party. The MAX switches an incoming call on line 1 to line 2 only if it is a voice-service call.
To allow a PBX one line for dialing out through the MAX, specify a number of digits to delete from the dialed number (Delete Digits). The MAX deletes the digits, and then (if applicable) adds numbers to the beginning of a dialed number (Add Number). The MAX can add any digits required by the T1/PRI switch, or it can be used to specify a trunk group that is used in the current T1 profile.
Use the Answer # and Answer Service parameters to route calls to the device terminating the second T1 line when the second line's signal mode is PBX T1. The answer number is one of the MAX unit's phone numbers, and answer service is a data service type, such as voice. (For more information, see Configuring call routing.)
Note: When you use Answer Service to route all voice calls received on line 1 to a PBX on
line 2, you can no longer receive modem calls on line 1. All voice calls received on the line
route to the PBX, without exception.
Input Sample Count lets you specify 2 rather than the default of 1 sample for standard tone durations and other PBXs that use a nonstandard tone duration of less than 50ms. Using one sample set seems to work with most PBXs, in most cases, but using two samples is more accurate. Where the tone duration is long (more than 70ms), setting the Input Sample Count to 2 is recommended.
Call-by-Call
The Call-by-Call parameter specifies The service provider's call-by-call signaling value for routing calls from a local device to the network through the MAX. The values differ by service provider.
Understanding the channel configuration parameters
This section provides background information on the T1 channel configuration parameters. For complete information, see the MAX Reference Guide.
Specifying how the channel will be used
Each of the 24 channels of a T1 line can be configured for one of the following uses:
Associating the channel with a slot/port in the MAX
With the Ch N Slot and Ch N Prt/Grp parameters, you can assign a switched channel to a slot or slot/port combination for a digital modem, AIM port, or Ethernet. This configuration affects both inbound call routing and outbound calls. In effect, it reserves the channel for calls to and from the specified slot or port. (For details, see Configuring call routing.)
If the channel is nailed, Ch N Prt/Grp is a Group number. To make use of this nailed connection, the Group number is referenced in a Connection or Call profile.
Assigning the channel to a trunk group
You can assign trunk group numbers 4-9 to channels to make them available for outbound calls. For details, see Routing outbound calls.
Examples of T1 configurations
This section provides examples of configuring T1 lines for ISDN PRI services, robbed-bit signaling, and NFAS signaling. the examples do not include names for the slot profiles (which are in the menu that appears when you select Line Config), because you can assign any name. To apply the settings in a slot profile, however, you must activate the profile. See Activating a profile for these procedures.
Enabling the internal CSU for a T1 port
To enable the internal CSU for a T1 port, proceed as follows:
- Open the Net/T1 > Line Config > any slot profile > Line N menu.
- Set Front End to CSU.
(To disable the internal CSU you would set Front End to DSX.)
- Exit and save your change.
Configuring a line for ISDN PRI service
When configuring ISDN PRI service for your MAX units, you must configure ISDN signaling for the line. Optionally, you can also configure the MAX to send either ISDN code 16 (Normal call clearing) or code 17 (User busy) when the PRI switch servicing the MAX triggers the T310 timer.
Example of configuring ISDN signaling
This example applies to switched channels with ISDN signaling on a T1 line:
- Open Net/T1 > Line Config > any slot profile > and set the 1st Line to Trunk:
Net/T1
      Line Config
          any slot profile
                  Name=
                  1st Line=Trunk
                2nd Line=Disabled
- Open the Line 1 subprofile and set the signaling mode to ISDN:
            Line 1...
                  Sig Mode=ISDN
- Specify the framing and encoding values to ESF and B8ZS, respectively (for example):
                  Framing Mode=ESF
                  Encoding=B8ZS
- Close the T1 profile.
Example of configuring Pre-T310 Timer
The ISDN Pre-T310 timer enables users calling into a MAX to get better clarification of call disconnects during the initial setup of the call. If a call is presented to the MAX, and there is an extended period of delay while the call is being set up (for example a lot of local Ethernet traffic slowing down RADIUS requests or DNS lookups) you might want your users to get a disconnect indication other than the generic Normal call clearing.
In compliance with CCITT Specification Q.931, the MAX sends a Call Proceeding message to the network switch for every call it accepts.
The network switch sets its T310 timer as it awaits further messages from the MAX. The switch tears down the call if the T310 timer expires. When this happens, the switch reports ISDN code 16 (Normal call clearing) to the calling device.
The ISDN Pre-T310 timer adds a MAX-specific timer which must be set to a time period less than that of the T310 timer on the switch. Then, after the MAX-specific timer expires but before the T310 timer expires, the MAX sends ISDN code 17 (User Busy) and clears the call.
Note: Only calls presented on T1/PRI lines support the Pre-T310 timer feature.
To configure the Pre-T310 timer:
- Open the Net/T1 > Line Config > slot profile > Line N menu.
- Set the Send Disc parameter to a value of from 0 to 60 seconds.
The parameter must be set to a value less than the T310 timer value, so that it expires (and the MAX sends its ISDN disconnect) before the T310 timer.
- Open the Ethernet > Mod Config > Auth menu.
- Set the Timeout Busy=Yes if you would like User Busy sent when the Send Disc timer expires. Set Timeout Busy=No if you would like Normal call clearing sent.
Note: The Timeout Busy parameter replaces the CLID Timeout Busy parameter.
Overlap Receiving for the MAX
By adding the Overlap Receiving feature, the Ascend unit can gather the complete called-party number from network switch, enabling the usage of features such as called-number authentication.
Overlap Receiving affects the incoming-call establishment procedure at the Ascend unit. According to ITU's Q.931 specifications, the user can use either the en-bloc receiving procedure or the Overlap Receiving procedure to handle the incoming call. If en-bloc receiving is in use, the Setup message contains all the information required by the called user to process the call. If you enable the Overlap Receiving parameter, the received Setup message might contain incomplete called number information. After it receives the Setup Acknowledge message, the network sends the remainder of the call information (if any) in one or more Information messages.
Configuring robbed-bit signaling
The following configuration shows a T1 line using all switched channels and the default inband (robbed-bit) signaling mode. To configure a T1 line for robbed-bit:
- Open Net/T1 > Line Config > any slot profile and set the 2nd Line to Trunk (for example):
Net/T1
      Line Config
            any slot profile
                Name=
                1st Line=Trunk
              2nd Line=Trunk
- Open the Line 2 subprofile and set the signaling mode to Inband:
          Line 2...
                Sig Mode=Inband
- Specify the robbed-bit call control mechanism:
Rob Ctl=Wink-Start
- Close the T1 profile.
Using NFAS signaling
When you configure two T1 lines for NFAS signaling, they share a D channel. Configure one line with a primary D channel, and the other with a secondary D channel. Use the secondary D channel only if the primary line goes down or if it receives a signal commanding a change to the other D channel.
Note: Both lines must reside in the same slot.
To configure two T1 lines for NFAS:
- Open Net/T1 > Line Config > any slot profile and set both lines to Trunk service.
Net/T1
      Line Config
            any slot profile
                Name=
                1st Line=Trunk
              2nd Line=Trunk
- Open the Line 1 subprofile and set the signaling mode to NFAS:
            Line 1...
                  Sig Mode=ISDN_NFAS
- Keep the default NFAS ID.
NFAS ID num=1
- Configure Channel 24 as the primary NFAS D channel:
Ch 24=NFAS-Prime
- Close the Line 1 subprofile.
- Open the Line 2 subprofile and set the signaling mode to NFAS:
            Line 2...
                  Sig Mode=ISDN_NFAS
- Keep the default NFAS ID:
NFAS ID num=2
- Configure Channel 24 as the secondary NFAS D channel:
Ch 24=NFAS-Second
- Close the T1 profile.
Enabling a robbed-bit PBX with PRI access lines (PRI-to-T1 Conversion)
Apply this section if you have PRI lines from the WAN and need to convert to T1 signaling for support of T1 PBXs. In most cases, you cannot use this feature in combination with digital modems.
The following sample configuration uses line 1 to send and receive calls on the WAN and line 2 to handle a PBX for voice service. The MAX emulates a WAN switch, so the PBX on line 2 simulates connection to an AT&T or other carrier switch. For detailed information about each parameter, see the MAX Reference Guide.
Note: The PBX must use 2-state inband with DTMF signaling and must support Senderized
(en bloc) digit transmission, because the MAX has a preset time limit on received dialing
digits. In addition, the called-party number should be available from the switch; that is, you
need Dialed Number Identification Service (DNIS) or called-party information element.
To configure a pair of T1 lines to support a PBX:
- Open 20-000 Net/T1 > Line Config > any slot profile, and select a slot profile. That is, select a profile for the second of the two Net/T1 slots.
Net/T1
      Line Config
            Name=
            1st Line=Trunk
            2nd Line=Disabled
Note: For the MAX 2000 which has only one pair of T1 lines, these steps apply to the
profile for lines 1 and 2 in slot 1 (the 10-100 menu).
Note: On the MAX 1600, PRI-to-T1 conversion is available only if you install the
Net/T1 slot card, and these steps apply to the profile for those lines.
- Set the 2nd Line parameter to Trunk:
2nd Line=Trunk
- Open the Line 1 subprofile and set the Sig Mode parameter to ISDN:
            Line 1...
                  Sig Mode=ISDN
On the MAX 1600, this step applies to line #1 of the Net/T1 slot card.
Note: On the MAX 4000 and 1600, you can also set the first pair of T1 lines (slot 1) for
ISDN (PRI) signaling. In that case they become available for outgoing calls from the PBX
and can switch incoming calls to the PBX.
- Close the Line 1 subprofile.
- Open the Line 2 subprofile and set the Sig Mode parameter to PBX T1:
            Line 2...
                  Sig Mode=PBX T1
On the MAX 1600, this step applies to line #2 of the Net/T1 slot card.
- Set the Rob Ctl parameter as required by the PBX. For example:
            Line 2...
                  Rob Ctl=Wink-Start
- Set the T1-PRI:PRI # Type parameter as allowed by the provide of your PRI lines as appropriate for the calls placed by your PBX. For example:
            Line 2...
                  T1-PRI:PRI # Type=National
- Set the T1-PRI:NumPlanID parameter as required by the provider of your PRI lines. For example:
            Line 2...
                  T1-PRI:NumPlanID=ISDN
- The PBX Type parameter tells the MAX what type of service the PBX expects on its T1 line. In most installations the PBX expects voice-service calls with call progress tones. The Data setting does not supply call progress tones or information messages to the user.
            Line 2...
                  PBX Type=Voice
- The Ans Service parameter tells the MAX whether to convert a call coming in on the PRI line(s) to robbed-bit T1 signaling or to answer the call and perform normal incoming call routing. Most installations select Voice:
            Line 2...
                  Ans Service=Voice
Note: If you set Ans Svc=Voice, the MAX converts incoming voice-service calls on PRI
line(s) to T1 signaling on the outgoing line to the PBX. The MAX routes data-service calls
according to the MAX unit's normal incoming call routing. The calls do not go to the PBX
and are not converted.
Note: If you set Ans Svc=Voice, you cannot configure the MAX for both digital modem
operation and PBX-T1 support, because the MAX switches all incoming voice service
calls to the PBX and none ever reach the digital modems.
- Most installations leave the Ans # parameter blank.
            Line 2...
                  Ans #=
- Set the Delete Digits and Add Number parameters, which convert the phone number dialed at the PBX to an ISDN PRI format. For example:
            Line 2...
                  Delete Digits=2
                Add Number=923
- Set the Call-by-Call parameter, which adds the appropriate ISDN PRI call-setup request for calls dialed out from the PBX. For example:
            Line 2...
                  Call-by-Call=2
- Close the Line 2 subprofile.
- Close the T1 profile.
- If you have not already set the Modem:NumPlanID parameter in the System Profile (Sys Config menu), set it now. It determines the numbering plan on outgoing calls. It applies not only to calls the PBX places, but to all outgoing call the MAX places.
Note: On MAX models with multiple lines configured for ISDN (that is, PRI), outgoing calls
from the PBX use the first available channel on any line configured for ISDN signaling. If you
wish to select a PRI line for outgoing calls, the number dialed by the PBX must be prefaced by
a dialing prefix set up in the Ch N Trnk Grp Line profile parameter, and you must enable trunk
groups (by setting the System profile's Use Trunk Grps parameter to Yes).
Note: When the MAX forwards an incoming call to the PBX, it does not forward the
called-party number.
Assigning bandwidth to a nailed link
A nailed link is up permanently. Both ends of the link must assign the same number of channels to the link. However, channel assignments do not have to match. For example, Channel 1 might be switched at the local end and nailed at the remote end. To designate certain channels for a nailed line:
- Open Net/T1 > Line Config > any slot profile > Line 1.
Net/T1
      Line Config
          any slot profile
                Name=
                1st Line=Trunk
                2nd Line=Disabled
                Line 1...
- Configure the nailed channels. For example, to assign channels 1-5 to the same nailed connection:
                  Ch 1=Nailed
                  Ch 1 Prt/Grp=3
                  Ch 2=Nailed
                  Ch 2 Prt/Grp=3
                  Ch 3=Nailed
                  Ch 3 Prt/Grp=3
                  Ch 4=Nailed
                  Ch 4 Prt/Grp=3
                  Ch 5=Nailed
                  Ch 5 Prt/Grp=3
- Close the T1 profile.
Note: A Connection profile can use this permanent link by specifying the nailed channels'
group number in the Group parameter. A Frame Relay profile uses a permanent nailed link by
specifying the group number in its Nailed Grp parameter.
Performing T1 line diagnostics
The MAX provides the following T1 diagnostic commands:
Net/T1
      Line Diag
            Line LB1
            Line LB2
            Switch D Chan
            Clr Err1
            Clr Perf1
            Clr Err2
            Clr Perf2
You can use these commands to test the line configuration. For detailed information about each command, see the MAX Reference Guide.
Configuring E1 lines
Each built-in E1 line contains 32 channels, each of which can support one single-channel connection. Depending on the signaling mode used on the line, all 32 channels are available for user data, or 31 channels are available for data and the 32nd channel is reserved for signaling. E1 line configuration parameters are in the slot profiles listed in the menu that appears when you select Line Config, as shown in the following example:
Net/E1
      Line Config
          any slot profile
                Name=myPTT_line1
                1st Line=Trunk
                2nd Line=Trunk
                Back-to-Back=No
                Line 1...
                      Sig Mode=DPNSS
                      Switch Type=Net 5
                      Framing Mode=G.703
                      # Complete=N/A
                      Grp B Signal=N/A
                      Grp II Signal=N/A
                      L3 End=X END
                      L2 End=B END
                      NL Value=64
                      LoopAvoidance=7
                      Clock Source=Yes
                      Ch 1=Switched
                      Ch 1 #=1212
                      Ch 1 Slot=3
                      Ch 1Prt/Grp=1
                      Ch 1 TrnkGrp=5
                    Ch 2=Switched
Note: The Line N profile includes a set of Ch N parameters for each channel in the line (31
channels if PRI signaling is used, or 32 channels for robbed-bit signaling).
You can configure multiple slot profiles and assign each a different name. Then, you can apply a different configuration to the slot by activating a different slot profile. To activate a slot profile, see Activating a profile.
Ina slot profile, you can set Line 1 and Line 2 to Trunk service (indicating a standard E1 interface with signaling information) or Disabled.
The ETSI series of standards does not include a specification for how a CPE unit disables a NET5 line. Therefore, if you disable an E1 line, the switch to which your MAX is connected does not take the line out of service when you save the profile. The MAX disables outgoing call requests for a disabled line, but the switch still delivers incoming calls to the MAX. If you need to disable incoming calls, contact your carrier.
Note: If you have not configured any CLID profiles, you can use a workaround instead of
contacting the carrier. Set Ethernet > Answer > ID Auth to Required. The MAX then does not
accept any incoming calls on any E1 line. The MAX does not answer the call (go off-hook), so
the caller is not charged for the call.
For lines configured with a DPNSS switch type, you can make a test connection to another DPNSS unit, without using an intervening switch, by setting Back-to-Back to Yes.
Understanding the line interface parameters
This section provides background information about the E1 line interface parameters. For detailed information about each parameter, see the MAX Reference Guide.
E1 signaling mode
An E1 line's signaling mode (Sig Mode) can be None (leased) or one of the following:
- ISDN-ISDN signaling using the D channel. You must designate the 32nd channel of the E1 line as the D channel.
- DPNSS-The interface supports DPNSS or DASS 2 signaling.
- R2-R2 signaling.
- Metered-Metered R2 signaling protocol, used in Brazil and South Africa.
- Chinese-A version of the R2 signaling protocol, used in China.
- CLID processing for the Philippines uses an inband A-5 MFR2 register signal to initiate and proceed with CLID processing.)
- Argentina-A version of the R2 signaling protocol, used in Argentina. (CLID processing for Argentina uses an inband A-5 MFR2 register signal to initiate and proceed with CLID processing.)
- Brazil-A version of the R2 signaling protocol, used in Brazil. (CLID processing for Brazil uses an inband A-5 MFR2 register signal to initiate and proceed with CLID processing.)
- India-A version of the R2 signaling protocol, for use in India. (CLID processing for India uses an inband A-5 MFR2 register signal to initiate and proceed with CLID processing.)
Note: The default bandwidth for data calls across R2 lines is 64 Kbps, so set Ethernet >
Connections > any Connection profile > Telco Options > Force 56 to Yes in any Connection
profile that should use 56 kbps over R2 lines.
Switch type
The Switch Type parameter specifies the type of network switch the carrier uses for providing ISDN service on your E1/PRI line. Switch types for E1/PRI lines include:
- GloBanD-(Q.931W GloBanD data service.
- NI-1-National IDSN-1.
- Net 5-Euro ISDN services in Belgium, the Netherlands, Switzerland, Sweden, Denmark, and Singapore.
- Danish-Conforms to the Danish E1-TB91020, July 1991 specification. Is a variation of Net5 PRI E1.
- DASS 2-U.K. only.
- ISLX-DPNSS switch type.
- ISDX-DPNSS switch type.
- Mercury-DPNSS switch type.
- Australian-Australia only.
- French-VN3 ISDN PRI.
- German-1TR6.
- CAS-New Zealand.
Framing Mode
The physical layer of the E1 line uses G.703 framing, which is the standard framing mode used by most E1 ISDN and DASS 2 providers. Most E1 DPNSS providers in the U.K require 2Ds, which is a variant of G.703. If you select G.703, the MAX provides CRC-4 checking. If you select 2DS, it does not.
# Complete
The # Complete parameter specifies are in the number received for an incoming call using R2 signaling. You can specify end-of-pulsing to indicate that the MAX should keep on receiving digits until the caller stops sending them, or you can specify a fixed number of digits (up to 10).
Group signaling parameters
Grp B Signal and Grp II Signal specify the group signal to send before answering a call.
Required settings for DPNSS or DASS 2 switches
- L3 End and L2 End-Specify CCITT Layer 2 and CCITT Layer 3, respectively.
- NL value-The default value specifies 64 transmissions.
- Loop avoidance-The default value is 7.
For more details, contact the carrier. These settings are not applicable for ISDN.
Clock Source
The Clock Source parameter determines whether the E1 line can be used as the master clock source for synchronous connections. In synchronous transmission, both the sending device and the receiving device must maintain synchronization in order to determine where one block of data ends and the next begins.
Understanding the channel configuration parameters
This section provides background information about the E1 channel configuration parameters. For complete information, see the Network Configuration Guide for your MAX.
Ch N
For each of the 32 channels of an E1 line, the Ch N parameter specifies how the channel is used. Select one of the following values.
- Switched-The default. Supports switched connections. Can be robbed-bit or a B channel, depending on the line's signal mode.
- Nailed-A clear-channel 64K circuit.
- D channel-The channel used for ISDN D-channel signaling. Assigned automatically to channel number 16 when ISDN signaling is in use.
- Unused-Unavailable for use.
Ch N #
The Ch N # parameter specifies the add-on number associated with each switched channel. For details, see Add-on numbers.
Ch N Slot and Ch N Port
In the Ch N Slot and Ch N Prt/Grp parameters, you can assign a switched channel to a slot or slot/port combination for a digital modem, AIM port, or Ethernet. This configuration affects both inbound call routing and outbound calls. In effect, it reserves the channel for calls to and from the specified slot or port. For details, see Configuring call routing.
If the channel is nailed, Ch N Prt/Grp is a Group number. To make use of the nailed connection, the Group number is referenced in a Connection or Call profile.
Ch N Trnk Grp
You can assign trunk group numbers 4-9 to channels to make them available for outbound calls. For details, see Routing outbound calls.
Examples of E1 configuration
This section provides some examples of configuring for E1 lines for ISDN signaling, for DPNSS signaling, and for nailed connections.
Using ISDN signaling
To configure an E1 PRI line for ISDN signaling in Belgium, the Netherlands, Switzerland, Sweden, Denmark, or Singapore:
- Open Net/E1 > Line Config > any slot profile > Line 1 and specify ISDN signaling:
Net/E1
      Line Config
          any slot profile
                Line 1...
                      Sig Mode=ISDN
- Set the Switch Type parameter to Net 5 (the standard used in these countries):
Switch Type=Net 5
- Specify G.703 framing (the standard used by most E1 ISDN providers):
Framing Mode=G.703
Note: If you select G.703, the MAX provides CRC-4 checking. If you select 2 DS, it
does not.
- Close the E1 profile.
Using DPNSS signaling
To configure the E1 line for DPNSS signaling:
- Open Net/E1 > Line Config > any slot profile > Line 1.
- Set the DPNSS signaling mode and compatible switch type. For example:
Net/E1
      Line Config
            any slot profile
                Line 1...
                      Sig Mode=DPNSS
                    Switch Type=Mercury
Mercury is a variant of DPNSS.
- Set the framing mode. For example:
Framing Mode=2DS
Most E1 DPNSS providers in the U.K. require 2DS, which is a variant of G.703. If you select G.703, the MAX provides CRC-4 checking. If you select 2DS, it does not.
- When you set the DPNSS signaling mode, the following parameters show the appropriate default value.
                  L3 End=X END
                  L2 End=B END
                  NL Value=64
                  LoopAvoidance=7
- Close the E1 profile.
Setting up a nailed connection
The number of nailed channels must be the same at both ends of the connection but the channel assignments do not have to match. For example, if there are five nailed channels at the local end, there must be five nailed channels at the remote end but Channel 1 could be switched at the local end and nailed at the remote end.
Note: To use nailed channels, a Connection or Call profile references the group number
specified by each channel's Prt/Grp parameter. A total of 64 nailed connections can be defined
over nailed channels.
To configure nailed channels on Line 1 of either of the two E1 slots, open the Line 1 profile:
- Open Net/E1 > Line Config > any slot profile > Line 1 (for example):
Net/E1
      Line Config
            any slot profile
                Name=
                1st Line=Trunk
                2nd Line=Disabled
                Line 1...
                      Sig Mode=Inband
                      NFAS ID num=N/A
                    Rob Ctl=Wink-Start
- Scroll to the Ch N parameters, and configure the nailed channels. For example, to assign channels 1-5 to the same nailed connection:
                  Ch 1=Nailed
                  Ch 1 Prt/Grp=3
                  Ch 2=Nailed
                  Ch 2 Prt/Grp=3
                  Ch 3=Nailed
                  Ch 3 Prt/Grp=3
                  Ch 4=Nailed
                  Ch 4 Prt/Grp=3
                  Ch 5=Nailed
                  Ch 5 Prt/Grp=3
- Close the E1 profile.
Performing E1 line diagnostics
The MAX provides the following E1 diagnostic commands:
Net/E1
      Line Diag
            Line LB1
            Line LB2
You can use these commands to test the line configuration. For detailed information about each parameter, see the MAX Reference Guide.
ISDN call information
If the E1 PRI line switch type is German 1TR6 or Japan NTT, you can display information about ISDN calls by invoking the terminal-server command line and entering the Show Calls command. For example:
ascend% show calls
The command displays statistics about current calls. For example:
Call ID Called Party ID Calling Party ID InOctets OutOctets
3        5104563434      4191234567        0        0
4        4197654321      5108888888        888888   99999
The Call ID column contains an index number specific to the call.
Called Party ID and Calling Party ID show the telephone number of the answering device and calling device, respectively.
InOctets and OutOctets show the number of bytes received by the answering device and transmitted by the calling device, respectively.
Note: When an ISDN call disconnects from either a German 1TR6 switch or a Japan NTT
switch, the switch sends call billing information to the call originator as part of the call
tear-down process. This information is written to the eventCallCharge (eventEntry 17) SNMP
object in the Ascend Enterprise MIB events group (10). An SNMP manager can then read this
object to determine the cost of the call. The eventCallCharge object is a read-only integer and
is applicable only if eventType is callCleared (3). Otherwise, 0 is returned.
Configuring the serial WAN port
The MAX has a built-in V.35 serial WAN DB-44 port. A serial WAN port provides a V.35/RS-449 WAN interface that typically connects to a Frame Relay switch. The clock speed received from the link determines the serial WAN data rate. The maximum acceptable clock is 8 Mbps. The clock speed at the serial WAN port has no effect on the bandwidth of other WAN interfaces in the MAX.
Serial WAN configuration includes the following parameters (shown with sample settings):
Serial WAN
      Mod Config
            Module Name=serial
            Nailed Grp=3
            Activation=Static
Understanding the serial WAN parameters
This section provides some background information about the serial WAN configuration. For detailed information about each parameter, see the MAX Reference Guide.
Nailed Grp
The Nailed Grp parameter assigns a number that can be referenced as the Group in a Connection profile as the Nailed Grp in a Frame Relay profile. If Group is specified in a Connection profile, the MAX bridges or routes packets to another unit across that nailed connection. If a Frame Relay profile references the parameters, the MAX has a nailed connection to a Frame Relay switch, and the DLCI number in each frame determines which frames the MAX sends over the link.
The number you assign must be unique in the MAX configuration. Do not use a group number that is already in use for a nailed connection on another interface.
Activation
The Activation parameter tells the MAX which signals control the data flow through the serial WAN port. The DCE that connects to the serial WAN port (for example, a Frame Relay switch) determines how to set the value. The Clear To Send (CTS) signal handles flow control.
Example serial WAN configuration
To configure the serial WAN interface to connect to a Frame Relay switch that uses Static data flow:
- Open Serial WAN > Mod Config.
- Assign a module name and a group number. For example:
Serial WAN
      Mod Config
            Module Name=wan-serial
            Nailed Grp=3
- Set the Activation parameter to Static:
Activation=Static
- Close the Serial WAN profile.
- Configure a Frame Relay profile and specify the Nailed Grp number assigned to this port. For example:
Frame Relay
      Name=NNI
      Active=Yes
      Call Type=Nailed
      FR Type=NNI
      LinkUp=Yes
      Nailed Grp=3
      ...
For more information about Frame Relay, see Chapter 5, Configuring Frame Relay.
Configuring digital modems
A digital modem is a device that can communicate over a digital line (such as an ISDN line) with a station that uses a modem connected to an analog line. Incoming modem calls and incoming digital calls come over the same digital line to the MAX unit's integrated digital modem. The MAX can also make an outgoing call over a digital line to a modem on an analog line.
A digital modem accepts an incoming call as a Pulse Coded Modulation (PCM) encoded digital stream that contains a digitized version of the analog waveform sent by a caller attached to a modem. The digital modem also converts outgoing data to a PCM-encoded digital stream for transmission across the WAN to an analog modem.
Following are the digital-modem-configuration parameters for a V.34 modem slot card with eight digital modems:
V.34 Modem
      Mod Config
            Ans 1#=12
            Ans 2#=13
            Ans 3#=14
            Ans 4#=15
V.34 Modem
      Modem Diag
            ModemSlot=enable slot
            Modem #1=enable modem
            Modem #2=enable modem
            Modem #3=enable modem
            Modem #4=enable modem
            Modem #5=enable modem
            Modem #6=enable modem
            Modem #7=enable modem
            Modem #8=enable modem
If you have a V.32bis modem installed in your MAX, the interface displays LAN Modem instead of V.34 Modem. If you have a K56Flex modem installed, the interface displays K56 Modem. Also, there can be 8, 12, or 16 modems per modem slot card. The Modem Diag menu displays 8, 12, or 16 Modem #N parameters corresponding to the number of modems on the slot card.
For detailed information about each parameter, see the MAX Reference Guide.
56k Modem Numbering
K56Flex modem cards are not numbered sequentially. The numbering does not affect functionality.
8-MOD modem numbering
Modems in the 8-MOD modem card are numbered 0, 1, 2, 3, 6, 7, 10, 11.
For example, if you have an 8-MOD modem card in slot 8 in a MAX 6000, the Show Modems command in the terminal-server displays the following output:
ascend% show modems
slot:item      modem    status
8:0         1      idle
8:1         2      idle
8:2         3      idle
8:3         4      idle
8:6         5      idle
8:7         6      idle
8:10        7      idle
8:11        8      idle
12-MOD modem numbering
Modems in the 12-MOD K56Flex modem card are numbered 0, 1, 2, 3, 4, 5, 6, 7, 8, 9, 12, 13
For example, if you have a 12-MOD K56Flex modem card in slot 8 in a MAX 6000, the Show Modems command in the terminal-server displays the following output:
ascend% show modems
slot:item      modem    status
8:0         1      idle
8:1         2      idle
8:2         3      idle
8:3         4      idle
8:4         5      idle
8:5         6      idle
8:6         7      idle
8:7         8      idle
8:8                  9            idle
8:9                10            idle
8:12              11            idle
8:13              12            idle
Understanding the digital modem parameters
Asynchronous data calls initiated by analog modems requires digital-modem processing, so all incoming analog modem calls must be routed first to a digital modem. The Answer numbers are add-on numbers assigned to some of the MAX unit's WAN lines as described in Configuring call routing).
After the digital modems process the call, they send it to the MAX unit's terminal-server software. If it does not contain PPP encapsulation, it is handled as a login call that can be routed transparently to a Telnet host on the local network. PPP-encapsulated modem calls pass to the bridge/router as regular PPP connections.
For information about the terminal-server, see Configuring terminal-server connections.
Note: V.120 terminal adapters, such as the BitSurfer (also known as ISDN modems), are
asynchronous calls with CCITT V.120 encapsulation. The MAX handles V.120 encapsulation
in software, so these calls do not require digital-modem processing. For information about
processing V.110 calls, seeConfiguring V.110 modems.
Sample configuration
To configure digital modems:
- Open V.34 Modem > Mod Config (or V.42 Modem > Mod Config).
- Specify the unique digits of the phone numbers to be routed to digital modems.
For example:
V.34 Modem
      Mod Config
            Ans 1#=12
            Ans 2#=13
            Ans 3#=14
            Ans 4#=15
- Close the Modem profile.
Quiescing digital modems and returning them to service
A digital modem that has been temporarily disabled without disrupting existing connections is quiesced. When an active call disconnects, that modem is added to the disabled modem list and is not available for use. If all modems are on the disabled list, incoming callers receive a busy signal until the modems have been restored for service. When you re-enable a quiesced modem, a delay of up to 20 seconds might occur before the modem becomes available for service.
Note: Booting the MAX restores all quiesced lines, slots, and ports to service.
For more information about the 1st Line and 2nd Line parameters, see the MAX Reference Guide.
Configuring V.110 modems
A V.110 card provides eight V.110 modems that each enable the MAX to communicate with an asynchronous device over synchronous digital lines. An async device such as an ISDN modem encapsulates its data in V.110.
The V.110 module in the MAX removes the encapsulation and enables an async session (a terminal server session). For details, see the MAX Reference Guide.
The V.110 configuration parameters are:
V.110
      Mod Config
            Ans 1#=12
            Ans 2#=13
            Ans 3#=14
            Ans 4#=15
For detailed information about each parameter, see the MAX Reference Guide.
Understanding the V.110 modem parameters
Asynchronous data calls that use V.110 encapsulation require V.110 modem processing, so incoming calls using V.110 must be routed first to a V.110 modem. The Answer numbers are add-on numbers assigned to some of the MAX unit's WAN lines as described in Configuring call routing).
The V.110 modem processes the call and sends it to the MAX unit's terminal-server software. If the call does not contain PPP encapsulation, it is handled as a login call that can be routed transparently to a Telnet host on the local network. PPP-encapsulated modem calls pass to the bridge/router as regular PPP connections.
Note: V.110 terminal adapters make asynchronous calls with CCITT V.110 encapsulation.
These calls require V.110 modem processing.
Example of V.110 configuration
To configure V.110 modules:
- Open V.110 > Mod Config.
- Specify the dial-in phone numbers to be routed to V.110 as a terminal-server call.
For example:
V.110
      Mod Config
            Ans 1#=12
            Ans 2#=13
            Ans 3#=14
            Ans 4#=15
- Close the V.110 profile.
Configuring Personal Handy Phone Service (PHS)
PHS is a mobile phone service currently offered in Japan only. In addition to voice communication, PHS offers data communication at a bandwidth of up to 32 Kbps, thus providing Internet access as well as voice service.
This feature is available through the addition of slot cards, each of which supports 16 concurrent PHS users. You can install up to six cards.
You need to enable the software functionality on the MAX through a hash code upgrade. When you have this hash code, the System Options menu displays PHS Installed. Otherwise, the System Options menu displays PHS Not Installed.
When you boot up the MAX with a PHS card in slot 4 and the software enabled, the following menu appears:
Main Edit Menu

      00-000 System

      10-000 Net/T1

      20-000 Net/T1

      30-000 Empty

      40-000 PIAFS-16

      50-000 Empty

      60-000 Empty

      70-000 Empty

      80-000 Empty

      90-000 Ethernet

      A0-000 Ether Data

      B0-000 Serial WAN
PIAFS stands for Personal Internet Access Forum Standard. PIAFS is a protocol designed to support connection negotiation, data transfers, and error correction. The -16 refers to the slot card's support of 16 concurrent PHS users.
Configuring ISDN BRI network cards
An ISDN Basic Rate Interface (BRI) network interface card has eight BRI lines. These lines can provide lower-cost connections to sites that do not require or have access to the higher-bandwidth T1 or E1 lines. There are two types of BRI network cards: the U and the S cards, functionally they are the same. The BRI network configuration involve the following parameters (shown with sample settings):
Net/BRI
      Line Config
            any slot profile
                  Name=bri-net
                  Switch Type=AT&T
                  BRI Analog Encode=Mu-Law
                  Line 1...
                        Enabled=Yes
                        Link Type=P_T_P
                        B1 Usage=Switched
                        B1 Slot=3
                        B2 Prt/Grp=1
                        B1 Trnk Grp=5
                        B2 Usage=Switched
                        B2 Slot=3
                        B2 Prt/Grp=2
                        B2 Trnk Grp=5
                        Pri Num=555-1212
                        Pri SPID=01555121200
                        Sec Num=555-1213
                        Sec SPID=01555121300
For detailed information about each parameter, see the MAX Reference Guide.
Note: After you have configured the line, you might need to configure the card for outbound
calls (as described in Configuring the Net BRI line for outbound calls).
Understanding the Net BRI parameters
This section provides some background information about the Net BRI parameters. For detailed information about each parameter, see the MAX Reference Guide.
Name
You can configure several profiles in a Net/BRI slot and activate a profile when it is needed. Each profile's name should be descriptive.
Switch Type
The Switch Type parameter specifies the central network switch that provides ISDN service to the MAX. (For details about supported switch types, see the MAX Reference Guide.)
BRI Analog Encode
If you are going to receive modem calls, you can set the BRI Analog Encode parameter to specify the encoding type.
Link Type
The Link Type parameter specifies whether the switch operates in point-to-point or multipoint mode. In point-to-point mode, MAX requires one phone number and no Service Profile Identifiers (SPIDs). In multipoint mode, the MAX requires two phone numbers and two SPIDs. All international switch types except DBP Telecom, and all U.S. switch types except AT&T 5ESS, operate in multipoint mode.
Using the BRI line for switched or nailed connections
Each BRI line has two B channels for user data and one D channel for signaling. The B1 and B2 Usage parameters specify how to use the B channels: Switched (the default), Nailed, or Unused (not available for use).
Associating the channel with a slot/port in the MAX
With the B N Slot and B N Prt/Grp parameters, you can assign a switched channel to a slot or slot/port combination for a digital modem, AIM port, or Ethernet. The slot or slot/port- combination configuration affects both inbound call routing and outbound calls. In effect, it reserves the channel for calls to and from the specified slot or port. For details, see Configuring call routing.
Note: You cannot control whether an incoming call rings on the first or second B channel, so
set the the B1 Slot and B2 Slot parameters to identical values.
If the channel is nailed, B N Prt/Grp is a Group number. To make use of this nailed connection, the Group number is referenced in a Connection or Call profile.
Assigning the channel to a trunk group
You can assign trunk group numbers 4-9 to channels to make them available for outbound calls. You cannot combine PRI channels with BRI channels in the same trunk group. For details, see Routing outbound calls.
Phone number and Service Profile Identifier (SPID) assignments
The Pri Num parameter is the primary add-on number for the Net BRI line. If you configure the line for point-to-point service, this is the only number associated with the line.
The Sec Num parameter is the secondary add-on number for the Net BRI line. If you configure the line for point-to-point service, Sec Num is not applicable.
Pri SPID and Sec SPID are the SPIDs associated with the Primary and Secondary numbers, respectively. (For more information, see SPIDS (for Net BRI lines).)
Examples of Net BRI configuration
This section provides examples of configuring Net BRI lines for incoming switched connections and for outbound calls.
Configuring incoming switched connections
The following example shows how to configure the BRI lines in multipoint mode with an NI-1 switch. Configure the lines for switched incoming connections.
- Open Net/BRI > Line Config > any slot profile.
- Assign a name to the profile and specify the carrier's switch type.
Net/BRI
      Line Config
          any slot profile
                Name=bri-net
                Switch Type=NI-1
             BRI Analog Encode=Mu-Law
- Open Line 1, enable the line, and specify multipoint mode:
            Line 1...
                  Enabled=Yes
                  Link Type=Multi-P
- Configure the B channels for switched usage and for routing to the local network. For example:
                  B1 Usage=Switched
                  B1 Slot=9
                  B2 Prt/Grp=0
                  B1 Trnk Grp=
                  B2 Usage=Switched
                  B2 Slot=9
                  B2 Prt/Grp=0
                  B2 Trnk Grp=
- Specify the primary and secondary add-on numbers and their associated SPIDs. For example:
                  Pri Num=555-1212
                  Pri SPID=01555121200
                  Sec Num=555-1213
                  Sec SPID=01555121300
- Close the Line 1 subprofile and proceed to configure the other 7 lines.
- Close the Net BRI profile.
Configuring the Net BRI line for outbound calls
In the following example Net BRI configuration, the MAX has two T1 or E1 lines and has a Net BRI card installed in slot 5. To enable local users to use the BRI lines to initiate outbound connections, the MAX must be configured for trunk groups. To enable outbound calls on the Line 1 use trunk groups:
- Open System > Sys Config and enable trunk groups systemwide:
System
      Sys Config
            Use Trunk Grps=Yes
- Close the System profile.
- Open Net/BRI > Line Config > any slot profile > Line 1:
Net/BRI
      Line Config
            any slot profile
                  Name=bri-net
                  Switch Type=NI-1
                  BRI Analog Encode=Mu-Law
                  Line 1...
                          Sig Mode=Inband
                          NFAS ID num=N/A
                        Rob Ctl-Wink-Start
- Assign both of the line's channels to trunk group 6 (for example):
                  B1 Trnk Grp=6
                  B2 Trnk Grp=6
- Repeat this trunk group setting for the remaining BRI lines (Lines 2-8), so that all BRI lines are in trunk group 6.
- Close the Net BRI profile.
To specify that outbound calls initiated by the MAX unit's bridge/router use trunk groups:
- Open Ethernet > Mod Config > WAN Options and set the Dial Plan parameter to Trunk Grp:
Ethernet
      Mod Config
      Wan options...
            Dial Plan=Trunk Grp
- Close the Ethernet profile.
To specify that a connection uses a BRI line:
- Open the Connection profile.
- Include the Net BRI trunk group number in the Dial # parameter. For example:
Ethernet
      Connections
            Dial #=6-555-1212
When the first digit of the Dial # is a trunk group number, the MAX uses the call using the channels in that trunk group to place the call.
- Close the Connection profile.
Note: For a way to use Destination profiles to specify lines as backup channels if all WAN
channels are busy, see Routing outbound calls. Instead of explicitly entering the dial number in
the Connection profile, you can reference a Destination profile that can specify up to six
different dial-out paths to a particular destination.
Displaying information about BRI calls
If the BRI line switch type is German 1TR6, you can display information about ISDN calls from the terminal-server command line by entering the Show Calls command. For example:
ascend% show calls
The command displays statistics about current calls. For example:
Call ID  Called Party ID Calling Party ID InOctets OutOctets
3        5104563434      4191234567        0        0
4        4197654321      5108888888        888888   99999
The Call ID column contains an index number specific to the call. Called Party ID and Calling Party ID show the telephone number of the answering device and calling device, respectively.
InOctets and OutOctets show the number of bytes received by the answering device and transmitted by the calling device, respectively.
Note: When an ISDN call disconnects in Germany, the ISDN switch sends call billing
information to the call originator as part of the call tear-down process. For lines that use the
German 1TR6 switch type, you can access ISDN call charges in the Ascend Enterprise MIB
via SNMP management utilities.
Configuring Host BRI lines
The Host BRI module provides up to eight local ISDN BRI lines. The device terminating these local ISDN BRI lines might be a MAX (or any BRI device), on its own local Ethernet segment, or a Desktop video device with its own BRI line and built-in terminal adapter. When connected to a Host BRI line, the MAX appears to be an AT&T switch.
TEs on Host BRI lines can call each other, enabling local net-to-net BRI calls. These local calls never go out to the WAN. They make use of the BRI bandwidth internally. They can also send and receive calls from the WAN. To the actual WAN switch, the MAX appears as the call's endpoint. Routing to the Host BRI line is handled internally.
Host BRI configuration uses the following parameters (shown with sample settings).
Host BRI
      Line Config
            any slot profile
                  Name=local
                  Line 1...
                        Enabled=Yes
                        Dial Plan=Extended
                        Ans 1#=1212
                      Ans 2#=
For detailed information about each parameter, see the MAX Reference Guide.
Understanding the Host BRI parameters
This section provides some background information about the Host BRI configuration parameters. For complete information about the parameters, see the MAX Reference Guide.
Name
You can configure several profiles in a Host BRI slot and activate a profile when it is needed. Each profile's name should be descriptive.
Enabled
If you set the Enabled parameter to No, the line is not available for use.
Dial Plan
The Dial Plan parameter specifies how the device terminating a Host BRI line can send and receive calls. The options are to use the extended dial plan or use Trunk Groups. (For details about dial plans, see Routing outbound calls.)
Ans 1# and Ans 2#
Set Ans 1# and Ans 2# to route incoming WAN calls to the local BRI lines supplied by the Host BRI. For details, see Configuring call routing.
Examples of Host BRI configuration
This section provides examples of routing inbound calls to the terminating device, enabling the device to make outbound calls, and displaying information about BRI calls.
Routing inbound calls to the terminating device
With the configuration shown in this example, the MAX routes inbound WAN calls to the device terminating the Host BRI line. That device does not make outbound calls to the WAN. The inbound caller dials 555-1212 and connects to the terminating equipment that terminates BRI line 1.
- Open Host/BRI > Line Config > any slot profile and assign a name to the profile:
Host/BRI
      Line Config
                any slot profile
                      Name=local
- Open the Line 1 subprofile, enable the line, and assign an answer number.
            Line 1...
                  Enabled=Yes
                  Dial Plan=Trunk Grp
                  Ans 1#=1212
- Close the Host BRI profile.
Enabling the device to make outbound calls
In this sample configuration, the terminating equipment on line 1 can make an outbound call using Trunk Group 5 and Dial Plan profile 2. With this configuration, the caller at the Host BRI terminating equipment dials 502-408-555-1212 and connects to the device whose telephone number is 408-555-1212 (Trunk group 5, Dial Plan 2). To implement the configurations:
- Open System > Sys Config and enable trunk groups systemwide:
System
      Sys Config
            Use Trunk Grps=Yes
- Close the System profile.
- Open a Net/T1 (or Net/E1) profile and make sure that some of the line's channels are assigned to trunk group 5. Then, close the profile.
- Open Dial Plan 02.
- Specify the Inherit setting for the Data Service and PRI # Type parameters:
Dial Plan
      Name=Boston
      Call-by-Call=6
      Data Svc=Inherit
      PRI # Type=Inherit
For details, see Routing outbound calls.
- Close the Dial Plan profile.
Configure the Host BRI module for outbound calls using the Dial Plan:
- Open Host/BRI > Line Config > any slot profile > Line 1.
- Set Dial Plan to Extended
Host/BRI
      Line Config
          any slot profile
                Name=local
                Line 1...
                      Enabled=Yes
                      Dial Plan=Extended
                      Ans 1#=1212
                    Ans 2#=
- Close the Host BRI profile.
Configuring a local BRI-to-BRI call
With the configuration in this example, the terminating equipment on one Host BRI line can connect to the terminating equipment on another Host BRI by using a Dial Plan profile and going out on line 5, slot 4. To make the connection the caller dials:
345
This number, in a special 3-digit format references a Dial Plan profile. The first digit, called the dialing prefix, is 3. The second digit, 4, represents expansion slot 4, and the third digit is the host port on that card.
To enable outbound calls using trunk groups:
- Open System > Sys Config and enable trunk groups systemwide:
System
      Sys Config
            Use Trunk Grps=Yes
- Close the System profile.
To configure Line 3 for a local BRI-to-BRI call that is never seen by the telephone company:
- Open Host/BRI > Line Config > any slot profile and specify the use of trunk groups.
Host/BRI
      Line Config
            any slot profile
                  Line 3...
                        Enabled=Yes
                      Dial Plan=Trunk Grp
- Close the Host BRI profile.
Configuring BRI/LT lines
The BRI/LT provides up to 8 BRI lines just like the Host BRI card. Typically, the BRI lines provide end-users with IDSL services. The end-user terminates their BRI line with an IDSL TA such as a Pipeline 85. BRI/LT configuration uses the following parameters (shown with sample settings):
BRI/LT
      Line Config
            any slot profile
                  Name=idsl
                  Line 1...
                        Enabled=Yes
                        Dial Plan=N/A
                        B1 Usage=Switched
                        B1 Slot=3
                        B1 Prt/Grp=N/A
                        B1 Trnk Grp=0
                        B2 Usage=Switched
                        B2 Slot=4
                        B2 Prt/Grp=N/A
                        B2 Trnk Grp=0
                        Ans 1#=1212
                      Ans 2#=
Understanding the BRI/LT parameters
This section provides some background information about the Net BRI parameters. For detailed information about each parameter, see the MAX Reference Guide.
Name
You can configure several profiles in a BRI/LT slot and activate a profile when it is needed. Each profile's name should be descriptive.
Enabled
If you set the Enabled parameter to No, the line is not available for use.
Dial Plan
The Dial Plan parameter specifies how the device terminating a BRI/LT line can send and receive calls. The options are to use the extended dial plan or use Trunk Groups. For details about dial plans, see Routing outbound calls.
B1 Usage and B2 Usage
Each BRI line has two B channels for user data and one D channel for signaling. The B1 and B2 Usage parameters specify how to use the B channels: Switched (the default), Nailed, or Unused (not available for use).
B N Slot and B N Prt/Grp
In the B N Slot and B N Prt/Grp parameters, you can assign a switched channel to a slot or slot/port combination for a digital modem, AIM port, or Ethernet. This configuration affects both inbound call routing and placing calls. In effect, it reserves the channel for calls to and from the specified slot or port. For details, see Configuring call routing.
Note: You cannot control whether an incoming call rings on the first or second B channel, so
the B1 Slot and B2 Slot parameters should be set to identical values.
If the channel is nailed, B N Prt/Grp is a Group number, is referenced in a Connection or Call profile to make use of this nailed connection.
B N Trnk Grp
B N Trnk Grp allows you to configure trunk group dialing for outgoing calls on BRI lines provided by the BRI/LT card. Trunk group numbers 4-9 can be assigned to channels to make them available for outbound calls. You cannot combine PRI channels with BRI channels in the same trunk group. For details, see Routing outbound calls for details.
Phone number and Service Profile Identifier (SPID) assignments
The Pri Num parameter specifies is the primary add-on number for the Net BRI line. If you configure the line for point-to-point service, it is the only number associated with the line.
Sec Num is the secondary add-on number for the Net BRI line. If you configure the line for point-to-point service, the parameter is not applicable.
Pri SPID and Sec SPID are the SPIDs associated with the Primary and Secondary numbers, respectively. For details, see SPIDS (for Net BRI lines).
Ans 1# and Ans 2#
Set Ans 1# and Ans 2# to route incoming WAN calls to the local BRI lines supplied by the Host BRI. For details, see Configuring call routing.
Example of BRI/LT configuration
This section provides a sample configuration for a BRI/LT line. In this configuration, the MAX routes calls received on the phone number 555-1212 to the device terminating the BRI/LT line. To implement the configuration:
- Open a BRI/LT > Line Config profile and assign a name to it. For example:
Host/BRI
      Line Config
            40-1** idsl
                  Name=idsl
                  Switch Type=
                  Line 1 ...
                  Line 2 ...
                Line 3....
- Open the Line 1 subprofile, enable the line, and assign an answer number.
            Line 1...
                  Enabled=Yes
                  Dial Plan=Trunk Grp
                Ans 1#=1212
- Close the BRI/LT profile.
BRI/LT diagnostics
The MAX provides the following BRI/LT diagnostics:
BRI/LT
      Line Diag
            Line N...
                  EOC Address=
                  Line LoopBack
                  Corrupt CRC
                  UnCorrupt CRC
                  Rq Corrupt CRC
                  UnRq Corrupt CRC
                  Clr NEBE
                  Clr FEBE
                Sealing Current
For detailed information about each parameter, see the MAX Reference Guide.
Configuring IDSL voice-call support
Ascend's ISDN Digital Subscriber Line (IDSL) card supports incoming and outgoing voice calls. To support outgoing voice calls, the connected Terminal Equipment (TE) must send digits to the MAX by means of Q.931 en-bloc dialing (sends all dialed digits to the MAX in one block (the ISDN Call Setup message) rather than one digit at a time).
The MAX receives outgoing call requests from the attached ISDN TE and routes voice calls to the Public Switched Telephone Network (PSTN) over a T1 line or ISDN PRI line. The MAX receives incoming voice calls and to route the calls to TEs connected to IDSL cards uses Dialed Number Identification Service (DNIS).
Configuring the MAX IDSL card for outgoing voice calls
To configure the MAX to accept voice calls from ISDN TEs connected to the IDSL slot card and route them to the PSTN:
- Open the System > Sys Config menu.
- Set Use Trunk Groups to Yes.
- Exit and save the System profile.
Use the following steps if you want voice call requests routed to a T1/PRI line:
- Open the Net/T1 > Line Config > any slot profile Line N menu.
- Set Ch N TrnkGrp to a value from
4 to 9.
where N specifies the channel of the T1/PRI line you want to make available to the IDSL card.
You must prepend this value to the phone number the TE dials. When the MAX receives a voice-call request from the TE, the MAX uses the trunk-group number to route the call to a T1 channel with a matching trunk-group number. If trunk groups are not used, the call request terminates at the MAX and is not forwarded to the PSTN.
- Exit and save the Line N profile.
For details of configuring your T1/PRI line, see Configuring T1 lines.
Configuring the MAX IDSL card for incoming voice calls
You can use two different methods to configure the MAX to accept voice calls from the PSTN and route them to TEs connected to the IDSL slot cards.
To instruct the MAX to route calls to the IDSL card on the basis of the called number:
- Open the BRI/LT > Line Config > any slot profile Line N menu.
- Set Ans 1#, Ans 2#, or both, to the called number that is dialed to reach the end user's TE.
The Central Office (CO) switch must support DNIS, because the MAX matches the DNIS number of the incoming call to numbers specified by Ans N# parameters.
To instruct the MAX to route calls to the IDSL card on the basis of the T1 channel on which the MAX receives calls:
- Open the Net/T1 > Line Config > any slot profile Line N menu.
- If a MAX should route calls received on a specific channel to the IDSL card, set the appropriate Ch N Slot parameter to the IDSL card's slot number.
For example, if the MAX is to route all calls received on channel 1 to an IDSL card in slot 7, set Ch 1 Slot to seven.
Configuring a Pipeline for outgoing voice calls over IDSL
You can configure a Pipeline to support outgoing voice calls when they are connected to a MAX IDSL slot card for routing to the PSTN. If you use a TE other than a Pipeline, make sure it supports en-bloc dialing. To configure the Pipeline, proceed as follows:
- Open the Ethernet > Answer > PPP Options menu.
- Set Encaps to MPP.
MPP supports data-call preemption as described in the Note on page 3-38.
- Open the Configure menu.
- Set Switch Type to IDSL.
The IDSL selection is an AT&T 5ESS Point-to-Point configuration with en-bloc dialing support.
When you dial out from a phone connected to the analog port of the Pipeline or TE, you must prepend the Trunk group number (configured on the MAX) to the phone number you dial. This is similar to dialing from an ISDN Centrex System, where you must prepend an additional digit to get an outside line.
For example, if you configure the MAX with Trunk Group set to 9 and you are dialing 555-5555, dial 9-555-5555 to instruct the MAX to dial 555-5555 on the channels (T1 or PRI) configured with a Trunk Group setting of 9.
If you omit the trunk group, the call terminates at the MAX. It is not routed to the PSTN.
Note: Data call preemption is also supported with IDSL voice call support. If you use two
channels for a single MPP data call, and dial your analog phone, the MAX reallocates one
channel to the voice call, leaving one channel for the data call. When you hang up, the MAX
reallocates the channel to the data call if throughput load warrants it.
Performing loopback diagnostics for IDSL
The MAX supports loopback tests from itself to any device on the IDSL connection. For example, you can loop back the signal from the IDSL card to the remote TE or Pipeline, or from the IDSL card to any intermediate repeater (see Figure 3-2).
Figure 3-2. IDSL connection with repeaters

In Figure 3-2, you could set up a loopback test from the MAX to any of the ISDN repeaters, or from the MAX all the way to the remote device at the end of the connection. This ability enables you to isolate trouble anywhere in the connection.
To configure a loopback test on the BRI lines provided by the IDSL slot card:
- Select BRI/LT > Line Diag > any slot profile > Line N, where N is the number of the line you want to loopback.
- Specify the EOC Address of the device that is the terminating point for the loopback test. Or set the EOC Address parameter to one of the following values:
- 0-Specifies the remote TA or MAX
- 1-Specifies the repeater nearest the MAX
- 7-Specifies all devices
- Select Line Loopback and press Enter.
- In the confirmation dialog that appears, select 1=Line N LB.
While the line loops back, normal data transfer is disrupted.
- Press Escape to cancel the loopback.
For more details, see the MAX Reference Guide. In a local loopback test, data originating at the local site loops back to its originating port without going out over the WAN. It is as though a data mirror were held up to the data at the WAN interface, and the data reflected back to the originator. The WAN interface is the port on the MAX that connects to a WAN line.
New status messages
Select the BRI/LT > Line Diag > Line N > Sealing Current parameter to toggle loop sealing current between On and Off. If you toggle it on, the following message appears in the Edit window:
Message #242

    Loop Sealing Current

          now ON
If you toggle it off, the following message appears in the Edit window:
Message #243
    Loop Sealing Current
          now OFF
Configuring Host/6 (Host/Dual) AIM ports
You can connect a videoconferencing codec (coder/decoder) to an Ascend Inverse Multiplexing (AIM) port to communicate over a point-to-point link. An AIM port is the V.35, RS-499, or X.21 port on the MAX. Typically, inverse-multiplexed calls are between video codecs and other devices that might need high bandwidth serial data over the WAN.
An AIM port uses pins for controlling the data flow through the port. A device sends a signal through a pin and over the line to another device. The signal being sent determines the control-line state, for example, when a device sends a signal to another party, indicating that it has data to send, the control-line state is RTS (Request to Send). If the other device sends a signal to indicate that it is ready to receive data, the control-line state is DTR (Data Transmit Ready). The process of sending these synchronization signals between AIM ports is called handshaking.
Note: When you install an AIM-port card in the MAX, the AIM ports become the default
route for inbound data calls, taking precedence over the bridge/router software. Make sure that
your call-routing configuration accommodates calls defined for the local Ethernet. (See
Configuring call routing.)
An AIM port requires three levels of configuration:
- The Port profile, to configure the AIM port itself
- The Host interface profile, to configure the interface to the codec
- The Call profile, to configure WAN connections on the port
Configuring the AIM port
The Port profile sets protocol and routing parameters for the port itself. The profile includes the following parameters (shown with sample settings):
Host/6 (or Host/Dual)
      PortN Menu
            Port Config
                  Port Name=Port1
                  Dial Plan=Trunk Grp
                  Ans 1#=1212
                  Ans 2#=1213
                  Ans 3#=
                  Ans 4#=
                  Idle=None
                  Dial=Terminal
                  Answer=Auto
                  Clear=Terminal
                  Port Password=Ascend
                  Term Timing=No
                  RS-366 Esc=N/A
                  Early CD=None
                  DS0 Min Rst=Off
                  MAX DS0 Mins=N/A
                  MAX Call Mins=0
This section provides some background information about AIM-port configuration. For detailed information about each parameter, see the MAX Reference Guide.
Dial Plan
The Dial Plan parameter specifies how to place calls from this port. The choices are to use trunk groups or to use the extended dial plan. (For details, see Routing outbound calls.)
Ans N#
The Ans N# parameters specify add-on numbers assigned to a WAN line. Using them is one way of routing inbound calls received on those numbers to the AIM port. (For details, see Configuring call routing.)
Idle
The Idle parameter specifies the action the port takes when you turn on the power, or when no call is active. You can specify None (the port waits for a user to establish a call), or Call (the port dials the call).
Dial
The Dial parameter specifies how the codec dials an outbound call. The settings are as follows:
- Terminal-Dial manually by using DO Dial.
- DTR Active-Dial only if DTR is asserted at the port, indicating that the codec is ready to send data.
- RS-366 ext1-Dial through an RS-366 dialing service.
- RS-366 ext2-Same as RS-366 ext 1 but with different message protocols.
- V.25bis-Dial direct according to V.25 bis hardware handshaking.
- V.25bis-C -Same as V.25bis, but the CTS signal cannot change state during a call.
- X.21 ext1-Dial as described in the CCITT Blue Book Rec. X.21.
- X.21 ext2-Same as X.21 ext1, but with different message protocols.
- X.21 ext1-P-Same as X.21 ext1, but used for a PictureTel X.21 dialer.
Answer
The Answer parameter specifies how the codec answers a call. The settings are as follows:
- Terminal-Answer manually by using DO Answer.
- DTR Active-Answer only if DTR is asserted at the port, indicating that the codec is ready to receive data.
- DTR+Ring-Answer after one ring if DTR is asserted at the port, for codecs configured to answer manually.
- P-Tel Man-Same as DTR+Ring, but used for a Picture Tel codec configured to answer calls manually.
- V.25bis-Answer according to V.25 bis hardware handshaking.
- V.25bis-C-Same as V.25bis, but the CTS signal cannot change state during a call.
- X.21-Answer according to X.21 hardware handshaking.
- Auto-Answer every call automatically, regardless of the control-line state.
- None-Use the port for outgoing calls only.
Clear
The Clear parameter specifies how the control-line state determines when the MAX clears a call.
Port Password
The receiving unit compares the Port Password setting to compare the Call Password the caller sends upon initial connection of the first channel of an AIM or BONDING call. If the user's password matches the Port Password, the session establishes normally for the remainder of the call. If it does not match, the authenticating unit sends a message back to the originator and drops the session. The port-status screen indicates that the call failed authentication. If the Port profile does not specify a Port Password, the units connect without authentication, even though the originating unit might have sent a password.
Note that the MAX only authenticates AIM and BONDING calls. The MAX does not authenticate dual-port calls. (See This section provides some background information on Call profile parameters. For detailed information about each parameter, see the MAX Reference Guide..)
Term Timing
The Term Timing parameter enables a clock signal that compensates for the phase difference between Send Data and Send Timing. If the codec uses this signal, set the Term Timing parameter to yes. Otherwise, it uses the Send Timing signal from the codec.
Esc
If the Dial parameter specifies RS-366 ext2, the default escape character is #. You can set RS-366 Esc to specify a different escape character if you wish.
Early CD
By default, the MAX raises Carrier Detect (CD) after the completion of handshaking and an additional short delay. If the local or remote codec times out waiting for CD, you can set Early CD to raise CD without waiting for handshaking.
DS0 Min Rst
A DS0 minute is the online usage of a single 56-Kbps or 64-Kbps switched channel for one minute. When the usage exceeds the maximum (MAX DS0 Mins), the MAX cannot place any more calls, and it takes any existing calls offline. The DS0 Min Rst parameter resets accumulated DS0 minutes to zero after a specified time, or disables the timer.
Sample Port profile configuration
To configure the port for RS-366 dialing:
- Open Host/6 > Port 1 Menu > Port Config.
- Assign the profile a name, and configure call routing. For example:
Host/6
      Port 1 Menu
            Port Config
                  Port Name=Port1
                  Dial Plan=Trunk Grp
                  Ans 1#=1212
                  Ans 2#=1213
                  Ans 3#=1214
                  Ans 4#=1215
- Set the Dial, Answer, and Clear parameters appropriately for the codec. For example:
                  Dial=RS-366 ext1.
                  Answer=Auto
                  Clear=Terminal
- Leave the default values for the remaining parameters, or modify them as needed.
- Close the Port profile.
Port diagnostics
After configuring the port, you can perform a loopback test to verify the configuration. The Port Diagnostics menu contains only the loopback command:
Host/6
      Port N Menu
            Port Diag
                  Local LB
For detailed information about the Local LB command, see the Administration Guide for your MAX. In a local loopback test, data originating at the local site loops back to its originating port without going out over the WAN. It is as though a data mirror were held up to the data at the WAN interface, and the data reflected back to the originator. The WAN interface is the port on the MAX that connects to a WAN line. The AIM port on the MAX must be idle when you run the local loopback test. It can have no calls online.
Configuring the Host interface
A Host interface profile defines how the port or pair of ports interfaces with the codec. Following are the related host-interface parameters (shown with sample settings):
Host/6
      Mod Config
            Module Name=dualport
            Port 1/2 Dual=Yes
            Port 3/4 Dual=Yes
            Port 5/6 Dual=No
            Palmtop=Full
            Palmtop Port #=N/A
            Palmtop Menus=Standard
Host/Dual
      Mod Config
            Module Name=nodual
            Dual Ports=No Dual
            Palmtop=Full
            Palmtop Port #=N/A
            Palmtop Menus=Standard
This section provides some background information about configuring the interface to the codec. For detailed information about each parameter, see the MAX Reference Guide.
Pairing ports for dual-port calls
If you are configuring the interface to an older model codec that does not support AIM, you can pair two AIM ports to provide double the bandwidth for the videoconferencing call. A dual-port call requires a dual-interface on the codec.
In a dual-port call, the codec performs its own inverse multiplexing on two channels so that a call can achieve twice the bandwidth of a single channel. A pair of AIM ports on the MAX connects to the codec. The pair includes a primary and secondary port. Because the MAX places the two calls in tandem and clears the calls in tandem, it considers them a single call.
Creating a dual-port configuration does not prevent you from dialing any other type of call from the primary host port of the pair, or from using either port for receiving type of call. Pairing ports does not disable RS-366 dialing at the secondary port.
Restricting access to the AIM port from the palmtop controller
You can prevent palmtop operators from accessing the port, or restrict their level of access.
Enabling dual-port calls
The following configuration pairs the first two AIM ports in a Host 6 card:
- Open Host/6 > Mod Config.
- Assign a name (optional).
- Set the Dual Port parameter to pair two ports. For example:
Host/6
      Mod Config
            Module Name=pair-one
            Port 1/2 Dual=Yes
            Port 3/4 Dual=No
            Port 5/6 Dual=No
- Close the Host interface profile.
For more information, see Configuring a two-channel dual-port call.
Configuring WAN connections between serial hosts
A Call profile defines a WAN connection on the AIM port. Following are the profile's parameters (shown with sample settings):
Host/6 (or Host/Dual)
      Port1 Menu
            Directory
                  Name=bonding
                  Dial #=212-555-1212
                  Call Type=bonding
                  Call Mgm=Mode 1
                  Data Svc=56K
                  Force 56=No
                  Base Ch Count=3
                  Inc Ch Count=2
                  Dec Ch Count=1
                  Bill #=212-555-1213
                  Auto-BERT=120
                  Bit Inversion=No
                  Fail Action=Disc
                  PRI # Type=Intl
                  Transit #=222
                  Group=N/A
                  FT1 Caller=N/A
                  B&O Restore=N/A
                  Flag Idle=Yes
                  Dyn Alg=N/A
                  Sec History=N/A
                  Add Pers=N/A
                  Sub Pers=N/A
                  Call Password=Ascend
                  Time Period 1...
                        Activ=N/A
                        Beg Time=N/A
                        Min Ch Cnt=2
                        MAX Ch Cnt=12
                        Target Util=N/A
This section provides some background information on Call profile parameters. For detailed information about each parameter, see the MAX Reference Guide.
Dial#
The Dial# parameter specifies the far-end number and can specify the method of placing the call. It can include up to 24 characters. On a two channel call, it can contain up to 49 characters, or two phone numbers containing up to 24 characters each and separated by an exclamation point. For details about specifying the method of placing the call, see Routing outbound calls.
Note: The V.25bis protocol implementation in the MAX includes extensions that enable you
to use the V.25bis CRS command to specify a phone number. In the CRS command you can
specify a BONDING or other profile, followed by a phone number that is stored in the Dial#
parameter. For such usage, the phone number has a limit of 20 characters.
Connection type and bandwidth management
The Call type parameter specifies the type of connection between the local and remote codecs. The available settings are:
Bandwidth issues
The Base Ch Count parameter specifies the base number of channels to use when setting up the call. Inc Ch Count and Dec Ch Count specify the number of channels the MAX can add and subtract at one time, respectively.
The Data Svc parameter affects how much bandwidth is available for a particular session, and how channels may be allocated to the call. For example, if Data Svc is set to 384K, then the channel count parameters such as Dec Ch Count should be divisible by 6 (namely, 6, 12, 18, or 24), because 384 Kbps is 6x64 Kbps. Operational problems can result if you do not specify a multiple of 6. The Inc Ch Count parameter's setting should equal the number of B channels in the service or a integer multiple of that service's B channels.
Similarly, if the data service is MultiRate or GloBanD (a multiple of 64 Kbps), then be sure to make Inc Ch Count and Dec Ch Count divisible by the same multiple. Again, the Inc Ch Count parameter's setting should equal the number of B channels in the service or a integer multiple of that service's B channels.
Action upon failure to establish base channels of a connection
The Fail Action parameter specifies whether the MAX disconnects, reduces the bandwidth request, or establishes a lower bandwidth call and retries for the additional bandwidth when it cannot establish a call with the number of channels specified by the Base Ch Count parameter.
Telco options
You can configure a set of Telco options for the call, including a billing number, automatic byte-error test (Auto-BERT), PRI # Type, Transit #, a trunk group or nailed group number, and FT1 caller (whether the local codec originates the call).
B & O Restore and Flag Idle
When the call type is FT1-B&O, the B&O Restore parameter specifies the number of seconds to wait before restoring a nailed channel that has been dropped because of quality problems.
When the call management type is Dynamic, Flag Idle specifies whether the port looks for a flag pattern (01111110) or a mark pattern (11111111) as the idle indicator.
Dynamic bandwidth allocation issues
The MAX can use its proprietary dynamic bandwidth allocation algorithms, for calls that have AIM- or BONDING-compatible equipment on both ends.
The MAX connects to the remote end over a single channel and then dials multiple channels to the same destination on the basis of the total amount of bandwidth requested. When adding bandwidth, the MAX adds the number of channels specified in the Inc Ch Count parameter. When subtracting bandwidth, it subtracts the number of channels specified in the Dec Ch Count parameter. The following settings determine when bandwidth is added or subtracted:
- Dyn Alg specifies the algorithm to use for calculating ALU during the time period specified by the Sec History parameter.
- Sec History specifies a time period, in seconds that the MAX uses as the basis for calculating average line utilization (ALU). The MAX compare the ALU to a target percentage threshold (Target Util). When the ALU exceeds the threshold for a specified time, the MAX attempts to add channels. When ALU falls below the threshold for a specified time period, the MAX attempts to remove channels.
- Add Pers specifies the time, in seconds for which the ALU must exceed the Target Util before the MAX adds bandwidth.
- Sub Pers specifies the number of seconds for which the ALU must fall below the Target Util before the MAX subtracts bandwidth.
- Time period N opens a submenu of parameters for a specifying a time period. You can divide an AIM call that specifies Dynamic call management into time periods, each characterized by separate Activ, Beg Time, Max Ch Cnt, Min Ch Cnt, and Target Util parameters.
Call Password
The calling unit sends the Call Password setting when the base channel of the call connects. The receiving unit compares the value to its Port Password. If the password received matches the stored password, the session establishes normally for the remainder of the call. If there is no match, the authenticating unit sends a message back to the originator and drops the session.The Port Status screen sends a Password Mismatch message to indicate that the call failed authentication.
For additional information, see This section provides some background information about AIM-port configuration. For detailed information about each parameter, see the MAX Reference Guide..
Example of AIM call configuration
To configure an AIM call that uses dynamic bandwidth allocation algorithms to manage the call dynamically:
- Open a Host/6 Directory profile, such as Host/6 > Port 1 Menu > Directory.
- Specify the dial number to reach the remote device, and set the call type to AIM. For example:
Host/6
      Port 1 Menu
            Directory
                  Name=aim
                  Dial #=6-212-555-1212
                  Call Type=aim
- Specify Dynamic call management:
Call Mgm=Dynamic
- Set the base channels and the number of channels to be added or subtracted when bandwidth requirements change. For example:
                  Base Ch Count=3
                  Inc Ch Count=2
                  Dec Ch Count=1
- Set the DBA parameters. For example:
                  Dyn Alg=Quadratic
                  Sec History=60
                  Add Pers=20
                  Sub Pers=20
                  Time Period 1...
                        Activ=Enabled
                        Beg Time=00:00:00
                        Min Ch Cnt=1
                        MAX Ch Cnt=12
                        Target Util=70
- Close the Call profile.
Example FT1-B&O call configuration
While FT1 calls use nailed channels, FT1-AIM and FT1-B&O calls can combine switched channels with nailed channels. For FT1-B&O calls, you must also specify B&O Restore.
Note: For FT1-AIM or FT1-B&O, you must set the Idle and Dial parameters in the Port
profile at both the local and remote ends of the call. For the MAX to connect the switched
channels when you turn it on, choose Idle=Call and Dial=Terminal. For the MAX to connect
the switched channels when the host equipment at both ends sets DTR active, set Idle=None
and Dial=DTR.In this latter configuration, the hosts at both ends of the connection must
establish DTR active to make the MAX connect the switched channels.
To configure an FT1-B&O call:
- Open a Host/6 Directory profile, such as Host/6 > Port 1 Menu > Directory.
- Set the call type to FT1-B&O.
Host/6
      Port 1 Menu
            Directory
                  Name=ft1-bo
                  Call Type=FT1-B&O
- Set call management to Dynamic. This is required in the device that initiates the FT1-B&O call.
Call Mgm=Dynamic
- Specify the Group number for the nailed channels. For example:
Group=3
- Specify that the MAX initiates the call:
FT1 Caller=Yes
If the other end of the link initiates the call, set this parameter to No. Only one side of the link can initiate the call for FT1-AIM or FT1-B&O calls.
- Close the Call profile.
- Open the Port Config profile, which in this case is Host/6 > Port 1 Menu > Port Config.
- Specify how the switched channels connect. For example:
Host/6
      Port 1 Menu
            Port Config
                  Idle=None
                  Dial=DTR
These settings must be the same in the devices at both ends of the link. The settings shown above connect the switched channels when the host equipment at both ends sets DTR active. As an alternative, the following settings connect the channels at power-up:
Host/6
      Port 2 Menu
            Port Config
                  Idle=Call
                  Dial=Terminal
- Close the Port profile.
Configuring a single-channel call
This example shows how to configure a connection between two terminal adaptors connected to two AIM ports in the MAX. A call between AIM ports on the same MAX remains entirely local; the MAX does not use any WAN channels. To configure a single-channel port-to-port call:
- Open a Host/6 Directory profile, such as Host/6 > Port 3 Menu > Directory.
- Set the Dial # parameter in a special 3-digit format. For example:
Host/6
      Port 3 Menu
            Directory
                  Name=terminal-adaptors
                  Dial #=241
For more information, see Routing outbound calls.
- Specify a single-channel call type:
Call Type=1 Chnl
- Close the Call profile.
Configuring a two-channel dual-port call
In a dual-port call, two AIM ports on the MAX connect the call to the serial host. The two ports are a primary port and a secondary port. However, the MAX places the two calls in tandem and clears the calls in tandem, and considers them a single call. The following restrictions apply for dual-port connections:
- The selected data service must be available end-to-end.
- The dialing method cannot be V.25 bis.
- The Answer number must be the same for both ports.
- If trunk groups are in use, both channels of the call must be in the same trunk group.
In this example, the Host interface profile must enable port pairing for dual-port calls. (For details, see Enabling dual-port calls.) In addition, a T1 or E1 line has two of its channels configured with the phone number 1212 (a hunt group). To route the call answered on the 1212 hunt group to the paired ports for a dual-port call:
- Open Host/Dual > Port 1 Menu > Port Config.
This is the Port profile for the primary port (Port 1).
- Specify the hunt-group answer number. For example:
Host/Dual
      Port 1 Menu
            Port Config
                  Port Name=Port1
                  Ans 1#=1212
Note: Do not set the Ans # parameter for the secondary host port (Port 2).
- Close the Port profile.
To configure the dual-port call:
- Open Host/Dual > Port 1 Menu > Directory.
This is the Call profile for the primary port (Port 1).
- Specify the dial number of the remote codec. For example:
Host/Dual
      Port 1 Menu
            Directory
                  Name=hunt-groups
                  Dial #=6-201-555-7878
If the dual-port call requires two dial numbers, specify both numbers. Separate them with by an exclamation mark. For example
Dial #=6-201-555-7878!6-201-555-7879
- Set Call Type to 2 Chnl:
Call Type=2 Chnl
- Close the Call profile.
Configuring call routing
This section describes how to configure incoming and outgoing call routing on the MAX. If you have a mixture of incoming calls, such as modem and digital, this section answers your questions about routing those calls to the proper modules in the MAX. This section also includes a state diagram illustrating incoming call routing. The last part of the section describes how the MAX handles outbound calls.
Routing inbound calls
When the MAX receives a call on a WAN line, it performs CLID or DNIS authentication (if appropriate), answers the call, and determines which slot should receive the call. It then finds the caller's profile, authenticates the call, builds a session, and passes the data stream to the appropriate module or host. If a call is routed to the Ethernet port, the bridge/router software forwards it to a host or hosts according to packet addresses.
Specifying answer numbers for destination host ports
The MAX then checks for answer-number specifications. If it finds a matching answer number, it uses that to route the call. If not, it goes on to the next comparison.
Specifying host ports' slot and port numbers in WAN channel configurations
The MAX then checks for slot and port number specifications. If it finds a matching slot number, it uses that to route the call. (If it also finds a port number, if routes to that specific port on the slot number.) If not, it goes on to the next comparison.
Exclusive port routing
Unless you turn on exclusive port routing, if the call comes in on an ISDN line, the MAX can route the call by means of bearer service information if it finds no explicit call-routing information.
Setting up ISDN subaddressing
The MAX first checks for an ISDN subaddress in the dialed number. If it finds one, it uses that to route the call. If not, it goes on to the next comparison.
To set up ISDN subaddressing, set the following parameters (shown with sample settings):
System
      Sys Config
            Sub-Adr=Routing
            Serial=1
            LAN=2
            DM=3
            V.110=4
Assign single-digit settings to the AIM ports (Serial), Ethernet (LAN), digital modems (DM), and V.110 slots. When you use ISDN subaddressing in routing mode, incoming calls include a subaddress number as part of the phone number. With the configuration in this configuration, the caller would dial 510-555-1212,3 to reach the digital modems. The subaddress "3" follows the dialed number and is separated from it by a comma.
Specifying answer numbers for destination host ports
Each host port can specify one or more answer numbers. When the MAX receives an inbound call and no subaddress is in use, it matches the called number to these answer numbers and routes the call to the port with the matching number. Following are the related parameters (shown with sample settings):
V.34 Modem (or V.42 Modem)
      Mod Config
            Ans 1#=1213
            Ans 2#=1214
            Ans 3#=1215
            Ans 4#=1216
V.110
      Mod Config
            Ans 1#=1217
            Ans 2#=1218
            Ans 3#=1219
            Ans 4#=1220
Host/BRI
      Line Config
            Line N...
                  Ans 1#=1230
                  Ans 2#=1231
BRI/LT
      Line Config
            Line N...
                  Ans 1#=1240
                  Ans 2#=1241
      Port N Menu
            Port Config
                  Ans 1#=1232
                  Ans 2#=1233
                  Ans 3#=1234
                  Ans 4#=1235
Ethernet
      Mod Config
            WAN options...
                  Ans 1#=1236
                  Ans 2#=1237
                  Ans 3#=1238
                  Ans 4#=1239
Note: When a MAX has more than one digital modem slot card installed, the cards and
modems form a pool, and any modem can answer a call routed to any digital modem slot.
Slot and port specifications
In the configuration of WAN lines, you can assign one or more channels to a slot card. In the case of an AIM slot card, you can assign channels to a port on the card. This channel configuration affects both inbound call routing and the placement of calls. In effect, the configuration reserves the channel for calls to and from the specified slot or port.
Configure slot and port routing only when answer number and ISDN subaddress routing are not specified. Following are the related parameters (shown with sample settings):
Net/T1
      Line Config
              Line N...
                  Ch N=Switched
                  Ch N Slot=3
                  Ch N Prt/Grp=1
Net/E1
      Line Config
            Line N...
                  Ch N=Switched
                  Ch N Slot=3
                  Ch N Prt/Grp=1
Net/BRI
      Line Config
            Line N...
                  BN Usage=Switched
                  BN Slot=3
                  BN Prt/Grp=1
When the MAX receives an inbound call and no subaddress is in use or no matching answer number is found, it evaluates the slot and port specifications and routes the call to the specified destination. In the MAX 6000 model:
- 0 (Zero, the default) specifies that this parameter is not used to route incoming calls.
- 1 and 2 are invalid settings, because they represent the built-in slots for T1 or E1 lines.
- 3-8 represent expansion slots. When looking at the back panel of the MAX unit, slot 3 is the bottom slot in the left bank of slots, followed by 4 and 5 in ascending order. Slot 6 is the bottom right slot, followed by 7 and 8 in ascending order.
- 9 represents the LAN. The MAX routes calls to the bridge/router module.
Note: When a MAX has more than one digital modem slot card installed, the cards and
modems form a pool, and any modem can answer a call routed to any digital modem slot.
Exclusive port routing
Exclusive port routing prevents the MAX from accepting calls for which it has no explicit routing destination. If you set the System > Sys Config > parameter Excl Routing to No (the default), it routes the call on the basis of bearer service. The MAX routes voice calls to a digital modem, it routes V.110 calls to a V.110 module, and data calls to an AIM port or, if no AIM ports are available, to the bridge/router. If you set Excl Routing to Yes and none of the specified call-routing comparisons are successful, the MAX drops the call.
Limiting incoming calls using DNIS-related methods
You can limit the number of incoming calls that the MAX accepts to sixteen specific dialed numbers, or from modem callers, V.110 callers, or HDLC callers. Also, there are three terminal-server commands to display DNIS sessions and statistics.
Overview
You can configure the MAX to limit the number of incoming calls on the basis of:
- Called number ID (DNIS) presented by calls
- MAX resource that answers the call: modem, HDLC, or V.110
- Combined maximum number of calls to modem, HDLC, and V.110 resources
Note: The MAX considers a call to be an HDLC call if it is not a modem call or a V.110 call.
The MAX returns the cause Busy for rejected calls.
If the MAX receives a call that does not specify a dialed number or provides a dialed number not specified in the DNIS #N parameters, the MAX considers the call as having an Unspecified DNIS.
Call routing
When you set Ethernet > Mod Config > DNIS options > DNIS Limitation to Yes, and the MAX receives a call that provides a DNIS number specified in Ethernet > Mod Config > DNIS options > DNIS #N, the MAX routes the call as follows:
- The MAX compares DNIS #N max calls to the number of active calls made to the called number.
If the maximum has been reached, the MAX rejects the call.
- If the call is a modem call, the MAX compares DNIS #N max Modem to the number of active modem calls made to the called number.
If the maximum has been reached, the MAX rejects the call.
- If the call is an V.110 call, the MAX compares DNIS #N max V110 to the number of active V.110 calls made to the called number.
If the maximum has been reached, the MAX rejects the call.
- If the call is not a modem or V.110 call, the MAX considers it an HDLC call and compares DNIS #N max HDLC to the number of active HDLC calls made to the called number.
If the maximum has been reached, the MAX rejects the call.
The MAX answers the call if no maximum has been reached.
If the call does not provide DNIS, or no specified DNIS #N matches the provided DNIS number, the MAX proceeds as follows:
- The MAX compares Unspecified max calls to the number of unspecified active calls.
If the maximum has been reached, the MAX rejects the call.
- If the call is a modem call, the MAX compares Unspecified max Modem to the number of unspecified active modem calls.
If the maximum has been reached, the MAX rejects the call.
- If the call is an V.110 call, the MAX compares Unspecified max V110 to the number of unspecified active V.110 calls.
If the maximum has been reached, the MAX rejects the call.
- If the call is not a modem or V.110 call, the MAX considers it an HDLC call and compares Unspecified max HDLC to the number of unspecified active HDLC calls.
If the maximum has been reached, the MAX rejects the call.
The MAX answers the call if no maximum has been reached.
Limiting calls to specific dialed numbers
To limit calls to specific dialed numbers, proceed as follows:
- Open the Ethernet > Mod Config > DNIS options submenu.
- Set DNIS Limitation to Yes.
- Set DNIS #N to a called number.
The MAX compares the called number to DNIS #N digit-by-digit, right to left. A match occurs when all the digits specified in DNIS #N match the same number of rightmost digits of the called number. For example, if you set DNIS #N to 1235, then the called number 8761235 matches, but 1235876 does not match.
- Set DNIS #N max calls to specify the total of simultaneous V.110, HDLC, and modem calls to the called number specified in DNIS #N.
Note: You must set DNIS #N max calls even if you configure the MAX to limit calls on
the basis of modem, V.110, or HDLC calls.
- Set DNIS #N Modem if you want to limit the number of simultaneous modem calls to the called number specified in DNIS #N.
- Set DNIS #N HDLC if you want to limit the number of simultaneous synchronous calls to the called number specified in DNIS #N.
- Set DNIS #N V110 if you want to limit the number of simultaneous V.110 calls to the called number specified in DNIS #N.
- Exit and save the changes.
You can configure up to sixteen DNIS numbers with unique limiting configurations for each DNIS number.
Limiting calls to unspecified dialed numbers
Similar to specified dialed numbers, you can limit the number of simultaneous modem, HDLC, or V.110 calls. Proceed as follows:
- Open the Ethernet > Mod Config > DNIS options submenu.
- Set DNIS Limitation to Yes.
- Set Unspecified max calls if you want to limit the total of simultaneous V.110, HDLC, and modem calls to called numbers that do not match any specified in DNIS #N.
Note: You must set Unspecified max calls even if you configure the MAX to limit calls
on the basis of modem, V.110, or HDLC calls.
- Set Unspecified max Modem if you want to limit the number of simultaneous modem calls to called numbers that do not match any specified in DNIS #N.
- Set Unspecified max HDLC if you want to limit the number of simultaneous synchronous calls to called numbers that do not match any specified in DNIS #N.
- Set Unspecified max V110 if you want to limit the number of simultaneous V.110 calls to called numbers that do not match any specified in DNIS #N.
- Exit and save the changes.
Example of call routing
This section shows three sample configurations to limit incoming calls on the basis of DNIS values.
Limiting all modem calls that do not specify a DNIS number
To specify that the MAX accepts ten simultaneous modem calls that do not specify a DNIS number, configure the following parameters as shown:
- Unspecified max calls = 10
- Unspecified modem calls = 10
- Unspecified V110 calls = 0
- Unspecified HDLC calls = 0
Limiting all calls that do not specify a DNIS number
To specify that the MAX accepts twenty calls of any type that do not specify a DNIS number, configure the following parameters as shown:
- Unspecified max calls = 20
- Unspecified modem calls = 20
- Unspecified V110 calls = 20
- Unspecified HDLC calls = 20
Limiting V.110 calls to a specific DNIS number
To specify that the MAX accepts fifteen simultaneous V.110 calls that specify a DNIS number of 1212, and allowing 100 simultaneous calls to any DNIS number (except 1212), configure the following parameters as shown:
- DNIS #1 max calls = 15
- DNIS #1 modem calls = 0
- DNIS #1 V110 calls = 15
- DNIS #1 HDLC calls = 0
- Unspecified max calls = 100
- Unspecified modem calls = 100
- Unspecified V110 calls = 0
- Unspecified HDLC calls = 0
Incoming call routing state diagram
The following pages show detailed state information about inbound call routing in the MAX. To understand these charts, you should be familiar with the parameters referenced in many of the steps. 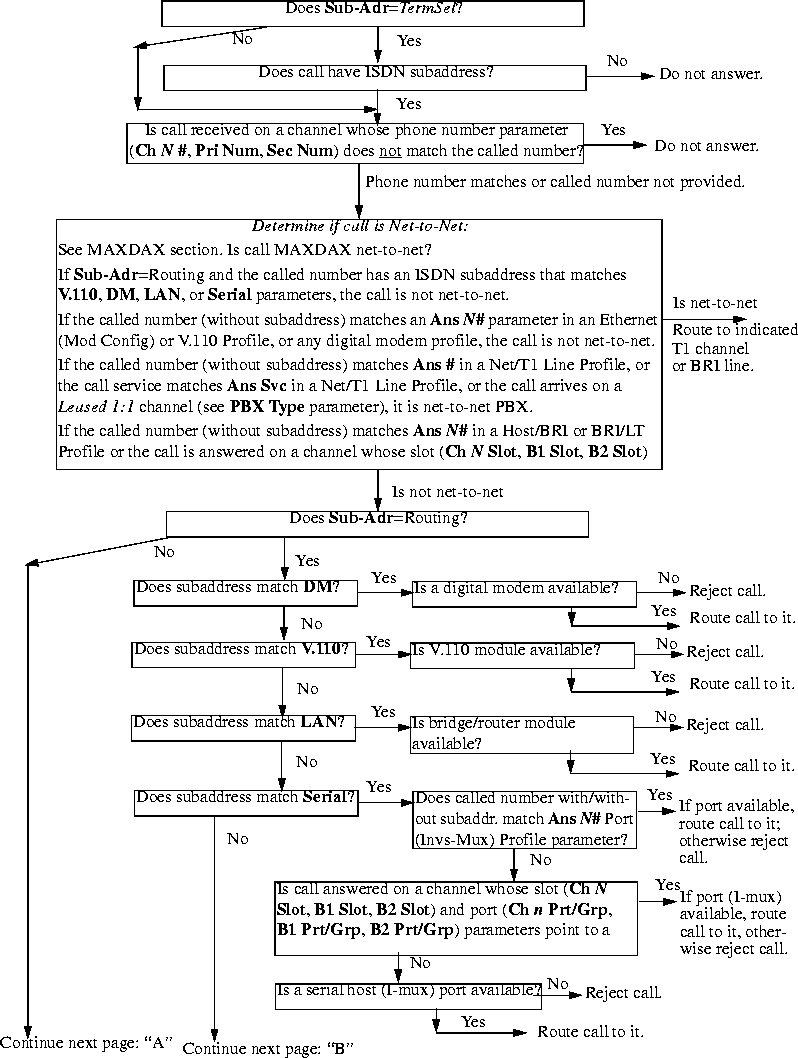
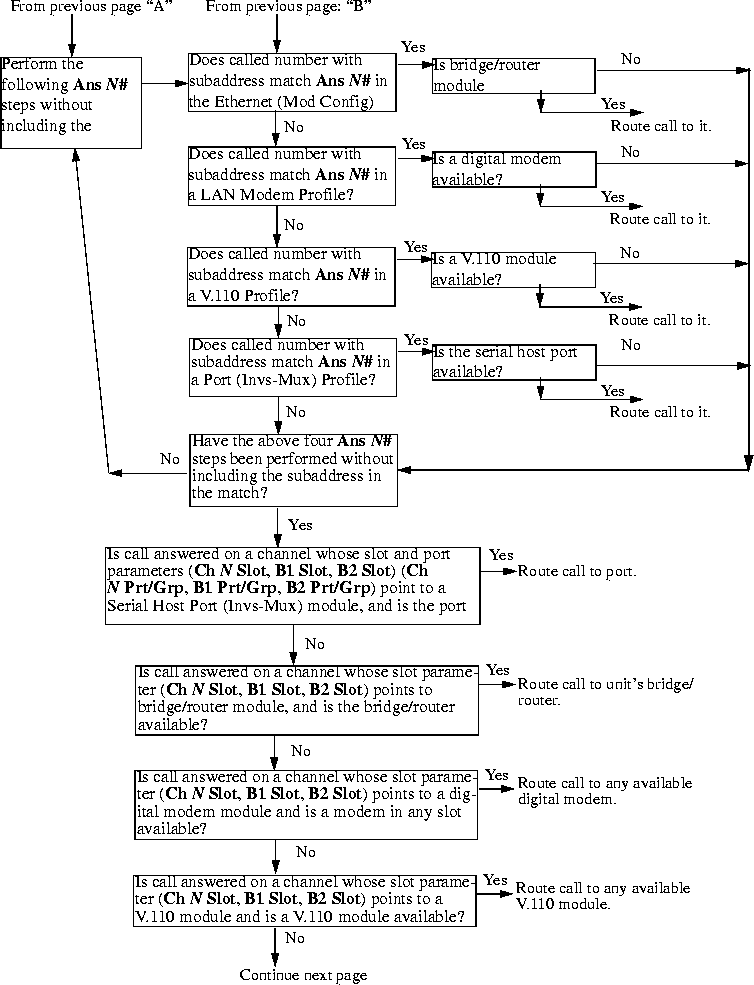

Routing outbound calls
When the MAX dials out, it routes the outbound call from the originating slot to a WAN channel to place the call. It looks for channels whose Ch N Trn Grp (or B1 Trnk Grp or B2 Trnk Grp) parameter matches the trunk group prefix in the number dialed; that is, in the Dial # parameter of the Call Profile placing the call.
(Note that, invs-mux calls have priority over other types of outgoing calls on those channels whose Ch N Slot parameters point to invs-mux modules.) If no trunks have available channels, the call is not placed.
Note: An available channel within the trunk group is one that is not assigned to any port (its
slot/port numbers are zero) or is assigned to the port that originated the call. Channels assigned
to another port are not available.
Enabling trunk groups
If you enable trunk groups, dial-out numbers must include a trunk group number as a dialing prefix, and all switched channels to be available for outbound calls must be assigned to a trunk group.
A trunk group is a group of channels that has been assigned a number. Once you have enabled trunk groups, all switched channels must be assigned a trunk group number if they are to be available for outbound calls. The following setting enables trunk groups:
System
      Sys Config
            Use Trunk Grps=Yes
Note: Trunk group numbers 2 and 3 have special meaning, as described in the next two
sections. Only trunk groups 4-9 are available for assignment to channels.
Dialing through trunk group 2 (local port-to-port calls)
Use trunk group 2 for port-to-port calls within the MAX system. Trunk group 2 is the first digit in a 3-digit dialing prefix in which the next 2 digits are interpreted as the slot and port number of the called port.
When 2 is the first digit in a three-digit dial number, the MAX places a call to the slot and port specified in the next two digits. Following are the related parameters (shown with sample settings):
Host/6 (or Host/Dual)
      PortN Menu
            Directory
                  Name=bonding
                  Dial #=241
With Dial# set to 241, the MAX places a call to the first port of a Host 6 or Host Dual card in slot 4. The second digit can be 0 or any number from 3 to 8. If it is zero, the call goes to any available AIM port (the third digit is ignored in this case). Digits 3-8 represent an expansion slot number, and the third digit is the host port on that card.
Dialing through trunk group 3 (Destination profiles)
Trunk group 3 is the first digit in a three-digit dialing prefix in which the next two digits are interpreted as the number of a Destination profile.
When three is the first digit in a three-digit dialing prefix, the MAX interprets the next two digits as the number of a Destination profile. Following are the related parameters (shown with sample settings):
Destinations
      Name=outdial-1
      Option=1st Avail
      Dial 1#=4-212-555-1212
Dial Plan
      Call-by-Call 1=1
      Dial 2#=5-212-555-1212
      PRI # Type=National
      Transit #=
      Bill #=
Host/6 (or Host/Dual)
      Port N Menu
            Directory
                  Dial #=312
Ethernet
      Connections
            Dial #=312
With Dial# set to 312, the MAX reads Destination profile 12. Destination profiles let you instruct the MAX to use the first available channels to place the call, or to try one trunk group first, followed by another if the first in unavailable. For example, if the Destination profile sets Option=1st Avail, the MAX takes the first available channels for the call. If the dial numbers specify different trunk groups, the MAX can use bandwidth from one switch as backup for another. For example, trunk group four might contain channels serviced by Sprint while trunk group five might be serviced by AT&T.
Dialing through trunk groups 4-9
You can assign a trunk group to any channel that the MAX uses for placing the call. If the specified group has no available channels, the call is not placed.
There are six available trunk groups. Trunk group numbers 4-9 can be assigned to WAN channels to group those channels. Trunk-group assignments limit the number of channels available to multichannel calls, because only channels within the same trunk group can be aggregated. The MAX uses trunk-group assignments to group the channels from different types of lines. For example, when more than one carrier services the MAX lines, you can assign trunk group four to a line serviced by one carrier and trunk group five to a line serviced by another.
Note: A trunk group cannot include both BRI and PRI channels.
Following are the related parameters (shown with sample settings):
Net/T1
      Line Config
            Line N...
                  Ch N=Switched
                  Ch N TrnkGrp=4
                  ...
Net/E1
      Line Config
            Line N...
                  Ch N=Switched
                  Ch N TrnkGrp=4
                  ...
Net/BRI
      Line Config
            Line N...
                  BN Usage=Switched
                  BN TrnkGrp=5
Ethernet
      Mod Config
            WAN options...
                  Dial Plan=Trnk Grp
Ethernet
      Connections
            Dial #=5-555-1212
Host/6 (or Host/Dual)
      Port N Menu
            Directory
                  Dial Plan=Trunk Grp
                  Dial #=4-555-1217
Host/BRI
      Line Config
            Line N...
                  Dial Plan=Trnk Grp
If Dial Plan=Trunk Grp and a single-digit dialing prefix from 4 to 9, the MAX places the call through using channels in that trunk group.
Dialing through the extended dial plan
When the extended dial plan is specified for a particular port, the trunk-group number is the first digit in a three-digit dialing prefix in which the next two digits are interpreted as the number of a Dial Plan profile.
The extended dial plan relates only to PRI lines. It uses a specified trunk group, but accesses a Dial Plan profile to obtain PRI parameters for the outbound call. The extended dial plan is typically used to route calls from a terminating device on a Host BRI line out to the WAN over PRI channels. However, it can also be used to set up the PRI parameters for other outbound calls. Following are the related parameters (shown with sample settings):
Dial Plan
      Name=host1
      Call-by-Call=8
      Data Svc=56KR
      PRI # Type=National
      Transit #=222
      Bill #=
Host/BRI
      Line Config
            Line N...
                  Dial Plan=Extended
To use the extended dial plan from an AIM port or Ethernet:
Host/6 (or Host/Dual)
      Port N Menu
            Port Config
                  Dial Plan=Extended
                  Dial #=806-212-555-1217
Ethernet
      Mod Config
            WAN options...
                  Dial Plan=Extended
Ethernet
      Connections
            Dial #=806-212-555-1212
With the dialing prefix 806, the first digit is a trunk-group number and the next two digits instruct the MAX to read Dial Plan profile 6. Placement of the call uses channels in trunk group 8 and the PRI settings in that Dial Plan profile.
Matching slot and port specifications (reserved channels)
Whether or not you enable trunk groups, the MAX relies on slot/port specifications to place outbound calls if you specify any slot/port numbers. When a channel configuration specifies a slot or slot/port combination, it effectively reserves the channel for calls to and from the specified slot or port. Calls originating from a different slot or port do not find the channel available.
Specifying a slot and port number in a channel configuration reserves the channel for calls to and from the specified slot or port. Following are the related parameters (shown with sample settings):
Net/T1
      Line Config
              Line N...
                  Ch N=Switched
                  Ch N Slot=3
                  Ch N Prt/Grp=1
Net/E1
      Line Config
            Line N...
                  Ch N=Switched
                  Ch N Slot=3
                  Ch N Prt/Grp=1
Net/BRI
      Line Config
            Line N...
                  BN Usage=Switched
                  BN Slot=3
                  BN Prt/Grp=1
If the outbound call originates from a host on Ethernet, the destination address in the packets brings up a Connection profile or RADIUS user profile that dials the call. If the call does not go out through a digital modem, it originates from slot 9.
If the outbound call originates from a device connected to an AIM port, the Call profile associated with that port dials the call. This type of call originates from the slot and port of the AIM card.
If the outbound call originates from a terminal adapter connected to a Host/BRI or BRI/LT port, the call originates from the slot and port of the Host/BRI or BRI/LT card.
If the outbound call originates from a terminal-server user dialing out through a digital modem, the digital modem slot is the source of the call. (No matter where the call originates, if it goes out through a digital modem, the digital modem slot is the source of the call.)
When the MAX receives an outbound call, it evaluates the slot and port specifications as part of identifying the channels available for placing the call:
- If you set the slot and port specifications for a channel to zero (the default), the channel is available for all outbound calls that specify the trunk group assigned to the channel in the Ch N Trnk Grp parameter.
- If the slot is non-zero and the port is zero, the channel is available to outbound calls originating on that slot.
- If you set both the slot and port numbers to non-zero, the channel is available only to outbound calls originating on that port.
Configuring MAXDAX
With MAXDAX, you can route incoming switched calls from inband T1 or PRI lines to specific outgoing channels on the same or different inband T1 or PRI lines. The MAX selects outgoing channels on the basis of parameters you configure for incoming channels.
Introduction
The MAX can be configured to route incoming calls to inband T1 lines by means of either T1 Drop and Insert or PRI-T1 conversion. With T1 Drop and Insert, the MAX sends any calls received on specifically configured channels of an inband T1 to another inband T1 that connects to a PBX. With PRI-T1 conversion, the MAX sends any voice calls received on channels of a PRI line to an inband T1 line that connects to a PBX.
T1 Drop and Insert and PRI-T1 are both acceptable call-routing solutions, provided you are able to dedicate specific channels to the features, and you connect the MAX unit to a PBX via an inband T1 line. MAXDAX retains both options, but broadens the MAX unit's call-routing functionality, by enabling you to route calls to outgoing PRI lines or inband-T1 lines.
For example, Figure 3-3 displays a corporate private network utilizing two MAX units.
Figure 3-3. Sample MAXDAX environment
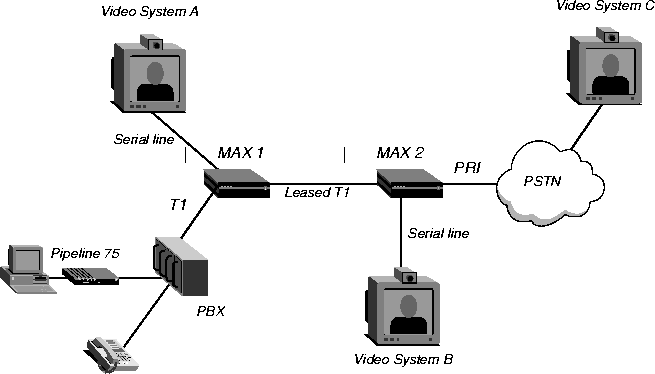
How the MAX determines outbound call routing
Basically, MAXDAX performs one function. When a MAX, with MAXDAX enabled, receives a call from any T1 or PRI line, it routes that call to the same (or a different) T1 or PRI line. The MAX bases its routing decision on one of the following algorithms:
- Direct mapping-The MAX routes a call received on a specified channel to a channel assigned to the configured destination channel-group. The called number on the incoming call is used as the calling number on the outgoing call.
- Channel-specific Dial Plan profile-The MAX routes a call received on a specific channel to a channel assigned to the configured destination channel-group, and to a specified Dial Plan profile. The Dial Plan profile either contains a dial number for the outgoing call or enables you to specify digits that the MAX prepends to the incoming calls's called number. In the latter case, the called number with prepended digits becomes the dial number for the outgoing call.
- Caller-defined Dial Plan profile-The MAX routes a call received on a specified channel to a channel assigned to the configured destination channel-group. You configure the MAX to strip either the first digit or the first two digits from the called number. The MAX uses the stripped digits to determine the Dial Plan profile for the call. For example, if you configure the MAX to strip the first two digits of the called number, and the MAX receives the called number 235551212, it uses Dial Plan profile 23 for the outgoing call.
You can specify if the MAX receives a call on a channel that has not been assigned an outgoing channel, it routes the call on the basis of Answer Plan profiles. The MAX then compares the called number and the data service of the call to those configured in the Answer Plan profiles. You do not need to configure an Answer Plan profile with both a number and a data service, but if you do, both must match to have a successful comparison. If the MAX makes a successful comparison, it places the outgoing call on a channel assigned to the specified destination-channel group.
MAXDAX call-routing flowchart
Figure 3-4 shows how a MAX, with MAXDAX enabled, routes an incoming call. If MAXDAX does not route the call, the MAX routes the call according to call routing as discussed in this chapter. (Figure 3-4 does not include any greater than symbols. An angle bracket (>) points to the next menu item in the path to a parameter.)
Figure 3-4. MAXDAX call routing
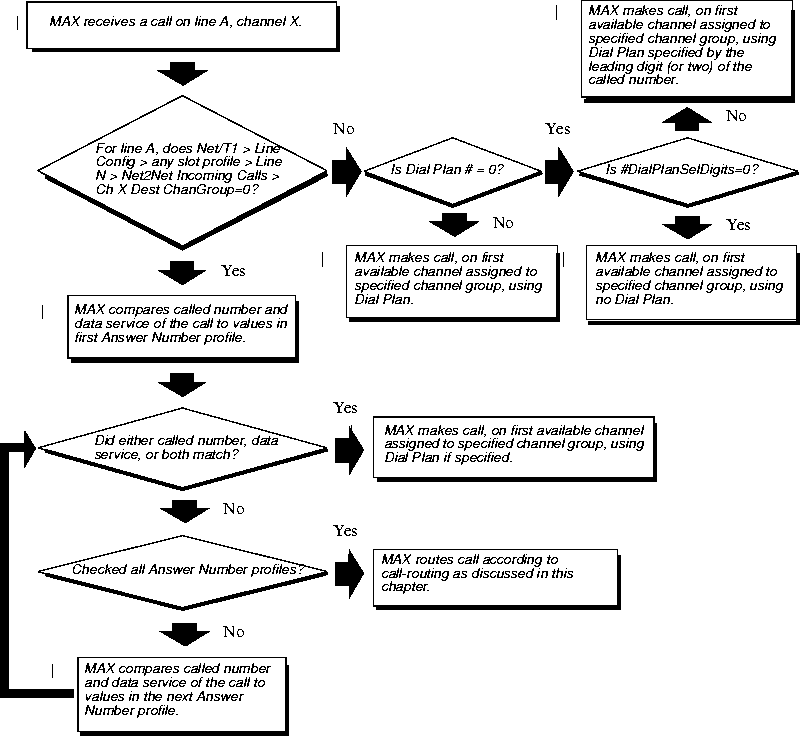
Configuring channels on which the MAX sends outgoing calls
You can configure any channel to be available for outgoing calls, by assigning it a channel-group number. A channel group can consist of a single channel or multiple channels.
To configure channels to be available for outbound calls, use the following parameters:
To set the parameters, first open the Net/T1 > Line Config > slot profile > Line N > Net2Net ChanGroup ID menu.
Then, for each outgoing channel you configure:
- Set Ch N to Switched.
- Set Ch N ChanGroup to a value from 1-65536.
When finished configuring channels, exit and save your changes.
Configuring channels on which the MAX receives calls
To configure a channel on which the MAX receives incoming calls, you must specify a destination channel-group. When the MAX receives a call, it makes an outgoing call on the first available channel assigned to the destination channel-group number you specify. You can assign any number of channels to a channel group.
Note: Make sure you do not direct the MAX to make an outbound call on the same channel
on which it receives the call.
Depending on whether you configure the MAX to use direct mapping, a specific Dial Plan profile, or a caller-defined Dial Plan profile, you must set some or all of the following parameters:
You set additional parameters if you configure an Answer Plan profile.
Configuring the MAX to directly map channels
To configure the MAX to map incoming calls to outgoing channel groups, without specifying a Dial Plan profile, first open Net/T1 > Line Config > any slot profile > Line N > Net2Net Incoming Calls.
Then, for each incoming channel you configure:
- Set Ch N to Switched.
- Set Ch N Dest ChanGroup to a value from 1 to 65536. (You must assign one or more channels to a channel group that matches the one you configured in Ch N Dest ChanGroup for outgoing calls, as described in "Configuring channels on which the MAX sends outgoing calls" on page 17.)
- Set Ch N #DialPlanSelDigits to 0 (zero) so that the MAX strips no digits from the called number to determine the Dial Plan profile to use.
Exit and save your changes.
Configuring the MAX to use a specific Dial Plan profile
To configure the MAX to use a specific Dial Plan profile, you must first configure a destination channel-group and then specify the Dial Plan profile. Proceed as follows.
- Open the Net/T1 > Line Config > any slot profile > Line N > Net2Net Incoming Calls.
Then, for each channel you configure in the Net2Net Incoming Calls menu:
- Set Ch N to Switched.
- Set Ch N Dest ChanGroup to a value from 1 to 65536. (You must assign one or more channels to a channel group that matches the one you configured in Ch N Dest ChanGroup for outgoing calls, as described in Configuring channels on which the MAX sends outgoing calls.)
- Set Ch N Dial Plan to a value from 1 to 32. The MAX uses the Dial Plan profile you specify for the outgoing call.
When finished configuring channels, exit and save your changes.
Next, configure the Dial Plan profile:
- Open the System > Dial Plan profile.
The last two digits of the Dial Plan profile must match the value you specified in Net/T1 > Line Config > slot profile > Line N > Net2Net Incoming Calls > Ch N Dial Plan.
- Set Call-by-Call to the PRI service to use for the outgoing call.
Call-by-Call does not apply to outbound calls on inband T1 lines.
- Set Data Svc to the data service to use for the outgoing call.
Data Svc does not apply to outbound calls on inband T1 lines.
- Set PRI # Type to the type of phone number the MAX dials for the outgoing call:
- Set Transit # to a dialing prefix the MAX uses when making the outbound call.
The default (null) directs the MAX to use any available IEC for the long distance call. You can also specify 288 (AT&T), 222 (MCI), or 333 (Sprint).
Transit # does not apply to outbound calls on inband T1 lines.
- Set Bill # if you use a different phone number for billing purposes.
In most cases, you can leave this setting blank. If you have questions, ask your service provider.
- Set PrependDigits to digits that the MAX prepends to the called number before making the outgoing call.
- Set Dest # to the phone number to be dialed for the outgoing call.
- Exit and save the Dial Plan profile.
When the MAX receives a call on the channel you configured in the Net2Net Incoming Calls menu, the MAX makes the outgoing call on the first available channel in the channel group you specify in the Ch N Dest ChanGroup parameter. For the outgoing call, the MAX uses the Dial Plan you specify in the Dial Plan # parameter.
Configuring the MAX to use a caller-defined Dial Plan profile
You can allow callers to specify the Dial Plan profile the MAX uses for the outgoing call. With this type of configuration, callers prepend the Dial Plan profile number to the phone number they dial. The MAX strips either one or two digits from the called number, and uses them to determine the Dial Plan profile.
To configure the MAX to use a caller-defined Dial Plan profile, you must first configure a destination channel-group and then specify the Dial Plan profile. Proceed as follows.
Open Net/T1 > Line Config > any slot profile > Line N > Net2Net Incoming Calls.
Then, for each incoming channel for which you want to specify a caller-defined Dial Plan profile:
- Set Ch N to Switched.
- Set Ch N Dest ChanGroup to a value from 1 to 65536. (You must assign one or more channels to a channel group that matches the one you configured in Ch N Dest ChanGroup for outgoing calls, as described in Configuring channels on which the MAX sends outgoing calls.
- Set Ch N Dial Plan to 0 (zero). The zero disables static channel assignment of a Dial Plan profile on the MAX.
- Set Ch N #DialPlanSelDigits to either 1 or 2. The MAX strips the number of leading digits you specify, and uses them to identify the Dial Plan for the outgoing call.
When finished with the Net2Net Incoming Calls menu, exit and save your changes.
Next, configure the Dial Plan profile:
- Open the System > Dial Plan profile.
The last two digits of the Dial Plan profile must match the value you specified in Net/T1 > Line Config > slot profile > Line N > Net2Net Incoming Calls > Ch N Dial Plan.
- Set Call-by-Call to the PRI service to use for the outgoing call.
Call-by-Call does not apply to outbound calls on inband T1 lines.
- Set Data Svc to the data service to use for the outgoing call.
Data Svc does not apply to outbound calls on inband T1 lines.
- Set PRI # Type to the type of phone number the MAX dials for the outgoing call:
- Set Transit # to a dialing prefix the MAX uses when making the outbound call.
The default (null) directs the MAX to use any available IEC for the long distance call. You can also specify 288 (AT&T), 222 (MCI), or 333 (Sprint).
Transit # does not apply to outbound calls on inband T1 lines.
- Set Bill # if you use a different phone number for billing purposes.
In most cases, you can leave this parameter blank. If you have questions, ask your service provider.
- Set PrependDigits to digits that the MAX prepends to the called number before making the outgoing call.
- Set Dest # to the phone number to be dialed for the outgoing call.
- Exit and save the Dial Plan profile.
When the MAX receives a call on the channel you configured in the Net2Net Incoming Calls menu, the MAX makes the outgoing call on the first available channel in the channel group you specify in the Ch N Dest ChanGroup parameter for outgoing calls. The MAX uses the specified number of leading digits to determine which Dial Plan profile to use for the outgoing call. For example, if you set #DialPlanSelDigits to 2 and a caller dials 234155551212, the MAX uses Dial Plan profile 23 for the outgoing call.
Configuring the MAX to use Answer Plan profiles
With MAXDAX, you can define Answer Plan profiles, which the MAX checks if you have set no channel-specific parameters. You configure the MAX to compare called number, data service of the call, or both, to values in the profiles. If the MAX finds a match, it routes the incoming call to the first available channel in the channel group specified in the Answer Plan profile.
For example, if the MAX receives a call on channel 3, and Net/T1 > Line Config > slot profile > Line N > Net2Net Incoming Calls > Ch 3 Dest ChanGroup=0 (zero), the MAX compares the called number and data service of the incoming call with configured Answer Plan profiles. If you configure an Answer Plan profile with values for Answer # and Answer Data Svc parameters, then both must match the corresponding parameters of the incoming call for the MAX to route the call to the specified destination channel-group. If you configure only the Answer # or the Answer Data Svc parameter, only the configured parameter is compared.
Note: Answer Data Svc only applies to calls received on PRI lines. With inband T1 lines,
there is no facility to pass data service information to a called unit. If your MAX receives calls
on inband T1 lines, and you want to use Answer Plan profiles, make sure you leave the Answer
Data Svc parameter blank.
To configure an Answer Plan profile:
- Open the System > Answer Number > any Answer Number profile.
- Set Ch N Dest ChanGroup to a value from 1 to 65536. (You must assign one or more channels to a channel group that matches the one you configured in Ch N Dest ChanGroup for outgoing calls, as described inConfiguring channels on which the MAX sends outgoing calls.)
- If you want the MAX to select this Answer Plan profile on the basis of the called number of the incoming call, set Answer #.
- If you want the MAX to select this Answer Plan profile on the basis of the data service of the incoming call, set Answer Data Svc.
If you set both Answer # and Answer Data Svc, the incoming call must match both parameters for the MAX to use the specified Answer Plan profile.
- Exit and save the profile.
Viewing MAXDAX configurations
A DO menu is a context-sensitive list of commands that appears when you press Ctrl-D. The commands in the list vary on the basis of the menu the MAX is displaying when you press Ctrl-D. To display the current MAXDAX configuration, including a channel-by-channel listing of channel groupings, Select the View ChanGroup/s command. When the MAX is displaying the Net/T1 > Line Config menu, or any submenu under Net/T1 > Line Config, and you press Ctrl-D, the MAX displays the following command listing:
DO...

      0=Esc

      P=Password

      S=Save

      C=Close TELNET

      E=Termsrv

      D=Diagnostics

      V=View ChanGroup/s
Press V or select V=View ChanGroup/s to display the current MAXDAX channel group mappings. For example:
  S:P:Ch      Dest |  ChanGroup

>1:1:01        777 |                  0

  1:1:02        777 |                  0

  1:1:03        777 |                  0

  1:1:04        777 |                  0

  1:1:05        777 |                  0

  1:1:06        777 |                  0

  1:1:07        777 |                  0

  1:1:08        777 |                  0

  1:1:09        777 |                  0

  1:1:10        777 |                  0

  1:1:11        777 |              333

  1:1:12        333 |              777
In the channel-group display:
S indicates the slot number. For a MAX, the slot number can be either 1 or 2.
P indicates the T1 lines in the slot. A MAX supports two T1 lines per slot.
Ch indicates the channel number on the T1 line.
Dest indicates the value configured in Net/T1 > Line Config > slot profile > Line N > Net2Net ChanGroup ID > Ch N Dest ChanGroup.
ChanGroup indicates the value configured in Net/T1 > Line Config > slot profile > Line N > Net2Net ChanGroup ID > ChanGroup for the specified channel.
ChanGroup is the group to which you have assigned the channel. When the MAX receives a call on a channel, it makes the outgoing call on the first available channel for which Net/T1 > Line Config > slot profile > Line N > Net2Net ChanGroup ID > Ch N ChanGroup matches Net/T1 > Line Config > slot profile > Line N > Net2Net Incoming Calls > Dest ChanGroup for the channel on which the MAX receives the incoming call.
In the example, if the MAX receives a call on channel 12 of the first line in the first slot, it places the outgoing call on channel 11 of the first line in the first slot.
Note: The MAX cannot make an outgoing call on the same channel on which it is receiving a
call. Make sure you do not configure a channel with identical channel-group and destination
channel-group numbers.
Examples of MAXDAX configurations
This section describes two MAXDAX environments, including specific parameter settings.
Routing calls on the basis of called number
Figure 3-5 shows an example of a MAXDAX installation.
Figure 3-5. Sample MAXDAX installation
On MAX 1, T1 Drop and Insert enables users connected to the PBX to make and receive calls. The system administrator configures MAXDAX on MAX 2.
The system administrator uses Answer Plan profiles to direct incoming calls to the PRI, and therefore does not change any of the parameters in the Net/T1 > Line Config > slot profile > Line N > Net2Net Incoming Calls menu from their default settings:
10-1** Factory

      Line 1...(Net2Net Incoming C

            Ch 1=Switched

            Ch 1 Dest ChanGroup=0

            Ch 1 Dial Plan #=0

            Ch 1 #DialPlanSelDigits=0

            Ch 2=Switched

            Ch 2 Dest ChanGroup=0

            Ch 2 Dial Plan #=0

            Ch 2 #DialPlanSelDigits=0

            Ch 3=Switched

            Ch 3 Dest ChanGroup=0

            Ch 3 Dial Plan #=0

            Ch 3 #DialPlanSelDigits=0
To reach Video System C, a user dials the number (617) 555-1212. MAX 2 should only redirect to the PRI line any calls received with a called number of 6175551212. The system administrator configures the Answer Plan as follows:
Answer Plan

      00-601

            Name=Site C

            Answer #=6175551212

            Answer Data Svc=

            Dest ChanGroup=1

            Dial Plan #=12
MAX 2 makes a call on the first available channel assigned to destination channel-group 1, using Dial Plan profile 12. Because the system administrator leaves Answer Data Svc blank, MAX 2 ignores the data service of the incoming call, and matches on the basis of called number only.
Because the system administrator sets Dest ChanGroup to 1 in the Answer Plan profile, at least one channel of the PRI line must belong to channel group 1. The system administrator configures the line as follows:
Net/T1

      Line Config

            Line 2

                  Net2Net ChanGroup ID

                        Ch 1=Switched

                        Ch 1 ChanGroup=1

                        Ch 2=Switched

                        Ch 2 ChanGroup=1
The system administrator can assign more channels to channel group 1 if users, connected to the PBX, require outbound dialing on the PRI line.
The Answer Plan profile also specifies that MAX 2 is to use Dial Plan profile 12 to make the outbound call. The system administrator configures Dial Plan profile 12 as follows:
System

      Dial Plan

            00-512

                  Name=PRI plan

                  Call-by-Call=6

                  Data Svc=64K

                  PRI # Type=National

                  NumPlanID =ISDN

                  Transit #=

                  Bill #=

                  Dest #=

                  PrependDigits=
Because the system administrator leaves Dest # and PrependDigits blank, MAX 2 makes the outbound call by using the called number from the incoming call.
Routing calls on the basis of the channel on which MAX 2 receives the call
This example illustrates a different call-routing process for MAX 2. The physical environment for this example is the same as displayed in Figure 3, but MAX 2 routes calls on the basis of the channel on which it receives the call from MAX 1.
Note: Because MAX 2 considers Answer Number profiles after determining whether it
should route on the basis of specific channels, the system administrator could leave the
configuration from the previous example as it is.
The system administrator configures MAX 1 to deliver calls to MAX 2 on specific channels. MAX 1 sends calls with calling number 1234 to channel 1 or 2 of the leased T1 line on MAX 2. The system administrator configures the Net/T1 > Line Config > slot profile > Line 1 > Net2Net Incoming Calls profile as follows:
10-1** Factory

      Line 1...(Net2Net Incoming C

            Ch 1=Switched

            Ch 1 Dest ChanGroup=1

            Ch 1 Dial Plan #=0

            Ch 1 #DialPlanSelDigits=2

            Ch 2=Switched

            Ch 2 Dest ChanGroup=1

            Ch 2 Dial Plan #=0

            Ch 2 #DialPlanSelDigits=2

            Ch 3=Switched

            Ch 3 Dest ChanGroup=0

            Ch 3 Dial Plan #=0

            Ch 3 #DialPlanSelDigits=0
MAX 2 routes any call it receives on channel 1 or 2 to the first available channel assigned to channel group 1. MAX 2 uses the Dial Plan profile number by examining the leading two digits of the called number.
Because the system administrator sets Dest ChanGroup to 1 in the Net2Net Incoming Call profile, at least one channel of the PRI line must belong to channel group 1. The system administrator configures the outgoing-calls profile as follows:
Net/T1

      Line Config

            any slot profile

                  Line 1

                        Net2Net ChanGroup ID

                              Ch 1=Switched

                              Ch 1 ChanGroup=1

                              Ch 2=Switched

                              Ch 2 ChanGroup=1
The system administrator can assign more channels to channel group 1 if users connected to the PBX require outbound dialing on the PRI line.
Users specify the Dial Plan profile MAX 2 uses for their call. The system administrator configures two Dial Plan profiles, 31 and 32, and tells the users which profile to use for specific destinations. Dial Plan profile 31 has the following configuration:
System

      Dial Plan

            00-531

                  Name=PRI plan

                  Call-by-Call=6

                  Data Svc=64K

                  PRI # Type=National

                  NumPlanID =ISDN

                  Transit #=

                  Bill #=

                  Dest #= 14155551212

                  PrependDigits=
Because the system administrator specifies Dest #, MAX 2 makes the outbound call by dialing 4155551212.
techpubs@ascend.com
Copyright © 1998, Ascend Communications, Inc. All rights
reserved.